HP ProBook 4421s HP ProBook 4320s, 4321s, 4420s, and 4421s Notebook PCs - Mai - Page 107
Restoring factory settings in Computer Setup, Computer Setup menus, File menu - specifications
 |
View all HP ProBook 4421s manuals
Add to My Manuals
Save this manual to your list of manuals |
Page 107 highlights
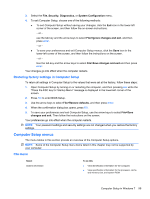
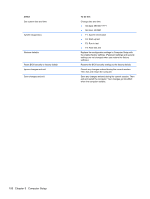
3. Select the File, Security, Diagnostics, or System Configuration menu. 4. To exit Computer Setup, choose one of the following methods: ● To exit Computer Setup without saving your changes, click the Exit icon in the lower-left corner of the screen, and then follow the on-screen instructions. - or - use the tab key and the arrow keys to select File>Ignore changes and exit, and then press enter. - or - ● To save your preferences and exit Computer Setup menus, click the Save icon in the lower-left corner of the screen, and then follow the instructions on the screen. - or - Use the tab key and the arrow keys to select File>Save changes and exit and then press enter. Your changes go into effect when the computer restarts. Restoring factory settings in Computer Setup To return all settings in Computer Setup to the values that were set at the factory, follow these steps: 1. Open Computer Setup by turning on or restarting the computer, and then pressing esc while the "Press the ESC key for Startup Menu" message is displayed in the lower-left corner of the screen. 2. Press f10 to enter BIOS Setup. 3. Use the arrow keys to select File>Restore defaults, and then press enter. 4. When the confirmation dialog box opens, press f10. 5. To save your preferences and exit Computer Setup, use the arrow keys to select File>Save changes and exit. Then follow the instructions on the screen. Your preferences go into effect when the computer restarts. NOTE: Your password settings and security settings are not changed when you restore the factory settings. Computer Setup menus The menu tables in this section provide an overview of the Computer Setup options. NOTE: Some of the Computer Setup menu items listed in this chapter may not be supported by your computer. File menu Select System information To do this ● View identification information for the computer. ● View specification information for the processor, cache and memory size, and system ROM. Computer Setup in Windows 7 99
-
 1
1 -
2
-
3
-
4
-
5
-
6
-
7
-
8
-
9
-
10
-
11
-
12
-
13
-
14
-
15
-
16
-
17
-
18
-
19
-
20
-
21
-
22
-
23
-
24
-
25
-
26
-
27
-
28
-
29
-
30
-
31
-
32
-
33
-
34
-
35
-
36
-
37
-
38
-
39
-
40
-
41
-
42
-
43
-
44
-
45
-
46
-
47
-
48
-
49
-
50
-
51
-
52
-
53
-
54
-
55
-
56
-
57
-
58
-
59
-
60
-
61
-
62
-
63
-
64
-
65
-
66
-
67
-
68
-
69
-
70
-
71
-
72
-
73
-
74
-
75
-
76
-
77
-
78
-
79
-
80
-
81
-
82
-
83
-
84
-
85
-
86
-
87
-
88
-
89
-
90
-
91
-
92
-
93
-
94
-
95
-
96
-
97
-
98
-
99
-
100
-
101
-
 102
102 -
 103
103 -
 104
104 -
 105
105 -
 106
106 -
 107
107 -
 108
108 -
 109
109 -
 110
110 -
 111
111 -
 112
112 -
113
-
114
-
115
-
116
-
117
-
118
-
119
-
120
-
121
-
122
-
123
-
124
-
125
-
126
-
127
-
128
-
129
-
130
-
131
-
132
-
133
-
134
-
135
-
136
-
137
-
138
-
139
-
140
-
141
-
142
-
143
-
144
-
145
-
146
-
147
-
148
-
149
-
150
-
151
-
152
-
153
-
154
-
155
-
156
-
157
-
158
-
159
-
160
-
161
-
162
 |
 |
