HP ProBook 5320m HP ProBook Notebook PC User Guide - Windows Vista - Page 54
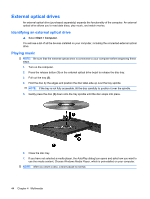
External optical drives, Identifying an external optical drive, Playing music
 |
View all HP ProBook 5320m manuals
Add to My Manuals
Save this manual to your list of manuals |
Page 54 highlights
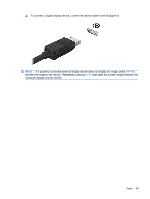
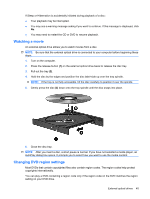
External optical drives An external optical drive (purchased separately) expands the functionality of the computer. An external optical drive allows you to read data discs, play music, and watch movies. Identifying an external optical drive ▲ Select Start > Computer. You will see a list of all the devices installed on your computer, including the connected external optical drive. Playing music NOTE: Be sure that the external optical drive is connected to your computer before beginning these steps. 1. Turn on the computer. 2. Press the release button (1) on the external optical drive bezel to release the disc tray. 3. Pull out the tray (2). 4. Hold the disc by the edges and position the disc label-side up over the tray spindle. NOTE: If the tray is not fully accessible, tilt the disc carefully to position it over the spindle. 5. Gently press the disc (3) down onto the tray spindle until the disc snaps into place. 6. Close the disc tray. 7. If you have not selected a media player, the AutoPlay dialog box opens and asks how you want to use the media content. Choose Windows Media Player, which is preinstalled on your computer. NOTE: After you insert a disc, a short pause is normal. 44 Chapter 4 Multimedia
-
 1
1 -
2
-
3
-
4
-
5
-
6
-
7
-
8
-
9
-
10
-
11
-
12
-
13
-
14
-
15
-
16
-
17
-
18
-
19
-
20
-
21
-
22
-
23
-
24
-
25
-
26
-
27
-
28
-
29
-
30
-
31
-
32
-
33
-
34
-
35
-
36
-
37
-
38
-
39
-
40
-
41
-
42
-
43
-
44
-
45
-
46
-
47
-
48
-
 49
49 -
 50
50 -
 51
51 -
 52
52 -
 53
53 -
 54
54 -
 55
55 -
 56
56 -
 57
57 -
 58
58 -
 59
59 -
60
-
61
-
62
-
63
-
64
-
65
-
66
-
67
-
68
-
69
-
70
-
71
-
72
-
73
-
74
-
75
-
76
-
77
-
78
-
79
-
80
-
81
-
82
-
83
-
84
-
85
-
86
-
87
-
88
-
89
-
90
-
91
-
92
-
93
-
94
-
95
-
96
-
97
-
98
-
99
-
100
-
101
-
102
-
103
-
104
-
105
-
106
-
107
-
108
-
109
-
110
-
111
-
112
-
113
-
114
-
115
-
116
-
117
-
118
-
119
-
120
-
121
-
122
-
123
-
124
-
125
-
126
-
127
-
128
-
129
-
130
-
131
-
132
-
133
-
134
-
135
-
136
-
137
-
138
-
139
-
140
-
141
-
142
-
143
 |
 |
