HP ProLiant BL35p ProLiant BL35p Server Blade Maintenance and Service Guide - Page 15
SAS drive cage assembly
 |
View all HP ProLiant BL35p manuals
Add to My Manuals
Save this manual to your list of manuals |
Page 15 highlights
4. Remove the cover plate and, if necessary, the center plate. 5. Remove the drive from the cage. To replace the component, reverse the removal procedure. The drive cage assembly lower drive bay is designated as the primary hard drive bay and must be populated first. Before installing a hard drive, be sure the jumper on the hard drive is set to CS so that the drive device ID is determined by the hard drive connection to the hard drive cable. SAS drive cage assembly To remove the component: 1. Power down the server blade (on page 13). 2. Remove the server blade (on page 13). Removal and replacement procedures 15
-
 1
1 -
2
-
3
-
4
-
5
-
6
-
7
-
8
-
9
-
 10
10 -
 11
11 -
 12
12 -
 13
13 -
 14
14 -
 15
15 -
 16
16 -
 17
17 -
 18
18 -
 19
19 -
 20
20 -
21
-
22
-
23
-
24
-
25
-
26
-
27
-
28
-
29
-
30
-
31
-
32
-
33
-
34
-
35
-
36
-
37
-
38
-
39
-
40
-
41
-
42
-
43
-
44
 |
 |

Removal and replacement procedures
15
4.
Remove the cover plate and, if necessary, the center plate.
5.
Remove the drive from the cage.
To replace the component, reverse the removal procedure.
The drive cage assembly lower drive bay is designated as the primary hard drive bay and must be
populated first.
Before installing a hard drive, be sure the jumper on the hard drive is set to CS so that the drive device ID
is determined by the hard drive connection to the hard drive cable.
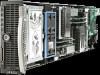
SAS drive cage assembly
To remove the component:
1.
Power down the server blade (on page
13
).
2.
Remove the server blade (on page
13
).