HP ProLiant BL35p ProLiant BL35p Server Blade Maintenance and Service Guide - Page 21
IMPORTANT, CAUTION, The processor is designed to fit one way into the socket. Use the alignment guides - 2 way server blade
 |
View all HP ProLiant BL35p manuals
Add to My Manuals
Save this manual to your list of manuals |
Page 21 highlights
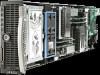
3. Open the processor cage and remove the heatsink. IMPORTANT: Processor socket 1 must always be populated. If processor socket 1 is empty, the server blade does not power up. 4. Remove the processor. To replace the component: 1. Install the processor. CAUTION: Be sure that the processor socket locking lever is open before installing the processor into the socket. CAUTION: The processor is designed to fit one way into the socket. Use the alignment guides on the processor and socket to properly align the processor with the socket. Refer to the server blade hood label for specific instructions. CAUTION: Do not bend or damage the pins beneath the processor. Removal and replacement procedures 21
-
 1
1 -
2
-
3
-
4
-
5
-
6
-
7
-
8
-
9
-
10
-
11
-
12
-
13
-
14
-
15
-
 16
16 -
 17
17 -
 18
18 -
 19
19 -
 20
20 -
 21
21 -
 22
22 -
 23
23 -
 24
24 -
 25
25 -
 26
26 -
27
-
28
-
29
-
30
-
31
-
32
-
33
-
34
-
35
-
36
-
37
-
38
-
39
-
40
-
41
-
42
-
43
-
44
 |
 |

Removal and replacement procedures
21
3.
Open the processor cage and remove the heatsink.
IMPORTANT:
Processor socket 1 must always be populated. If processor socket 1 is empty, the
server blade does not power up.
4.
Remove the processor.
To replace the component:
1.
Install the processor.
CAUTION:
Be sure that the processor socket locking lever is open before installing the
processor into the socket.
CAUTION:
The processor is designed to fit one way into the socket. Use the alignment guides
on the processor and socket to properly align the processor with the socket. Refer to the server
blade hood label for specific instructions.
CAUTION:
Do not bend or damage the pins beneath the processor.