HP ProLiant SL270s HP ProLiant SL270s Gen8 Server User Guide - Page 23
Installing components, Installing the server into the chassis
 |
View all HP ProLiant SL270s manuals
Add to My Manuals
Save this manual to your list of manuals |
Page 23 highlights
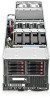
Installing components WARNING: The server is very heavy. To reduce the risk of personal injury or damage to the equipment: • Reduce the weight of the server by removing the hard drives and power supplies before installing the server into the rack. • Get help to lift and stabilize the server during installation. When the server weighs more than 22.5 kg (50 lb), two people might be required to install the server into the rack. CAUTION: Always plan the rack installation so that the heaviest item is on the bottom of the rack. Install the heaviest item first, and continue to populate the rack from the bottom to the top. Before installing front or rear components into the chassis, review chassis bay numbering for each component. For slot numbering information, see the quick setup instructions. Based on the total number ordered and the planned configuration, install the following components: • Nodes • Power supplies • System fans For more information, see the appropriate chassis setup and installation guide and the node installation instructions. Installing the server into the chassis WARNING: This server is very heavy. To reduce the risk of personal injury or damage to the equipment: • Observe local occupational health and safety requirements and guidelines for manual material handling. • Get help to lift and stabilize the product during installation or removal, especially when the product is not fastened to the rails. HP recommends that a minimum of two people are required for all rack server installations. A third person may be required to help align the server if the server is installed higher than chest level. • Use caution when installing the server in or removing the server from the rack; it is unstable when not fastened to the rails. 1. Insert the system tray into the chassis. Setup 23
-
 1
1 -
2
-
3
-
4
-
5
-
6
-
7
-
8
-
9
-
10
-
11
-
12
-
13
-
14
-
15
-
16
-
17
-
 18
18 -
 19
19 -
 20
20 -
 21
21 -
 22
22 -
 23
23 -
 24
24 -
 25
25 -
 26
26 -
 27
27 -
 28
28 -
29
-
30
-
31
-
32
-
33
-
34
-
35
-
36
-
37
-
38
-
39
-
40
-
41
-
42
-
43
-
44
-
45
-
46
-
47
-
48
-
49
-
50
-
51
-
52
-
53
-
54
-
55
-
56
-
57
-
58
-
59
-
60
-
61
-
62
-
63
-
64
-
65
-
66
-
67
-
68
-
69
-
70
-
71
-
72
-
73
-
74
-
75
-
76
-
77
-
78
-
79
-
80
-
81
-
82
-
83
-
84
-
85
-
86
-
87
-
88
-
89
-
90
-
91
-
92
-
93
-
94
-
95
-
96
-
97
-
98
-
99
-
100
-
101
-
102
-
103
-
104
-
105
-
106
-
107
 |
 |
