HP ProLiant SL270s HP ProLiant SL270s Gen8 Server User Guide - Page 25
Powering up the chassis, Configuring the chassis, Powering on and selecting boot options
 |
View all HP ProLiant SL270s manuals
Add to My Manuals
Save this manual to your list of manuals |
Page 25 highlights
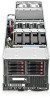
Item Description 12 NIC 2 network port 13 NIC 1 network port 14 Power On/Standby button and system power LED 15 Health LED 16 UID LED button 17 Serial port 18 SUV port * Not shown WARNING: To reduce the risk of electric shock, fire, or damage to the equipment, do not plug telephone or telecommunications connectors into RJ-45 connectors. 4. Connect the power cords to the power supplies. 5. Connect the power cord to the AC power source. WARNING: To reduce the risk of electric shock or damage to the equipment: • Do not disable the power cord grounding plug. The grounding plug is an important safety feature. • Plug the power cord into a grounded (earthed) electrical outlet that is easily accessible at all times. • Unplug the power cord from the power supply to disconnect power to the equipment. • Do not route the power cord where it can be walked on or pinched by items placed against it. Pay particular attention to the plug, electrical outlet, and the point where the cord extends from the server. Powering up the chassis Connect the AC or DC power cables, depending on the power configuration. When the circuit breakers are powered, the chassis and HP ProLiant SL Advanced Power Manager have power. By default, each installed component also powers up. Examine the HP ProLiant SL Advanced Power Manager for any errors which may prevent installed components from powering up. Configuring the chassis For further information on setting up and configuring your system, see the HP ProLiant s6500 Chassis Quick Setup Instructions and the HP ProLiant s6500 Chassis Setup and Installation Guide. Powering on and selecting boot options 1. Connect the Ethernet cable and press the Power On/Standby button. 2. During the initial boot: o To modify the server configuration ROM default settings, press F9 when prompted from the start up sequence to enter the RBSU. By default, RBSU runs in the English language. o If you do not need to modify the server configuration and are ready to install the system software, press F10 to access Intelligent Provisioning. Setup 25
-
 1
1 -
2
-
3
-
4
-
5
-
6
-
7
-
8
-
9
-
10
-
11
-
12
-
13
-
14
-
15
-
16
-
17
-
18
-
19
-
 20
20 -
 21
21 -
 22
22 -
 23
23 -
 24
24 -
 25
25 -
 26
26 -
 27
27 -
 28
28 -
 29
29 -
 30
30 -
31
-
32
-
33
-
34
-
35
-
36
-
37
-
38
-
39
-
40
-
41
-
42
-
43
-
44
-
45
-
46
-
47
-
48
-
49
-
50
-
51
-
52
-
53
-
54
-
55
-
56
-
57
-
58
-
59
-
60
-
61
-
62
-
63
-
64
-
65
-
66
-
67
-
68
-
69
-
70
-
71
-
72
-
73
-
74
-
75
-
76
-
77
-
78
-
79
-
80
-
81
-
82
-
83
-
84
-
85
-
86
-
87
-
88
-
89
-
90
-
91
-
92
-
93
-
94
-
95
-
96
-
97
-
98
-
99
-
100
-
101
-
102
-
103
-
104
-
105
-
106
-
107
 |
 |
