HP ProLiant WS460c HP Hardware Accelerated Graphics for Desktop Virtualization - Page 23
Configuring the Graphics Server Blade PCIe mode, Turn off PCIe Gen3 support - gen 6
 |
View all HP ProLiant WS460c manuals
Add to My Manuals
Save this manual to your list of manuals |
Page 23 highlights
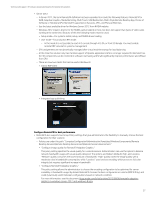
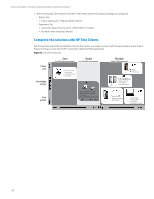
Technical white paper | HP Hardware Accelerated Graphics for Desktop Virtualization Configuring the Graphics Server Blade PCIe mode (Only applies to WS460c G6) Setting the HP Graphics Expander BIOS settings (Only applies to WS460c G6). The WS460c G6 supports up to two full size graphics cards in the graphics expansion bay. The PCIe graphics expansion bay slots can be configured for one card at x16 or two cards at x8. A BIOS setting dictates if the system can see one or two cards. This setting must be manually set. Setting "HP Graphics Expander x16." Enabled • This mode enables one slot at x16 Disabled • This mode enabled two slots at x8 Procedure to set PCIe mode: 1. Using either iLO remote console or the Local I/O Connector, connect to server console 2. When prompted during boot, press the F9 key. The ROM-based Setup Utility appears 3. As shown in figure 13, select System Options > HP Graphics Expander x16. The current Expander mode appears 4. To change mode, press Enter. The mode menu appears. Use the Up and Down arrow keys to select the desired mode. A. Enable-Turns on one card at x16 B. Disable-Turns on two cards at x8 5. When done, press Enter, and then perform the steps indicated to exit the ROM-based Setup Utility. 6. The Graphics Server Blade performs a reboot, and then the Remote Console Mode appears. Figure 13. PCIe mode Turn off PCIe Gen3 support (Only Needed on WS460c Gen8 with NVIDIA K4000/K5000/K6000) Although this is a default setting in WS460c Gen8 Graphics Server system BIOS as of 5/1/13 release, if this BIOS setting is enabled when using the NVIDIA K4000/5000/6000, the system will NMI on start up. To prevent this, disable Gen3 support at following location. Procedure to set PCIe mode: 1. Access BIOS and go to Power mgmt. options >> Adv. Power mgmt. options >> PCIe Gen 3 Control 2. Set both PCIe slots to disable Figure 14. PCIe Gen3 support 23
-
 1
1 -
2
-
3
-
4
-
5
-
6
-
7
-
8
-
9
-
10
-
11
-
12
-
13
-
14
-
15
-
16
-
17
-
 18
18 -
 19
19 -
 20
20 -
 21
21 -
 22
22 -
 23
23 -
 24
24 -
 25
25 -
 26
26 -
 27
27 -
 28
28 -
29
-
30
-
31
-
32
 |
 |
