HP Q6275A User Guide - Page 10
Use Advanced Setup - mac
 |
UPC - 883585158706
View all HP Q6275A manuals
Add to My Manuals
Save this manual to your list of manuals |
Page 10 highlights
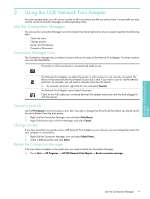
Use Advanced Setup The Advanced Setup screen allows you to discover your IP and Mac addresses and, if necessary for your network, manually change the IP address. 1 Go to Start --> All Programs --> HP USB Network Print Adapter--> Advanced Setup The IP and MAC addresses of all network print adapters on your network will display. 2 Select the adapter and click Next. The IP Address Setting screen will display. 3 Choose one of the following. a. Select Obtain IP Address automatically if you have a DHCP server on your LAN b. Click Next. OR a. If you do not have a DHCP server on your LAN, you must select Use the following IP Address. b. Either accept the suggested IP address or enter a new one. The IP Subnet Mask and Default Gateway must match your LAN and will be filled in for you. c. Click Next. 3. Confirm your IP settings and click Apply. • Click Back to go to the previous screen and change the IP address. • Click Cancel to exit without making any changes. 10 Using the USB Network Print Adapter
-
 1
1 -
2
-
3
-
4
-
 5
5 -
 6
6 -
 7
7 -
 8
8 -
 9
9 -
 10
10 -
 11
11 -
 12
12 -
 13
13 -
 14
14 -
 15
15 -
16
-
17
-
18
 |
 |