HP Scitex LX850 HP Scitex LX850 & LX820 Printer: Installation Guide - Page 57
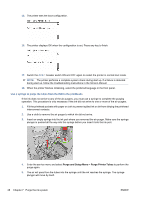
Cables wrongly positioned: hanging over the sliding door support, WARNING
 |
View all HP Scitex LX850 manuals
Add to My Manuals
Save this manual to your list of manuals |
Page 57 highlights
NOTE: Perform this task while you fill the intermediate ink tanks. 1. Install the keyboard platform with four T30 screws (two of which you will find already screwed into the printer), and route the keyboard and mouse cables through the hole in the top cover. NOTE: Use the longer of the two power cables (computer and monitor) to power the monitor. WARNING! Do not route the keyboard, mouse or monitor cables over the front panel cable. 2. Open the sliding door and check that all cables are routed above the sliding door support. Otherwise, over the course of time the movement of the door will damage the cables. Cables wrongly positioned: hanging over the sliding door support Cables correctly positioned: supported above the sliding door support 3. Use a T20 screwdriver to remove the monitor holder on the printer. 4. Remove the Phillips screws that secure the monitor arm and remove it. Keep the screws. 5. Attach the holder to the monitor using the 4 Phillips screws from the monitor arm. ENWW Install the computer, monitor, LAN switch, tray, keyboard and mouse 53
-
 1
1 -
2
-
3
-
4
-
5
-
6
-
7
-
8
-
9
-
10
-
11
-
12
-
13
-
14
-
15
-
16
-
17
-
18
-
19
-
20
-
21
-
22
-
23
-
24
-
25
-
26
-
27
-
28
-
29
-
30
-
31
-
32
-
33
-
34
-
35
-
36
-
37
-
38
-
39
-
40
-
41
-
42
-
43
-
44
-
45
-
46
-
47
-
48
-
49
-
50
-
51
-
 52
52 -
 53
53 -
 54
54 -
 55
55 -
 56
56 -
 57
57 -
 58
58 -
 59
59 -
 60
60 -
 61
61 -
 62
62 -
63
-
64
-
65
-
66
-
67
-
68
-
69
-
70
-
71
-
72
-
73
-
74
-
75
-
76
-
77
-
78
-
79
-
80
-
81
-
82
-
83
-
84
-
85
 |
 |
