HP Scitex LX850 HP Scitex LX850 & LX820 Printer: Installation Guide - Page 72
Print the HP test images
 |
View all HP Scitex LX850 manuals
Add to My Manuals
Save this manual to your list of manuals |
Page 72 highlights
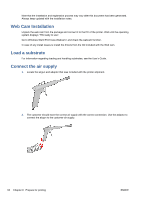
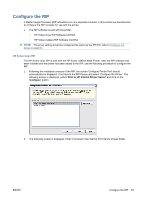
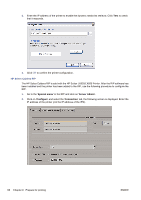
Print the HP test images Test images are available with which you can check the print quality achieved once the printer has been fully installed. From HP's Web site (http://www.hp.com/), select Support & drivers, check Download software & drivers, type the name of the printer, select Drivers, and download the pre-ripped images. The following three images are available, each designed to test the print quality in a different way. Filename: Petra Filename: Notatravel Filename: Fish The main purpose of these pre-ripped files is to be able to check the print quality achieved by using files that do not need to be ripped. This will avoid any print-quality issues due to the RIP application or to a mismatch of substrate/RIP selections. If any issues are found, the error can come only from the printer's installation and setup. It is important when selecting the print that the correct file is selected for the type of substrate loaded. There is a choice of two, and the correct selection will depend on which type of substrate is loaded in the printer. The pre-ripped images are located in the following location: C:\Users \scitexlx\Documents\HP IPS\Test Plot\Ripped Photorealistic: Make sure before printing the files that the printer is ready to print at its best. 1. Load the correct roll of substrate. 2. Align the printheads (see the Maintenance and Troubleshooting Guide). 3. Check the printhead alignment (from IPS, Printer > Printhead alignment > Diagnostics plot, seen Maintenance and Troubleshooting Guide). 4. Fine-tune the substrate advance with the print mode or modes that you intend to use: a. Create a new job to print, selecting a job from the following directory: C:\Users \'login'\Documents \HP IPS\Advance Calibration, ('login': the current login name on the IPS PC). b. The file name is substrateadvancecheck_300dpi and is also called this when it is added to the queue. c. Nest the ladder, adding the same ladder 2 more times. d. Arrange the nest to place one ladder in the center, and a ladder on each side of the substrate. e. Select the print mode and the correct preset substrate, and select print. f. Perform the Advance compensation procedure (refer to the Maintenance & Troubleshooting Guide for more details). 68 Chapter 9 Prepare for printing ENWW
-
 1
1 -
2
-
3
-
4
-
5
-
6
-
7
-
8
-
9
-
10
-
11
-
12
-
13
-
14
-
15
-
16
-
17
-
18
-
19
-
20
-
21
-
22
-
23
-
24
-
25
-
26
-
27
-
28
-
29
-
30
-
31
-
32
-
33
-
34
-
35
-
36
-
37
-
38
-
39
-
40
-
41
-
42
-
43
-
44
-
45
-
46
-
47
-
48
-
49
-
50
-
51
-
52
-
53
-
54
-
55
-
56
-
57
-
58
-
59
-
60
-
61
-
62
-
63
-
64
-
65
-
66
-
 67
67 -
 68
68 -
 69
69 -
 70
70 -
 71
71 -
 72
72 -
 73
73 -
 74
74 -
 75
75 -
 76
76 -
 77
77 -
78
-
79
-
80
-
81
-
82
-
83
-
84
-
85
 |
 |
