HP Server rp8400 nPartition Administrator's Guide, Second Edition - Page 193
Partition, Modify Partition, Change Cell Attributes, Modify Cells, Set Cell, Options, Con Memory
 |
View all HP Server rp8400 manuals
Add to My Manuals
Save this manual to your list of manuals |
Page 193 highlights
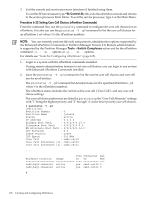
As needed, an absolute CLM specification is rounded up to the nearest 0.5 GBytes. If the clm value is rounded, the command reports the final value used. For details, refer to the parmodify(1M) manpage. 4. Reboot the nPartition to use the cells' new attribute values. On cell-based servers based on the HP sx1000 chipset or HP sx2000 chipset, if you have changed cell local memory (CLM) values then you must reboot the nPartition whose CLM values have changed (HP-UX: shutdown -r; Windows: shutdown /r; Linux: shutdown -r time; OpenVMS: @SYS$SYSTEM:SHUTDOWN with an automatic system reboot). If you also are changing use-on-next-boot values then also use the following guidelines. If you have changed any cell use-on-next-boot settings for the nPartition then reboot the nPartition in either of two ways: • Perform a standard reboot (HP-UX: shutdown -r; Windows: shutdown /r; Linux: shutdown -r time; OpenVMS: @SYS$SYSTEM:SHUTDOWN with an automatic system reboot). If you have only changed use-on-next-boot values from y to n, then perform a reboot. Any cells set to not be used will still be assigned to the nPartition but will not be used (will not rendezvous) in the nPartition. • Perform a reboot for reconfig (HP-UX: shutdown -R; Windows: shutdown /r; Linux: shutdown -r time; OpenVMS: @SYS$SYSTEM:SHUTDOWN with an automatic system reboot). If you have changed any use-on-next-boot values from n (do not use on next boot) to y (use the cell on next boot), then you must perform a reboot for reconfig to allow the currently inactive cells to reboot and rendezvous when the nPartition reboots. Procedure 6-19 Setting Cell Attributes (Partition Manager) You can set cell attributes by using Partition Manager. When using Partition Manager Version 1.0, select the nPartition to which the cell belongs, select the Partition→Modify Partition action, Change Cell Attributes tab, select the cell(s), and click Modify Cell(s). When using Partition Manager Version 2.0, select the nPartition to which the cell belongs, select the nPartition→Modify nPartition action, and then configure attributes using the Set Cell Options tab and the Configure Memory tab. 1. Access Partition Manager. For details on accessing Partition Manager or other tools, see "Tools for Configuring nPartitions" (page 165). 2. Select the nPartition whose cell attribute values you want to modify. 3. Initiate the nPartition modify action. If using Partition Manager Version 1.0, the Partition→Modify Partition action. If using Partition Manager Version 2.0, select the nPartition→Modify nPartition action. 4. Access the Partition Manager section(s) for configuring cell attributes. From Partition Manager Version 1.0, select the Change Cell Attributes tab, then select the cell and click the Modify Cell button. This enables you to configure the use-on-next-boot value for the selected cell. Setting Cell Attributes 193
-
 1
1 -
2
-
3
-
4
-
5
-
6
-
7
-
8
-
9
-
10
-
11
-
12
-
13
-
14
-
15
-
16
-
17
-
18
-
19
-
20
-
21
-
22
-
23
-
24
-
25
-
26
-
27
-
28
-
29
-
30
-
31
-
32
-
33
-
34
-
35
-
36
-
37
-
38
-
39
-
40
-
41
-
42
-
43
-
44
-
45
-
46
-
47
-
48
-
49
-
50
-
51
-
52
-
53
-
54
-
55
-
56
-
57
-
58
-
59
-
60
-
61
-
62
-
63
-
64
-
65
-
66
-
67
-
68
-
69
-
70
-
71
-
72
-
73
-
74
-
75
-
76
-
77
-
78
-
79
-
80
-
81
-
82
-
83
-
84
-
85
-
86
-
87
-
88
-
89
-
90
-
91
-
92
-
93
-
94
-
95
-
96
-
97
-
98
-
99
-
100
-
101
-
102
-
103
-
104
-
105
-
106
-
107
-
108
-
109
-
110
-
111
-
112
-
113
-
114
-
115
-
116
-
117
-
118
-
119
-
120
-
121
-
122
-
123
-
124
-
125
-
126
-
127
-
128
-
129
-
130
-
131
-
132
-
133
-
134
-
135
-
136
-
137
-
138
-
139
-
140
-
141
-
142
-
143
-
144
-
145
-
146
-
147
-
148
-
149
-
150
-
151
-
152
-
153
-
154
-
155
-
156
-
157
-
158
-
159
-
160
-
161
-
162
-
163
-
164
-
165
-
166
-
167
-
168
-
169
-
170
-
171
-
172
-
173
-
174
-
175
-
176
-
177
-
178
-
179
-
180
-
181
-
182
-
183
-
184
-
185
-
186
-
187
-
 188
188 -
 189
189 -
 190
190 -
 191
191 -
 192
192 -
 193
193 -
 194
194 -
 195
195 -
 196
196 -
 197
197 -
 198
198 -
199
-
200
-
201
-
202
-
203
-
204
-
205
-
206
-
207
-
208
-
209
-
210
-
211
-
212
-
213
-
214
-
215
-
216
-
217
-
218
-
219
-
220
-
221
-
222
-
223
-
224
-
225
-
226
-
227
-
228
-
229
-
230
-
231
-
232
-
233
-
234
-
235
-
236
-
237
-
238
-
239
-
240
-
241
-
242
-
243
-
244
-
245
-
246
-
247
-
248
-
249
-
250
-
251
-
252
-
253
-
254
-
255
-
256
-
257
-
258
-
259
-
260
-
261
-
262
-
263
-
264
-
265
-
266
 |
 |