HP StorageWorks Modular Smart Array 1000 HP StorageWorks 1000 Modular Smart Ar - Page 8
Updating Guide, show version, show disks, show units, show this_controller - storageworks modular smart array msa1000
 |
View all HP StorageWorks Modular Smart Array 1000 manuals
Add to My Manuals
Save this manual to your list of manuals |
Page 8 highlights
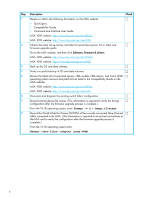
Step Description (continued) 7 Power off the MSA at this time as indicated in the MSA1000/MSA1500 Firmware Updating Guide: Check F IMPORTANT: Do not deviate from this power cycle sequence. If the MSA and the storage enclosures are power cycled out of order, LUNs will be marked as failed and must be re-enabled. a. Press and hold down the MSA Power/Standby button for approximately five seconds to place the MSA in Standby mode. b. Shutdown all storage enclosures attached to the MSA. c. Wait approximately two minutes to ensure that the hard drives stop rotating. d. Reboot all storage enclosures attached to the MSA. e. Wait approximately four minutes to allow the enclosures to complete their power on routine. f. Press and release the MSA Power/Standby button to restart the MSA. g. Wait until the MSA STARTUP COMPLETE message is displayed on the controller LCD panel. 8 Boot all servers that were shutdown in Step 4. F NOTE: This step is not necessary if the servers were not shutdown in Step 4. 9 Verify that the firmware upgrade completed successfully and the storage is visible. F From the MSA CLI, enter the following commands: show version-Displays MSA version information including MSA firmware and MSA hardware build. show disks-Displays physical disk information including disk number, enclosure box and bay number, enclosure bus number and ID, physical disk size, and Logical Units (LUNs) to which the disk is assigned. show units-Displays LUN information including LUN name, status, included physical disks and spares, RAID level and capacity. show this_controller-Displays controller information including serial number, hardware build, and redundancy mode. NOTE: The displayed information shows the MSA operating in a non-redundant mode. This is normal because the additional controller is not yet installed. For detailed information about the CLI, see the HP StorageWorks Modular Smart Array 1000/1500 Command Line Interface User Guide. 10 Verify that the storage units are available and the hardware IDs of the device files did F not change by entering the following commands from Tru64 V5.1B: # hwmgr -v d > hwmgr_filename1 # diff hwmgr_filename hwmgr_filename1 Verify that if any differences occur, they are limited to the manufacturer and/or the model name. 8
-
 1
1 -
2
-
 3
3 -
 4
4 -
 5
5 -
 6
6 -
 7
7 -
 8
8 -
 9
9 -
 10
10 -
 11
11 -
 12
12 -
 13
13 -
14
 |
 |
