HP StorageWorks XP12000 HP StorageWorks XP Disk Array Configuration Guide: Ope - Page 10
Installing and configuring the disk array, After these tasks are finished, use XP Remote Web Console
 |
View all HP StorageWorks XP12000 manuals
Add to My Manuals
Save this manual to your list of manuals |
Page 10 highlights
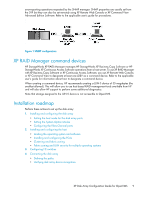
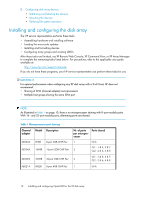
5. Configuring disk array devices • Initializing and labeling the devices • Mounting the devices • Verifying file system operation Installing and configuring the disk array The HP service representative performs these tasks: • Assembling hardware and installing software • Loading the microcode updates • Installing and formatting devices • Configuring array groups and creating LDEVs After these tasks are finished, use XP Remote Web Console, XP Command View, or XP Array Manager to complete the remaining tasks listed below. For procedures, refer to the applicable user guide available at: http://www.hp.com/support/manuals. If you do not have these programs, your HP service representative can perform these tasks for you. IMPORTANT: For optimal performance when configuring any XP disk array with a Tru64 host, HP does not recommend: • Sharing of CHA (channel adapter) microprocessors • Multiple host groups sharing the same CHA port NOTE: As illustrated in Table 1 on page 10, there is no microprocessor sharing with 8-port module pairs. With 16- and 32-port module pairs, alternating ports are shared. Table 1 Microprocessor port sharing Channel Model Description adapter AE020A 8HSR 8-port 2GB CHIP Pair AE006A 16HSR 16-port 2GB CHIP Pair AE007A 32HSR 32-port 2GB CHIP Pair AE021A 8FS2R 8-port 4GB CHIP Pair Nr. of ports Ports shared per microprocessor 1 N/A CL1 - 1 & 5; 3 & 7 2 CL2 - 2 & 6; 4 & 8 CL1 - 1 & 5; 3 & 7 2 CL2 - 2 & 6; 4 & 8 1 N/A 10 Installing and configuring OpenVMS for the XP disk array
-
 1
1 -
2
-
3
-
4
-
 5
5 -
 6
6 -
 7
7 -
 8
8 -
 9
9 -
 10
10 -
 11
11 -
 12
12 -
 13
13 -
 14
14 -
 15
15 -
16
-
17
-
18
-
19
-
20
-
21
-
22
-
23
-
24
-
25
-
26
-
27
-
28
-
29
-
30
-
31
-
32
-
33
-
34
-
35
-
36
 |
 |
