HP TouchSmart 300-1300 Upgrading and Servicing Guide - Page 21
Removing the CD/DVD Drive, the CD/DVD drive cage.
 |
View all HP TouchSmart 300-1300 manuals
Add to My Manuals
Save this manual to your list of manuals |
Page 21 highlights
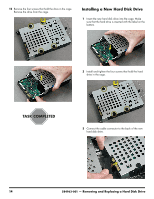
Removing the CD/DVD Drive 6 Lift the plastic shield on the back of the computer stand. 9 Loosen the screw at the back of the CD/DVD drive cage. TIP: You do not need to remove this screw, only loosen it in order to release the CD/DVD drive cage. 7 Use a torx or flat-head screwdriver to remove the screw that secures the left cover. 10 Grasp the tab at the top of the CD/DVD drive cage, and slide it in the direction of the arrow to disengage the CD/DVD drive cage. 8 Slide the left cover off. 584963-001 - Removing and Replacing a CD/DVD Drive 19
-
 1
1 -
2
-
3
-
4
-
5
-
6
-
7
-
8
-
9
-
10
-
11
-
12
-
13
-
14
-
15
-
 16
16 -
 17
17 -
 18
18 -
 19
19 -
 20
20 -
 21
21 -
 22
22 -
 23
23 -
 24
24 -
 25
25 -
 26
26
 |
 |

584963-001
— Removing and Replacing a CD/DVD Drive
19
Removing the CD/DVD Drive
6
Lift the plastic shield on the back of the computer
stand.
7
Use a torx or flat-head screwdriver to remove the screw
that secures the left cover.
8
Slide the left cover off.
9
Loosen the screw at the back of the CD/DVD drive
cage.
10
Grasp the tab at the top of the CD/DVD drive cage,
and slide it in the direction of the arrow to disengage
the CD/DVD drive cage.
TIP:
You do not need to remove this screw,
only loosen it in order to release the
CD/DVD drive cage.