HP Vectra VE 4/xx HP Vectra VE 4/xxX PC Series - User’s Guide - Page 37
Removing the Power Supply Unit
 |
View all HP Vectra VE 4/xx manuals
Add to My Manuals
Save this manual to your list of manuals |
Page 37 highlights
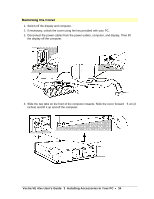
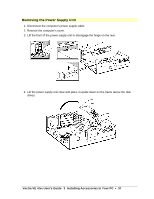
Removing the Power Supply Unit 1. Disconnect the computer's power supply cable. 2. Remove the computer's cover. 3. Lift the front of the power supply unit to disengage the hinge on the rear. 4. Lift the power supply unit clear and place it upside down on the frame above the disk drives. Vectra VE 4/xx User's Guide 3 Installing Accessories In Your PC • 37
-
 1
1 -
2
-
3
-
4
-
5
-
6
-
7
-
8
-
9
-
10
-
11
-
12
-
13
-
14
-
15
-
16
-
17
-
18
-
19
-
20
-
21
-
22
-
23
-
24
-
25
-
26
-
27
-
28
-
29
-
30
-
31
-
 32
32 -
 33
33 -
 34
34 -
 35
35 -
 36
36 -
 37
37 -
 38
38 -
 39
39 -
 40
40 -
 41
41 -
 42
42 -
43
-
44
-
45
-
46
-
47
-
48
-
49
-
50
-
51
-
52
-
53
-
54
-
55
-
56
-
57
-
58
-
59
-
60
-
61
-
62
-
63
-
64
-
65
-
66
-
67
-
68
-
69
-
70
-
71
-
72
-
73
-
74
-
75
-
76
-
77
-
78
-
79
-
80
-
81
-
82
-
83
-
84
-
85
-
86
-
87
-
88
-
89
-
90
-
91
-
92
-
93
-
94
-
95
-
96
-
97
-
98
-
99
-
100
-
101
-
102
-
103
-
104
-
105
-
106
-
107
-
108
-
109
-
110
-
111
-
112
-
113
-
114
-
115
-
116
-
117
-
118
-
119
-
120
-
121
-
122
-
123
-
124
-
125
 |
 |
Vectra VE 4/xx User's Guide
3
Installing Accessories In Your PC
•
37
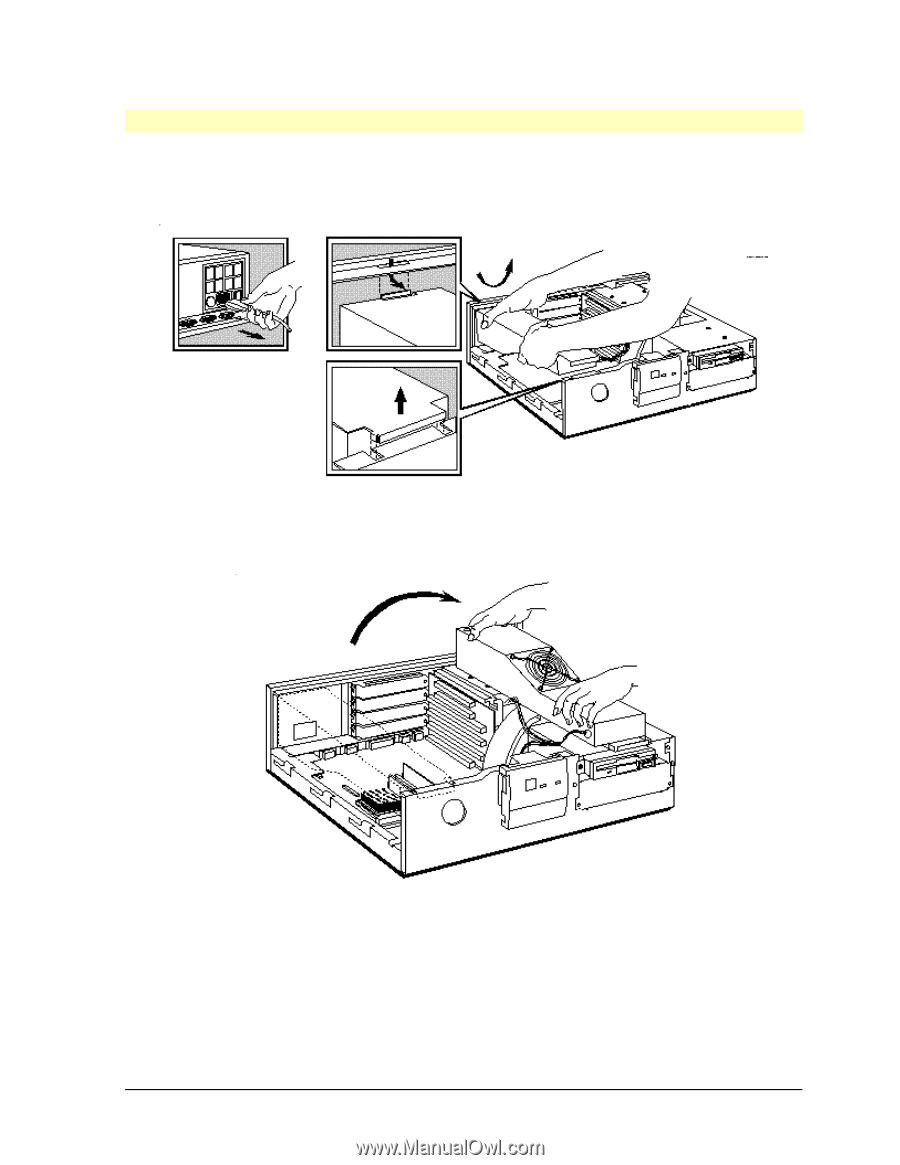
Removing the Power Supply Unit
1.
Disconnect the computer’s power supply cable.
2.
Remove the computer’s cover.
3.
Lift the front of the power supply unit to disengage the hinge on the rear.
4.
Lift the power supply unit clear and place it upside down on the frame above the disk
drives.