HP Vectra VE 4/xx HP Vectra VE 4/xxX PC Series - User’s Guide - Page 40
Installing a Main Memory Module
 |
View all HP Vectra VE 4/xx manuals
Add to My Manuals
Save this manual to your list of manuals |
Page 40 highlights
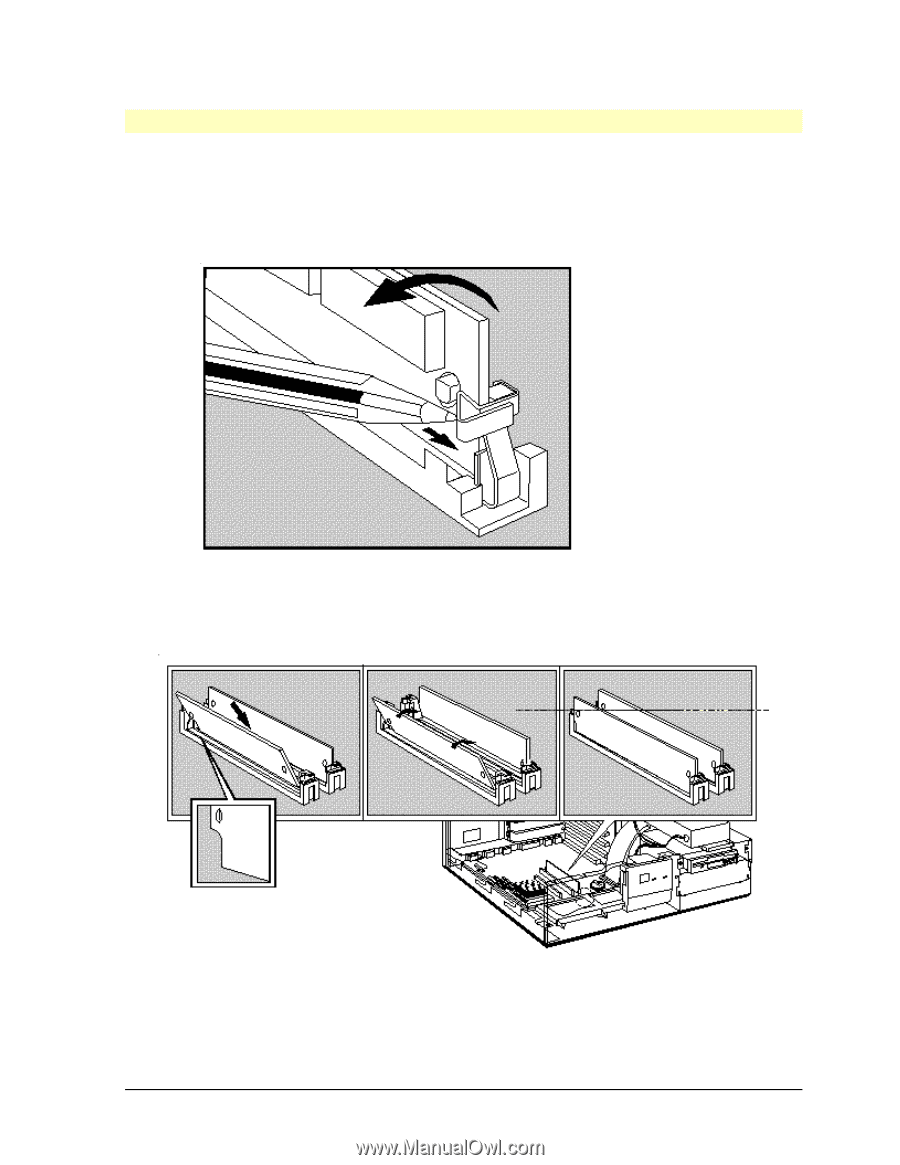
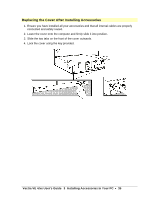
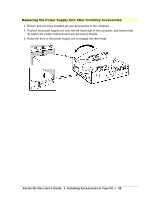
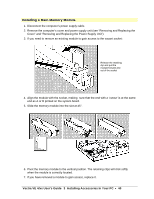
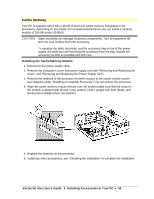
Installing a Main Memory Module 1. Disconnect the computer's power supply cable. 2. Remove the computer's cover and power supply unit (see "Removing and Replacing the Cover" and "Removing and Replacing the Power Supply Unit"). 3. If you need to remove an existing module to gain access to the vacant socket: Release the retaining clip and pull the module forward and out of the socket 4. Align the module with the socket, making sure that the end with a 'cutout' is at the same end as A or B printed on the system board. 5. Slide the memory module into the slot at 45°. 6. Pivot the memory module to the vertical position. The retaining clips will click softly when the module is correctly located. 7. If you have removed a module to gain access, replace it. Vectra VE 4/xx User's Guide 3 Installing Accessories In Your PC • 40
-
 1
1 -
2
-
3
-
4
-
5
-
6
-
7
-
8
-
9
-
10
-
11
-
12
-
13
-
14
-
15
-
16
-
17
-
18
-
19
-
20
-
21
-
22
-
23
-
24
-
25
-
26
-
27
-
28
-
29
-
30
-
31
-
32
-
33
-
34
-
 35
35 -
 36
36 -
 37
37 -
 38
38 -
 39
39 -
 40
40 -
 41
41 -
 42
42 -
 43
43 -
 44
44 -
 45
45 -
46
-
47
-
48
-
49
-
50
-
51
-
52
-
53
-
54
-
55
-
56
-
57
-
58
-
59
-
60
-
61
-
62
-
63
-
64
-
65
-
66
-
67
-
68
-
69
-
70
-
71
-
72
-
73
-
74
-
75
-
76
-
77
-
78
-
79
-
80
-
81
-
82
-
83
-
84
-
85
-
86
-
87
-
88
-
89
-
90
-
91
-
92
-
93
-
94
-
95
-
96
-
97
-
98
-
99
-
100
-
101
-
102
-
103
-
104
-
105
-
106
-
107
-
108
-
109
-
110
-
111
-
112
-
113
-
114
-
115
-
116
-
117
-
118
-
119
-
120
-
121
-
122
-
123
-
124
-
125
 |
 |