HP Workstation x1100 hp workstation x1100 - technical reference guide - Page 135
Removing And Replacing A System Board, Removing A System Board
 |
View all HP Workstation x1100 manuals
Add to My Manuals
Save this manual to your list of manuals |
Page 135 highlights
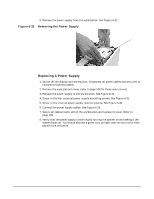
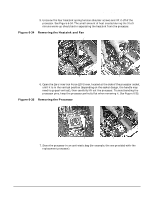
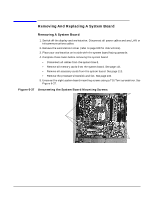
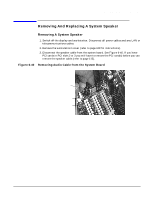
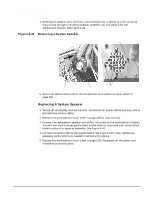
Removing And Replacing Hardware Parts Removing And Replacing A System Board Removing And Replacing A System Board Removing A System Board 1. Switch off the display and workstation. Disconnect all power cables and any LAN or telecommunications cables. 2. Remove the workstation's cover (refer to page 108 for instructions). 3. Place your workstation on its side with the system board facing upwards. 4. Complete these tasks before removing the system board: • Disconnect all cables from the system board. • Remove all memory cards from the system board. See page 111. • Remove all accessory cards from the system board. See page 113. • Remove the processor's heatsink and fan. See page 132. 5. Unscrew the eight system board mounting screws using a T10 Torx screwdriver. See Figure 6-37. Figure 6-37 Unscrewing the System Board Mounting Screws T10 Screws T10 Screws T10 Screws Chapter 6 135
-
 1
1 -
2
-
3
-
4
-
5
-
6
-
7
-
8
-
9
-
10
-
11
-
12
-
13
-
14
-
15
-
16
-
17
-
18
-
19
-
20
-
21
-
22
-
23
-
24
-
25
-
26
-
27
-
28
-
29
-
30
-
31
-
32
-
33
-
34
-
35
-
36
-
37
-
38
-
39
-
40
-
41
-
42
-
43
-
44
-
45
-
46
-
47
-
48
-
49
-
50
-
51
-
52
-
53
-
54
-
55
-
56
-
57
-
58
-
59
-
60
-
61
-
62
-
63
-
64
-
65
-
66
-
67
-
68
-
69
-
70
-
71
-
72
-
73
-
74
-
75
-
76
-
77
-
78
-
79
-
80
-
81
-
82
-
83
-
84
-
85
-
86
-
87
-
88
-
89
-
90
-
91
-
92
-
93
-
94
-
95
-
96
-
97
-
98
-
99
-
100
-
101
-
102
-
103
-
104
-
105
-
106
-
107
-
108
-
109
-
110
-
111
-
112
-
113
-
114
-
115
-
116
-
117
-
118
-
119
-
120
-
121
-
122
-
123
-
124
-
125
-
126
-
127
-
128
-
129
-
 130
130 -
 131
131 -
 132
132 -
 133
133 -
 134
134 -
 135
135 -
 136
136 -
 137
137 -
 138
138 -
 139
139 -
 140
140 -
141
-
142
-
143
-
144
-
145
-
146
-
147
-
148
-
149
-
150
-
151
-
152
-
153
-
154
-
155
-
156
-
157
-
158
-
159
-
160
-
161
-
162
-
163
-
164
-
165
-
166
 |
 |