HP Workstation x2100 hp workstations general - Network administration guide fo - Page 59
Installing the NDIS 2.01 and 4 Drivers for Windows 95 OSR2
 |
View all HP Workstation x2100 manuals
Add to My Manuals
Save this manual to your list of manuals |
Page 59 highlights
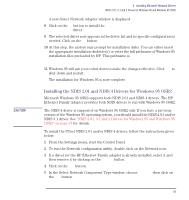
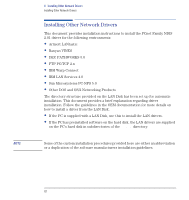
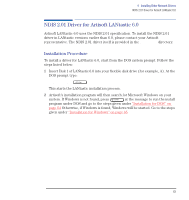
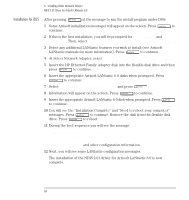
CAUTION 3 Installing Microsoft Network Drivers NDIS 2.01, 3.1 and 4 Drivers for Windows 95 and Windows 95 OSR2 A new Select Network Adapter window is displayed. 8 Click on the OK button to install the HP Ethernet Family Adapter with LAN Remote Power driver. 9 The selected driver now appears in the driver list and no specific configuration is needed. Click on the OK button. 10 At this step, the system may prompt for installation disks. You can either insert the appropriate installation diskette(s) or enter the full pathname of Windows 95 installation files preloaded by HP. This pathname is C:\Windows\Options\Cabs\ 11 Windows 95 will ask you to shut down to make the changes effective. Click Yes to shut down and restart. The installation for Windows 95 is now complete. Installing the NDIS 2.01 and NDIS 4 Drivers for Windows 95 OSR2 Microsoft Windows 95 OSR2 supports both NDIS 2.01 and NDIS 4 drivers. The HP Ethernet Family Adapter provides both NDIS drivers to run with Windows 95 OSR2. The NDIS 4 driver is supported on Windows 95 OSR2 only. If you have a previous version of the Windows 95 operating system, you should install the NDIS 2.01 and/or NDIS 3.1 driver. See "NDIS 2.01, 3.1 and 4 Drivers for Windows 95 and Windows 95 OSR2" on page 57 for details. To install the PCnet NDIS 2.01 and/or NDIS 4 drivers, follow the instructions given below: 1 From the Settings menu, start the Control Panel. 2 To run the Network configuration utility, double click on the Network icon. 3 If a driver for the HP Ethernet Family adapter is already installed, select it and then remove it by clicking on the Remove button. 4 Click on the Add button. 5 In the Select Network Component Type window, choose Adapter then click on the Add button. English 59
-
 1
1 -
2
-
3
-
4
-
5
-
6
-
7
-
8
-
9
-
10
-
11
-
12
-
13
-
14
-
15
-
16
-
17
-
18
-
19
-
20
-
21
-
22
-
23
-
24
-
25
-
26
-
27
-
28
-
29
-
30
-
31
-
32
-
33
-
34
-
35
-
36
-
37
-
38
-
39
-
40
-
41
-
42
-
43
-
44
-
45
-
46
-
47
-
48
-
49
-
50
-
51
-
52
-
53
-
 54
54 -
 55
55 -
 56
56 -
 57
57 -
 58
58 -
 59
59 -
 60
60 -
 61
61 -
 62
62 -
 63
63 -
 64
64 -
65
-
66
-
67
-
68
-
69
-
70
-
71
-
72
-
73
-
74
-
75
-
76
-
77
-
78
-
79
-
80
-
81
-
82
-
83
-
84
-
85
-
86
-
87
-
88
-
89
-
90
-
91
-
92
-
93
-
94
-
95
-
96
-
97
-
98
-
99
-
100
-
101
-
102
-
103
-
104
-
105
-
106
-
107
-
108
-
109
-
110
-
111
-
112
-
113
-
114
-
115
-
116
-
117
-
118
 |
 |
