| Section |
Page |
| HP VISUALIZE Linux Workstation User’s Guide |
1 |
| HP VISUALIZE Linux Workstation User’s Guide |
1 |
| HP VISUALIZE Linux Workstation User’s Guide |
1 |
| XL-Class Workstations |
1 |
| Printed in USA ��September 1999 |
1 |
| Manufacturing Part Number:� A1297-90000 |
1 |
| Edition E0999 |
1 |
| © Copyright 1999 |
1 |
| © Copyright 1999 |
1 |
| Hewlett-Packard Company |
1 |
| Legal Notices |
2 |
| Legal Notices |
2 |
| The information contained in this document is subject to change without notice. Hewlett-Packard m... |
2 |
| Adobe® Reader © 1987-1999 Adobe Systems Incorporated. All rights reserved. Adobe and Acrobat are ... |
2 |
| Red Hat® , the Red Hat “Shadow Man” logo, RPM, Maximum RPM, the RPM logo, Linux Library, PowerToo... |
2 |
| Netscape® is a trademark of Netscape Communications Corporation. Pentium |
2 |
| HP Printing Division: |
2 |
| Hewlett-Packard Company 3404 E. Harmony Road Fort Collins, CO 80528-9599 USA |
2 |
| IMPORTANT HP Linux Warranty Information |
3 |
| IMPORTANT HP Linux Warranty Information |
3 |
| IMPORTANT HP Linux Warranty Information |
3 |
| HP has made every effort to ensure the accuracy of our product testing. However, because each cus... |
3 |
| HP has made every effort to ensure the accuracy of our product testing. However, because each cus... |
3 |
| http://www.redhat.com |
3 |
| Contents |
5 |
| Chapter 1 Setting Up and Using Your HP Visualize Linux Workstation 1 |
6 |
| Chapter 2 How to Install Accessories In Your HP Visualize Linux Workstation 15 |
6 |
| Chapter 3 Troubleshooting Your HP Visualize Linux�Workstation 23 |
6 |
| Chapter 4 Hewlett Packard Support and Information Services 37 |
7 |
| Preface |
9 |
| Preface |
9 |
| This owner’s guide describes how to use your HP Visualize Linux XL-Class Workstation. This Workst... |
9 |
| The HP Visualize Linux Workstation is designed to perform simulations, formal verification, and o... |
9 |
| Red Hat Linux is a popular open source operating system that gives you the ability to develop cus... |
10 |
| Special Notice for Users |
10 |
| Special Notice for Users |
10 |
| The HP Visualize Linux Workstation is made from a combination of high performance Industry Standa... |
10 |
| Audience |
10 |
| Audience |
10 |
| This guide is intended for HP Visualize Linux Workstation users who want to: |
10 |
| • Set up the HP Visualize Linux Workstation for the first time. |
10 |
| • Set up the HP Visualize Linux Workstation for the first time. |
10 |
| • Configure the HP Visualize Linux Workstation. |
10 |
| • Troubleshoot problems on the HP Visualize Linux Workstation. |
10 |
| • Add accessories to the HP Visualize Linux Workstation. |
10 |
| • Find out where to get more information and support. |
10 |
| Important Safety Information |
11 |
| Important Safety Information |
11 |
| WARNING If you have any doubt that you can lift the HP Visualize Linux Workstation or display saf... |
11 |
| WARNING If you have any doubt that you can lift the HP Visualize Linux Workstation or display saf... |
11 |
| Important Ergonomic Information |
11 |
| Important Ergonomic Information |
11 |
| It is strongly recommended that you read the ergonomic information before using you HP Visualize ... |
11 |
| Installation Notice |
12 |
| Installation Notice |
12 |
| Products designated in the applicable Hewlett-Packard price list as customer-installable can be i... |
12 |
| Revision History |
12 |
| Revision History |
12 |
| The revision history for each edition of the manual is listed below: |
12 |
| Edition |
12 |
| Edition |
12 |
| Edition |
12 |
| Revision History |
12 |
| Revision History |
12 |
| E0999 |
12 |
| E0999 |
12 |
| First Printing |
12 |
| First Printing |
12 |
| Problems, Questions, and Suggestions |
12 |
| Problems, Questions, and Suggestions |
12 |
| If you have any problems or questions with our hardware, software, or documentation, please conta... |
12 |
| For further information about HP Linux program: |
12 |
| For further information about HP Linux program: |
12 |
| http://www.hp.com/visualize/products/linux |
12 |
| For more information about the Red Hat Operating System, see: |
12 |
| http://www.redhat.com |
12 |
| Documentation Conventions |
13 |
| Documentation Conventions |
13 |
| Unless otherwise noted in the text, this guide uses the following symbolic conventions. |
13 |
| <TABLE> |
13 |
| <TABLE BODY> |
13 |
| <TABLE ROW> |
13 |
| user-supplied values |
13 |
| Italic words or characters in syntax and command descriptions represent values that you must supp... |
13 |
| <TABLE ROW> |
13 |
| screen display |
13 |
| Information that the system displays, commands that you must use literally, and path names appear... |
13 |
| <TABLE ROW> |
13 |
| Enter |
13 |
| Enter |
13 |
| Keycaps are presented with a special keycap font as shown in the left column. (In this document, ... |
13 |
| Electrostatic Discharge (ESD) Precautions |
13 |
| Electrostatic Discharge (ESD) Precautions |
13 |
| ESD (electrostatic discharge) |
13 |
| ESD (electrostatic discharge) |
13 |
| Electrostatic discharge (ESD) |
13 |
| • Stand on a static-free mat. |
13 |
| • Stand on a static-free mat. |
13 |
| • Stand on a static-free mat. |
13 |
| • Wear a static strap to ensure that any accumulated electrostatic charge is discharged from your... |
13 |
| • Wear a static strap to ensure that any accumulated electrostatic charge is discharged from your... |
13 |
| • Create a common ground for the equipment you are working on by connecting the static-free mat, ... |
13 |
| • Create a common ground for the equipment you are working on by connecting the static-free mat, ... |
13 |
| • Keep uninstalled printed circuit boards in their protective antistatic bags. |
13 |
| • Keep uninstalled printed circuit boards in their protective antistatic bags. |
13 |
| • Handle printed circuit boards by their edges, once you have removed them from their protective ... |
13 |
| • Handle printed circuit boards by their edges, once you have removed them from their protective ... |
13 |
| 1� Setting Up and Using Your HP Visualize Linux Workstation |
15 |
| 1� Setting Up and Using Your HP Visualize Linux Workstation |
15 |
| unpacking the Personal Workstation |
16 |
| unpacking the Personal Workstation |
16 |
| unpacking the Personal Workstation |
16 |
| Personal Workstation:unpacking |
16 |
| WARNING If you are in any doubt that you can lift the HP Visualize Linux Workstation and the disp... |
16 |
| WARNING If you are in any doubt that you can lift the HP Visualize Linux Workstation and the disp... |
16 |
| 1. When you receive your Workstation, unpack all of the components: |
16 |
| � Computer and power cords |
16 |
| � Computer and power cords |
16 |
| � Display and its video cable |
16 |
| � HP keyboard, mouse and headphones |
16 |
| � Manuals, Diskettes and CD-ROMs. |
16 |
| 2. Place the HP Visualize Linux Workstation on a sturdy desk with easily accessible power outlets... |
16 |
| 2. Place the HP Visualize Linux Workstation on a sturdy desk with easily accessible power outlets... |
16 |
| 2. Place the HP Visualize Linux Workstation on a sturdy desk with easily accessible power outlets... |
16 |
| <GRAPHIC> |
16 |
| 4. Place the display next to the computer. |
16 |
| Installation Tools |
17 |
| No tools are required to install your HP Visualize Linux Workstation. However, if you plan to ins... |
17 |
| Connecting the Mouse, |
18 |
| Connecting the Mouse, |
18 |
| Connect the mouse, keyboard, display and printer to the back of the HP Visualize Linux Workstatio... |
18 |
| <GRAPHIC> |
19 |
| Connecting to a Network |
19 |
| Your HP Visualize Linux Workstation has a 10/100BT LAN interface adapter. |
19 |
| The LAN adapter supports both 10 Mbit/s and 100 Mbit/s operations and automatically detects which... |
19 |
| 1. Connect the RJ-45 plug on your network cable to the LAN connector on the LAN Adapter. Push the... |
19 |
| 1. Connect the RJ-45 plug on your network cable to the LAN connector on the LAN Adapter. Push the... |
19 |
| 1. Connect the RJ-45 plug on your network cable to the LAN connector on the LAN Adapter. Push the... |
19 |
| <GRAPHIC> |
19 |
| Let your Network Administrator know that you are connecting your HP Visualize Linux Workstation t... |
19 |
| Let your Network Administrator know that you are connecting your HP Visualize Linux Workstation t... |
19 |
| For further instructions on configuring your network connection, refer to the Upgrade and Configu... |
19 |
| Connecting Audio Accessories |
20 |
| Connecting Audio Accessories |
20 |
| Your HP Visualize Linux Workstation has a Headphone Out jack and a Microphone In jack on the Audi... |
20 |
| WARNING To avoid discomfort from unexpected noise, always turn down the volume before connecting ... |
20 |
| WARNING To avoid discomfort from unexpected noise, always turn down the volume before connecting ... |
20 |
| Connecting an External SCSI Accessory |
21 |
| Connecting an External SCSI Accessory |
21 |
| An external SCSI device can be connected as follows: |
21 |
| 1. You should assign an unused SCSI ID to the device. SCSI IDs range from 0 to 15 for wide 16-bit... |
21 |
| 1. You should assign an unused SCSI ID to the device. SCSI IDs range from 0 to 15 for wide 16-bit... |
21 |
| 1. You should assign an unused SCSI ID to the device. SCSI IDs range from 0 to 15 for wide 16-bit... |
21 |
| NOTE You don’t need to set a SCSI ID for Plug and Play SCSI devices (SCSI devices that support th... |
21 |
| NOTE You don’t need to set a SCSI ID for Plug and Play SCSI devices (SCSI devices that support th... |
21 |
| 2. Make sure the SCSI device is terminated correctly—either internally or by a terminating resist... |
21 |
| 3. Connect the SCSI device to your HP Visualize Linux Workstation’s external 16-bit SCSI connecto... |
21 |
| 3. Connect the SCSI device to your HP Visualize Linux Workstation’s external 16-bit SCSI connecto... |
21 |
| <GRAPHIC> |
22 |
| 4. Refer to the manual provided with the SCSI device to learn how to install any software that ma... |
22 |
| NOTE The total length of the external SCSI cables should not exceed 3 meters (approximately 10 fe... |
22 |
| NOTE The total length of the external SCSI cables should not exceed 3 meters (approximately 10 fe... |
22 |
| Connecting the Power Cords |
23 |
| Connecting the Power Cords |
23 |
| 1. Remove any warning labels that may be covering the computer’s power connector on the rear of t... |
23 |
| 1. Remove any warning labels that may be covering the computer’s power connector on the rear of t... |
23 |
| 2. Connect the power cords to the display and the computer. (The connectors are shaped to go in o... |
23 |
| 2. Connect the power cords to the display and the computer. (The connectors are shaped to go in o... |
23 |
| <GRAPHIC> |
23 |
| WARNING For your safety, always connect the equipment to a grounded wall outlet. Always use a pow... |
23 |
| WARNING For your safety, always connect the equipment to a grounded wall outlet. Always use a pow... |
23 |
| The MaxiLife Control Panel |
24 |
| The MaxiLife Control Panel |
24 |
| control panel |
24 |
| The MaxiLife panel is located on the front of your HP Visualize Linux Workstation. |
24 |
| <GRAPHIC> |
24 |
| HP MaxiLife |
24 |
| HP MaxiLife |
24 |
| HP MaxiLife and its LCD screen helps you diagnose problems with your HP Visualize Linux Workstati... |
24 |
| Network Activity Light |
24 |
| network:activity light;activity light:network |
24 |
| This light glows/flickers when your HP Visualize Linux Workstation is accessing the network. |
24 |
| Hard Disk Activity Light |
24 |
| hard disk:activity light;activity light:hard disk |
24 |
| This light glows/flickers when your hard disk drive is being accessed. |
24 |
| Starting and Stopping Your HP Visualize Linux Workstation |
25 |
| Starting and Stopping Your HP Visualize Linux Workstation |
25 |
| Starting Your Workstation for the First Time |
25 |
| Starting Your Workstation for the First Time |
25 |
| Your HP Visualize Linux Workstation has preinstalled Red Hat Linux and HP software. It is initial... |
25 |
| Initializing Your Software |
25 |
| Initializing Your Software |
25 |
| NOTE Do NOT switch OFF the HP Visualize Linux Workstation while the software is being initialized... |
25 |
| NOTE Do NOT switch OFF the HP Visualize Linux Workstation while the software is being initialized... |
25 |
| software:initializing |
26 |
| software:initializing |
26 |
| initializing:software |
26 |
| 1. Turn on the display first, and then the HP Visualize Linux Workstation. |
26 |
| 1. Turn on the display first, and then the HP Visualize Linux Workstation. |
26 |
| Creating a Rescue Disk Set |
26 |
| Creating a Rescue Disk Set |
26 |
| During the initialization of your software, it is very important that you create a Rescue Disk Se... |
26 |
| Stopping Your HP Visualize Linux Workstation |
27 |
| Stopping Your HP Visualize Linux Workstation |
27 |
| stopping:Personal Workstation |
27 |
| Personal Workstation:stopping |
27 |
| To stop the workstation (when running an operating system), first make sure that you have exited ... |
27 |
| Additional Information and Help |
27 |
| Additional Information and Help |
27 |
| <GRAPHIC> |
27 |
| After completing the Setup Program and rebooting, your Workstation will launch a special “Getting... |
27 |
| Setting BIOS Passwords |
28 |
| Setting BIOS Passwords |
28 |
| You can set two BIOS passwords, the Hardware Administrator (or Supervisor) password and the Hardw... |
28 |
| Setting a Password |
28 |
| Setting a Password |
28 |
| To set a Hardware Administrator or User password: |
28 |
| 1. Start the |
28 |
| 1. Start the |
28 |
| 2. Select the Security menu. |
28 |
| 3. Select the Administrator or User password submenu. |
28 |
| 4. Choose the Set Administrator or User password setup item. You will be asked to enter your pass... |
28 |
| 5. To save your changes and exit the |
28 |
| To remove the password, follow the same procedure as to set a password. You will be asked to ente... |
28 |
| accessories:installing;installing:accessories |
29 |
| accessories:installing;installing:accessories |
29 |
| accessories:installing;installing:accessories |
29 |
| accessories:supported |
30 |
| accessories:supported |
30 |
| accessories:supported |
30 |
| supported HP accessories |
30 |
| <GRAPHIC> |
30 |
| <GRAPHIC> |
30 |
| IMPORTANT Some of the accessories mentioned in this section reflect components that were not full... |
30 |
| IMPORTANT Some of the accessories mentioned in this section reflect components that were not full... |
30 |
| Contact HP or your dealer for an up-to-date list of supported devices. |
30 |
| Removing and Replacing the Cover |
31 |
| Removing and Replacing the Cover |
31 |
| WARNING For your safety, never remove the HP Visualize Linux Workstation’s cover without first re... |
31 |
| WARNING For your safety, never remove the HP Visualize Linux Workstation’s cover without first re... |
31 |
| Removing the Cover |
31 |
| Removing the Cover |
31 |
| cover:removing |
31 |
| 1. Switch off the display and computer. |
31 |
| 1. Switch off the display and computer. |
31 |
| 2. Disconnect all power cables and any telecommunications cables. |
31 |
| 3. If necessary, unlock the cover using the key on the back panel. |
31 |
| 4. Lift the two latches on the front sides of the computer upwards. |
31 |
| 5. Grasp the cover on the sides at the back of the computer and slide it forwards and off the com... |
31 |
| Replacing the Cover |
32 |
| Replacing the Cover |
32 |
| cover:replacing |
32 |
| 1. Ensure that you have installed all your accessories and that all internal cables are properly ... |
32 |
| 1. Ensure that you have installed all your accessories and that all internal cables are properly ... |
32 |
| 2. Ensure that the two latches on the front sides of the cover are lifted up, and that the lock i... |
32 |
| 3. Slide the cover onto the computer, making sure that the two guides at the bottom of the case s... |
32 |
| 4. Lower the latches on the front sides of the cover. |
32 |
| 5. If required, lock the cover using the key provided. |
32 |
| 6. Reconnect all the power and telecommunications cables. |
32 |
| <GRAPHIC> |
33 |
| Removing and Replacing the Airflow Guide |
33 |
| 1. Press the retaining buttons on each side of the airflow guide and lift it partly out of the HP... |
33 |
| 1. Press the retaining buttons on each side of the airflow guide and lift it partly out of the HP... |
33 |
| 2. Remove the fan connection to the system board and lift the airflow guide completely out of the... |
33 |
| <GRAPHIC> |
33 |
| To improve access when installing accessories you may need to remove the airflow guide. |
33 |
| To Replace the HP UltraFlow Airflow Guide |
33 |
| To Replace the HP UltraFlow Airflow Guide |
33 |
| 1. Hold the airflow guide partly inside the HP Visualize Linux Workstation’s case and reconnect t... |
33 |
| 1. Hold the airflow guide partly inside the HP Visualize Linux Workstation’s case and reconnect t... |
33 |
| 2. Align the airflow guide with the retaining slots on the HP Visualize Linux Workstation’s case ... |
33 |
| Installing Mass Storage Devices |
34 |
| Installing Mass Storage Devices |
34 |
| Connecting Devices |
34 |
| Connecting Devices |
34 |
| If you add an additional mass storage device, you need to connect it to power and data cables. Th... |
34 |
| Before Installing an IDE Hard Disk |
35 |
| Refer to the drive’s installation guide to see if you must set jumpers or if there is a special i... |
35 |
| Before Installing a SCSI Hard Disk |
35 |
| If you are installing an additional SCSI drive, you should assign an unused SCSI ID to this acces... |
35 |
| Plug and Play:SCSI |
35 |
| Plug and Play:SCSI |
35 |
| Plug and Play:SCSI |
35 |
| SCSI:Plug and Play |
35 |
| You should assign an unused SCSI ID to the second SCSI hard disk drive (for example, SCSI ID 1). |
35 |
| The SCSI ID is usually configured with jumpers on the SCSI hard disk drive. Refer to the installa... |
35 |
| Some internal SCSI disk drives may have termination resistors that must be removed or disabled be... |
35 |
| Installing Drivers and Utilities |
36 |
| Installing Drivers and Utilities |
36 |
| Once you have installed accessory boards and mass-storage devices on your system, you will need t... |
36 |
| troubleshooting |
37 |
| troubleshooting |
37 |
| troubleshooting |
37 |
| Personal Workstation:troubleshooting;troubleshooting:Personal Workstation |
37 |
| This chapter provides information that can help you solve problems you may have when using your H... |
37 |
| Using HP MaxiLife to Diagnose Problems |
38 |
| Using HP MaxiLife to Diagnose Problems |
38 |
| Your HP LCD can help you to diagnose problems with your HP Visualize Linux Workstation, even when... |
38 |
| Pre-Boot Checks |
38 |
| When you press your HP Visualize Linux Workstation’s on/off button, HP MaxiLife will check your s... |
38 |
| POST Phase |
39 |
| Following these checks, the POST (Power-On Self Test) sequence is initiated. One of the following... |
39 |
| Other Features |
39 |
| Other Features |
39 |
| HP MaxiLife can also be configured to: |
39 |
| • Display the configuration details of your HP Visualize Linux Workstation required to obtain sup... |
39 |
| • Display the configuration details of your HP Visualize Linux Workstation required to obtain sup... |
39 |
| • Indicate POST (Power-On Self Test) steps during the power-on phase |
39 |
| • Perform diagnostic tests on your HP Visualize Linux Workstation’s various hardware components a... |
39 |
| To configure your HP LCD: |
39 |
| 1. Ensure that your HP Visualize Linux Workstation’s power cord is connected to a grounded outlet... |
39 |
| 1. Ensure that your HP Visualize Linux Workstation’s power cord is connected to a grounded outlet... |
39 |
| 2. Press one of the LCD control buttons. The following menu is displayed. |
39 |
| 3. Use |
39 |
| System Info. |
40 |
| System information is displayed on the LCD one screen at a time and should detail the following: |
40 |
| To view these details, use the |
40 |
| Boot Steps |
40 |
| Where available, the |
40 |
| Diags |
40 |
| If your HP Visualize Linux Workstation is powered off when |
40 |
| If your HP Visualize Linux Workstation is already powered on, the diagnostic tests will be perfor... |
40 |
| To view the test results for each system component, press the |
40 |
| If no component errors are detected, the following screen will appear. |
41 |
| If an error is detected, an error screen appears indicating the problem. To continue viewing the ... |
41 |
| When the diagnostic tests are complete, one of the following screens is displayed. |
41 |
| You can exit the test session by pressing the |
41 |
| If Your HP Visualize Linux Workstation Does Not Start Properly |
42 |
| If Your HP Visualize Linux Workstation Does Not Start Properly |
42 |
| Display is Blank and There Are No Error Messages |
42 |
| Display is Blank and There Are No Error Messages |
42 |
| If your display is blank and there are no error messages when you turn on your HP Visualize Linux... |
42 |
| 1. Check the LCD screen (refer to “Using HP MaxiLife to Diagnose Problems”). |
42 |
| 1. Check the LCD screen (refer to “Using HP MaxiLife to Diagnose Problems”). |
42 |
| 2. Check external items. |
42 |
| 3. Check internal items. |
42 |
| Check External Items |
42 |
| Be sure the following external items are functioning properly: |
42 |
| • Check that the computer and display are turned on. (The power light should be illuminated.) |
42 |
| • Check that the computer and display are turned on. (The power light should be illuminated.) |
42 |
| • Check the display’s contrast and brightness settings. |
42 |
| • Make sure that all cables and power cords are firmly plugged in. |
42 |
| • Make sure the power outlet is working. |
42 |
| Check Internal Items |
42 |
| If the HP Visualize Linux Workstation still does not start properly, follow this procedure to che... |
42 |
| 1. Turn off the display, the computer, and all external devices. |
42 |
| 1. Turn off the display, the computer, and all external devices. |
42 |
| 2. Unplug all power cords and cables, noting their positions. Disconnect the HP Visualize Linux W... |
42 |
| 3. Remove the cover and check the following items: |
42 |
| 3. Remove the cover and check the following items: |
42 |
| <TABLE> |
42 |
| <TABLE HEADING> |
42 |
| <TABLE ROW> |
42 |
| LCD Error Messages |
42 |
| Action |
42 |
| Reference |
42 |
| <TABLE BODY> |
42 |
| <TABLE ROW> |
42 |
| Check all internal cables |
42 |
| Ensure they are correctly attached and firmly in place. |
42 |
| <TABLE ROW> |
43 |
| Power CPU 1 Power CPU 2 Power Cache |
43 |
| Check that the processors and VRMs are correctly installed. |
43 |
| Refer to “Installing a Processor” in the Upgrade and Configuration Guide. |
43 |
| <TABLE ROW> |
43 |
| CPU error |
43 |
| Reset the workstation or power-off the LAN. |
43 |
| Refer to “The MaxiLife Control Panel” in Chapter 1 |
43 |
| <TABLE ROW> |
43 |
| No RAM, RAM type |
43 |
| Check that the memory modules are correctly installed. |
43 |
| Refer to “Installing Memory” in the Upgrade and Configuration Guide. |
43 |
| <TABLE ROW> |
43 |
| Check that accessory boards are firmly seated in their slots. |
43 |
| Refer to “Installing Accessory Boards” in the Upgrade and Configuration Guide. |
43 |
| <TABLE ROW> |
43 |
| Verify that any switches and jumpers on the accessory board are properly set. |
43 |
| Refer to the manuals that came with each board. |
43 |
| <TABLE ROW> |
43 |
| Check that the switches on the system board are properly set. |
43 |
| Refer to “System Board Switches in the Upgrade and Configuration Guide. |
43 |
| <TABLE ROW> |
43 |
| Temp disk, Temp CPU Temp IO slot |
43 |
| Check fans and that air flow guide is not blocked. |
43 |
| <TABLE ROW> |
43 |
| Fan CPU, Fan disk Fan IO slot |
43 |
| Check that fans are installed correctly. |
43 |
| <TABLE ROW> |
43 |
| Power supply |
43 |
| Check that power supply is properly connected. |
43 |
| <TABLE ROW> |
43 |
| Power |
43 |
| Check that power supply is properly connected, and that terminators and VRMs are properly installed. |
43 |
| Refer to “Installing a Processor” in the Upgrade and Configuration Guide. |
43 |
| <TABLE ROW> |
43 |
| No video |
43 |
| Check that the video card is properly installed. |
43 |
| Refer to the manual that came with the video card. |
43 |
| <TABLE ROW> |
46 |
| No CPU 1 |
46 |
| Check that boot processor is correctly installed in socket 1. |
46 |
| Refer to “Installing a Processor” in the Upgrade and Configuration Guide. |
46 |
| <TABLE ROW> |
46 |
| CPU Socket 2 |
46 |
| Check that the terminator is correctly installed in socket 2. |
46 |
| <TABLE ROW> |
46 |
| CPU Freq. |
46 |
| Check that the processors installed are the same speed (frequency). |
46 |
| Refer to “Installing a Processor” in the Upgrade and Configuration Guide. |
46 |
| <TABLE ROW> |
46 |
| CPU Type |
46 |
| Check that the processors installed have the same cache voltage. |
46 |
| 4. Replace the cover. |
46 |
| 5. Reconnect all cables and power cords. |
46 |
| 6. Turn on the display and computer. |
46 |
| If Your HP Visualize Linux Workstation Has a Hardware Problem |
47 |
| If Your HP Visualize Linux Workstation Has a Hardware Problem |
47 |
| This section describes what to do if you have problems with your display, keyboard, or mouse. |
47 |
| Display Does Not Work Properly |
47 |
| Display Does Not Work Properly |
47 |
| If Nothing Is Displayed On the Screen |
47 |
| If nothing is displayed on the screen, but the HP Visualize Linux Workstation starts and the keyb... |
47 |
| • Check your HP Visualize Linux Workstation’s LCD screen to help you diagnose the problem. |
47 |
| • Check your HP Visualize Linux Workstation’s LCD screen to help you diagnose the problem. |
47 |
| • Make sure that the display is plugged in and switched ON. |
47 |
| • Check that the brightness and contrast controls are properly set. |
47 |
| • Ensure that the display video cable is correctly connected. |
47 |
| • Switch off the display, and unplug it from the power outlet. |
47 |
| • Disconnect the video cable and examine the video cable connector pins. If the pins are bent, ca... |
47 |
| • Check that the video upgrade is properly installed if you have one. |
47 |
| • If the display works correctly during the Power-On-Self-Test (POST), but goes blank, check that... |
47 |
| • If your screen’s refresh rate is set too high, the screen might be blank. Check the refresh set... |
47 |
| Other Display Problems |
47 |
| If the display image is not aligned with the screen, use the display’s controls to center the ima... |
47 |
| Troubleshooting Accessories on the HP Visualize Linux Workstation |
48 |
| Troubleshooting Accessories on the HP Visualize Linux Workstation |
48 |
| This section describes what you should do if your keyboard or mouse does not work. |
48 |
| If Your Keyboard Does Not Work |
48 |
| If Your Keyboard Does Not Work |
48 |
| • Ensure that the keyboard is correctly connected. |
48 |
| • Ensure that the keyboard is correctly connected. |
48 |
| • If you turn on your HP Visualize Linux Workstation, the operating system boots, and the keyboar... |
48 |
| mouse:troubleshooting;troubleshooting:mouse |
49 |
| mouse:troubleshooting;troubleshooting:mouse |
49 |
| mouse:troubleshooting;troubleshooting:mouse |
49 |
| • Ensure that the mouse is correctly connected. |
49 |
| • Ensure that the mouse is correctly connected. |
49 |
| • Clean the mouse ball and rollers as shown in the figure below (use a non-residual contact clean... |
49 |
| Recovering Your HP Visualize Linux Workstation’s Operating System |
50 |
| Recovering Your HP Visualize Linux Workstation’s Operating System |
50 |
| If, for some reason, you should need to recover your HP Visualize Linux Workstation’s operating s... |
50 |
| support:information services |
51 |
| support:information services |
51 |
| support:information services |
51 |
| Hewlett-Packard:support and information services |
51 |
| Introduction |
52 |
| Introduction |
52 |
| Hewlett Packard computers are engineered for quality and reliability to give you many years of tr... |
52 |
| • HP-Authorized Reseller support |
52 |
| • HP-Authorized Reseller support |
52 |
| • HP Information Service on the World Wide Web |
52 |
| • HP Support Services |
52 |
| • HP Support Services |
52 |
| Technical phone support |
52 |
| Technical phone support |
52 |
| Lifeline phone support |
52 |
| . |
52 |
| NOTE When calling any of the international telephone numbers listed in this chapter, replace the ... |
52 |
| NOTE When calling any of the international telephone numbers listed in this chapter, replace the ... |
52 |
| Your HP-Authorized Reseller |
53 |
| Your HP-Authorized Reseller |
53 |
| HP-Authorized Resellers have been trained on HP Workstation equipment and are familiar with its c... |
53 |
| Authorized HP Resellers can also offer consulting services tailored to your specific needs regard... |
53 |
| Hewlett-Packard:information services |
54 |
| Hewlett-Packard:information services |
54 |
| Hewlett-Packard:information services |
54 |
| information services |
54 |
| Hewlett-Packard Electronic Information Services are available 24�hours a day, 7 days a week, ensu... |
54 |
| HP World Wide Web Site |
54 |
| HP World Wide Web Site |
54 |
| The HP World Wide Web site gives you access to information about HP, its products, including prod... |
54 |
| The Access Guide Directory guides you through the information and services available. |
54 |
| <TABLE> |
54 |
| <TABLE BODY> |
54 |
| <TABLE ROW> |
54 |
| Service |
54 |
| World Wide Web URL |
54 |
| <TABLE ROW> |
54 |
| For product information |
54 |
| http://www.hp.com/visualize/linux |
54 |
| <TABLE ROW> |
54 |
| For service and support information |
54 |
| http://www.hp.com/visualize/support |
54 |
| Hewlett-Packard Telephone Support |
55 |
| Hewlett-Packard Telephone Support |
55 |
| HP North American Customer Support Center |
55 |
| Assistance from the HP North American Customer Support Center is available Monday to Friday, 7:00... |
55 |
| The number is: +1 (970) 635-1000 |
55 |
| HP European Customer Support Center |
55 |
| Assistance from the HP European Customer Support Center is available Monday to Friday, 8:30 am to... |
55 |
| <TABLE> |
55 |
| <TABLE HEADING> |
55 |
| <TABLE ROW> |
55 |
| Country |
55 |
| Language |
55 |
| Local Number |
55 |
| <TABLE BODY> |
55 |
| <TABLE ROW> |
55 |
| United Kingdom |
55 |
| English |
55 |
| 0171 512 5202 |
55 |
| <TABLE ROW> |
55 |
| Ireland |
55 |
| English |
55 |
| 01 662 5525 |
55 |
| <TABLE ROW> |
55 |
| Netherlands |
55 |
| Dutch |
55 |
| 020 606 8751 |
55 |
| <TABLE ROW> |
55 |
| Belgium |
55 |
| Dutch |
55 |
| 02 626 8806 |
55 |
| <TABLE ROW> |
55 |
| French |
55 |
| 02 626 8807 |
55 |
| <TABLE ROW> |
55 |
| Switzerland |
55 |
| French |
55 |
| 084 880 1111 |
55 |
| <TABLE ROW> |
55 |
| German |
55 |
| 084 880 1111 |
55 |
| <TABLE ROW> |
55 |
| Germany |
55 |
| German |
55 |
| 0180 525 8143 |
55 |
| <TABLE ROW> |
55 |
| France |
55 |
| French |
55 |
| 01 43 62 34 34 |
55 |
| <TABLE ROW> |
55 |
| Austria |
55 |
| German |
55 |
| 0660 6386 |
55 |
| <TABLE ROW> |
55 |
| Norway |
55 |
| Norwegian |
55 |
| 22 11 6299 |
55 |
| <TABLE ROW> |
55 |
| Denmark |
55 |
| Danish |
55 |
| 3929 4099 |
55 |
| <TABLE ROW> |
55 |
| Sweden |
55 |
| Swedish |
55 |
| 08 619 2170 |
55 |
| <TABLE ROW> |
55 |
| Italy |
55 |
| Italian |
55 |
| 02 26410350 |
55 |
| <TABLE ROW> |
56 |
| Spain |
56 |
| Spanish |
56 |
| 902 321 123 |
56 |
| <TABLE ROW> |
56 |
| Portugal |
56 |
| Portuguese |
56 |
| 01 441 7199 |
56 |
| Please have the following information ready when you call so that your enquiry can be dealt with ... |
56 |
| • Your HP Visualize Linux Workstation model number and serial number. |
56 |
| • Your HP Visualize Linux Workstation model number and serial number. |
56 |
| • The operating system version and the configuration. |
56 |
| • A description of the software installed and the accessories used. |
56 |
| Lifeline Telephone Support |
57 |
| Lifeline Telephone Support |
57 |
| Lifeline is a fee-based telephone support program for Workstations available after the one-year t... |
57 |
| Your call can either be charged to your phone bill at a per-minute rate or to your credit card (V... |
57 |
| The charge begins AFTER you have been put in contact with a support technician. If your problem i... |
57 |
| In the US please call the appropriate number listed below. |
57 |
| <TABLE> |
57 |
| <TABLE HEADING> |
57 |
| <TABLE ROW> |
57 |
| Number |
57 |
| Method of Payment |
57 |
| Charge Type |
57 |
| <TABLE BODY> |
57 |
| <TABLE ROW> |
57 |
| 1 (900) 555-1500 |
57 |
| Charged to phone bill |
57 |
| per-minute rate |
57 |
| <TABLE ROW> |
57 |
| 1 (800) 999-1148 |
57 |
| Charged to credit card |
57 |
| Flat fee |
57 |
| In Europe, please call the telephone support center (+44 171 512 5202). |
57 |
| Free access to HP information services is not affected by this service. You are encouraged to acc... |
57 |
| Summary |
58 |
| Summary |
58 |
| The table below summarizes the services and support available from HP or authorized resellers. |
58 |
| <TABLE> |
58 |
| <TABLE HEADING> |
58 |
| <TABLE ROW> |
58 |
| Service |
58 |
| Covers |
58 |
| Period covered |
58 |
| Response time |
58 |
| Fee |
58 |
| When available |
58 |
| Purchase from |
58 |
| <TABLE BODY> |
58 |
| <TABLE ROW> |
58 |
| Basic Warranty |
58 |
| Parts and labor for HP products: first year on-site parts & labor; second and third year parts only. |
58 |
| Three years from date of purchase. |
58 |
| Next working day for on-site. |
58 |
| No charge. |
58 |
| At time of purchase. |
58 |
| HP |
58 |
| <TABLE ROW> |
58 |
| Technical Phone support |
58 |
| Basic assistance for Workstation setup, configuration, start-up and hardware diagnostics. |
58 |
| First year. |
58 |
| Business hours. |
58 |
| No charge. |
58 |
| At time of purchase. |
58 |
| HP |
58 |
| <TABLE ROW> |
58 |
| Lifeline phone support |
58 |
| Basic assistance for Workstation setup, configuration, start-up and hardware diagnostics. |
58 |
| After first year. |
58 |
| Business hours. |
58 |
| Per-call fee, no time limit. |
58 |
| Anytime after first year. |
58 |
| HP |
58 |
| <TABLE ROW> |
58 |
| Service Contracts |
58 |
| Technical Support. |
58 |
| Customer defined. |
58 |
| As required. |
58 |
| Annual fee, or fee per incident. |
58 |
| Anytime. |
58 |
| Reseller. |
58 |
| A� Regulatory Information and Warranty |
59 |
| A� Regulatory Information and Warranty |
59 |
| This section contains all Regulatory and Warranty Information. |
59 |
| This section contains all Regulatory and Warranty Information. |
59 |
| Declaration of Conformity |
60 |
| Declaration of Conformity |
60 |
| according to ISO/IEC Guide 22 and EN 45014 |
60 |
| Regulatory Information |
61 |
| Regulatory Information |
61 |
| FCC (for USA only) |
61 |
| FCC (for USA only) |
61 |
| Federal Communications Commission Radio Frequency Interference Statement Warning: This equipment ... |
61 |
| Notice for Canada |
61 |
| This Class B digital apparatus meets all requirements of the Canadian Interference-Causing Equipm... |
61 |
| Safety Warning for the USA and Canada |
61 |
| If the power cord is not supplied with the computer, select the proper power cord according to yo... |
61 |
| For your safety, never remove the PC’s cover without first removing the power cord and any connec... |
62 |
| Si le cordon secteur n’est pas livré avec votre ordinateur, utiliser un cordon secteur en accord ... |
62 |
| Pour votre sécurité, ne jamais retirer le capot de l’ordinateur sans avoir préalablement débranch... |
62 |
| Notice for the United Kingdom |
62 |
| The HP Visualize Personal Workstations are approved under approval number NS/G/1234/J/100003 for ... |
62 |
| <GRAPHIC> |
62 |
| <GRAPHIC> |
62 |
| Bij dit apparaat zijn batterijen geleverd. Wanneer deze leeg zijn, moet U ze niet weggooien maar ... |
62 |
| Notice for Germany |
62 |
| Wenn die Batterie nicht korrekt eingebaut wird, besteht Explosionsgefahr. Zu ihrer eigenen Sicher... |
62 |
| Noise Declaration for Germany |
62 |
| Lärmangabe nach Maschinenlärmverordnung - 3 GSGV (Deutschland) LpA < 70 db am Arbeitsplatz normal... |
62 |
| Notice for Japan |
63 |
| This equipment is in the Class B category information technology equipment based on the rules of ... |
63 |
| Notice for Korea |
63 |
| Recycling Your PC |
63 |
| HP has a strong commitment toward the environment. Your HP Personal Computer has been designed to... |
63 |
| HP can also take your old PC back for recycling when it reaches the end of its useful life. |
63 |
| HP has a product take-back program in several countries. The collected equipment is sent to one o... |
63 |
| If you require more details about HP’s product take-back program, contact your dealer or your nea... |
63 |
| HP Hardware Warranty |
64 |
| HP Hardware Warranty |
64 |
| Important: This is your hardware product warranty statement. Please, read it carefully. |
64 |
| Three Year Limited Hardware Warranty |
64 |
| Three Year Limited Hardware Warranty |
64 |
| Hewlett-Packard (HP) warrants this hardware product against defects in materials and workmanship ... |
64 |
| Limitation of Warranty |
65 |
| Limitation of Warranty |
65 |
| Warranty does not apply to defects resulting from (a) improper or inadequate maintenance or calib... |
65 |
| TO THE EXTENT ALLOWED BY LOCAL LAW, THE ABOVE WARRANTIES ARE EXCLUSIVE AND NO OTHER WARRANTY OR C... |
65 |
| Obtaining On-Site Warranty Service |
66 |
| Obtaining On-Site Warranty Service |
66 |
| To obtain on-site warranty service, the customer must contact an HP Sales and Service Office (in ... |
66 |
| During the on-site warranty period, customer-replaceable components may be serviced through exped... |
66 |
| Customer Responsibilities |
67 |
| Customer Responsibilities |
67 |
| The customer may be required to run HP-supplied diagnostic programs before an on-site visit or re... |
67 |
| Obtaining Parts Warranty Service |
67 |
| Obtaining Parts Warranty Service |
67 |
| When parts warranty service applies, the customer may be required to run HP-supplied diagnostic p... |
67 |
| HP Telephone Support Services |
67 |
| HP Telephone Support Services |
67 |
| HP Free telephone support for your Personal Workstation is available during the first year from d... |
67 |
| (Rev. 17/03/98) |
68 |
| HP Software Product License Agreement and Software Product Limited Warranty |
68 |
| HP Software Product License Agreement and Software Product Limited Warranty |
68 |
| YOUR HP VISUALIZE PERSONAL WORKSTATION CONTAINS PREINSTALLED SOFTWARE PROGRAMS. PLEASE READ THE S... |
68 |
| HP Software Product License Agreement |
68 |
| HP Software Product License Agreement |
68 |
| The HP Visualize Workstation contains (a) the Red Hat Linux operating system and (b) additional s... |
68 |
| No Disassembly or Decryption. You may not disassemble or decompile the Software without HP’s prio... |
69 |
| HP Software Product Warranty |
70 |
| HP Software Product Warranty |
70 |
| A. Linux Operating System. |
70 |
| B. HP Software. HP warrants for a period of NINETY (90) DAYS after the date of purchase that HP s... |
70 |
| Notice of Warranty Claims. Customer must notify HP in writing of any warranty claim not later tha... |
70 |
| Limitation of Warranty. TO THE EXTENT ALLOWED BY LOCAL LAW, THE ABOVE WARRANTIES ARE EXCLUSIVE AN... |
70 |
| Index |
73 |
| Numerics |
74 |
| A |
74 |
| B |
74 |
| C |
74 |
| D |
74 |
| E |
74 |
| H |
74 |
| I |
74 |
| K |
74 |
| L |
74 |
| M |
75 |
| N |
75 |
| O |
75 |
| P |
75 |
| R |
75 |
| S |
75 |
| T |
75 |
| U |
76 |

 1
1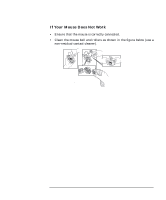 49
49 50
50 51
51 52
52 53
53 54
54 55
55 56
56 57
57 58
58 59
59

