HP Xw6200 User Manual for Integrated Intel SATA RAID for Windows XP and Window - Page 2
Integrated SATA RAID controller
 |
UPC - 882780333536
View all HP Xw6200 manuals
Add to My Manuals
Save this manual to your list of manuals |
Page 2 highlights
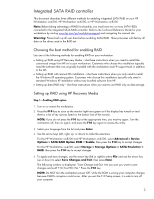
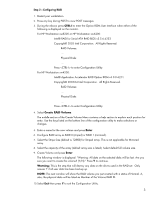
Integrated SATA RAID controller This document describes three different methods for enabling integrated SATA RAID on your HP Workstation xw4200, HP Workstation xw6200, or HP Workstation xw8200. Note: Before taking advantage of RAID functionality, you must have two or more SATA HDDs connected to the integrated SATA RAID controller. Refer to the Technical Reference Guide for your workstation by visiting www.hp.com/go/workstationsupport and navigating the manual site. Warning: Please back up all user data before enabling SATA RAID. These processes will destroy all data on the drives used in the RAID set. Choosing the best method for enabling RAID Use one of the following methods for enabling RAID on your workstation. • Setting up RAID using HP Recovery Media-Use these instructions when you need to install the customized image from HP on to your workstation. Customers who choose this installation typically need the software that was originally bundled with the workstation and HP support tools in addition to the OS. • Setting up RAID with manual OS installation-Use these instructions when you only need to install the Windows XP operating system. Customers who choose this installation typically only need a standard Windows XP installation without any bundled software from HP. • Setting up data RAID only-Use these instructions when you want to use RAID only as data storage. Setting up RAID using HP Recovery Media Step 1-Enabling RAID option 1. Turn on or restart the workstation. 2. Press the F10 key as soon as the monitor light turns green or if the display has turned on and there is a list of key options listed on the bottom line of the monitor. NOTE: If you do not press the F10 key at the appropriate time, you must try again. Turn the workstation off, then on again, and press the F10 key again to access the utility. 3. Select your language from the list and press Enter. 4. Use the arrow keys (left, right, up, or down) to make the selections. For the HP Workstation xw8200 and HP Workstation xw6200, select Advanced > Device Options > SATA RAID Option ROM = Enable, then press the F10 key to accept changes. For the HP Workstation xw4200, select Storage > Storage Options > SATA Emulation = RAID, then press the F10 key to accept changes. 5. To apply and save changes, use the arrow key (left or right) to select File and use the arrow key (up or down) to select Save Changes and Exit, then press Enter. The following window is displayed: "Save Change and Exit. Are you sure you want to save changes and exit? F10=Yes ESC=No." Press the F10 key. NOTE: Do NOT turn the workstation power OFF while the ROM is saving your computer changes because CMOS corruption could occur. After you exit the F10 Setup screen, it is safe to turn off your computer. 2
-
 1
1 -
 2
2 -
 3
3 -
 4
4 -
 5
5 -
 6
6 -
 7
7 -
 8
8 -
9
-
10
 |
 |