HP Z200 HP SATA/SAS Hard Drive and Solid State Drive Installation - Page 5
Computers with carrier rails that snap onto the hard drive, To attach the rails to the hard drive
 |
View all HP Z200 manuals
Add to My Manuals
Save this manual to your list of manuals |
Page 5 highlights
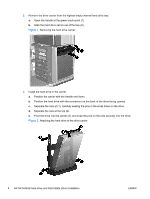
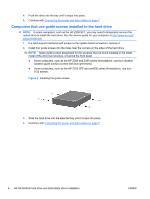
4. Slide the drive carrier firmly into the hard drive bay, rotating the handle to snap it closed. 5. Power and data connectors are pre-installed at the back of the bay. SAS-to-SATA adapters or additional power and data connections are not required. ● The blind-mate data cables might require adjustment at the system board, based on the computer drive configuration. Verify that the blind-mate cable from the applicable hard drive bay is connected to an appropriate connector in the system board. NOTE: The pre-installed blind-mate data cables for workstations with both SATA and SAS connectors on the system board are factory-configured according to the following rules: • The primary hard drive is connected to the system board connector labeled SATA-0 or SAS-0, depending on hard drive type. • SATA hard drives are plugged into SATA ports, starting with SATA-0. • SAS hard drives are plugged into SAS ports, starting with SAS-0. • If the LAST HDD is SATA, cables from empty HDD bays are plugged into SATA ports. If the LAST hard drive is SAS, cables from empty hard drive bays are plugged into SAS ports. ● When mixing SATA and SAS hard drive types, verify that the hard drive data cable is connected to the system board in a manner consistent with the drive type and rules above. Computers with carrier rails that snap onto the hard drive 1. Select an empty hard drive bay. 2. To remove the green rails from the empty bay, squeeze the green tabs and slide the rails out of the bay. 3. To attach the rails to the hard drive: a. Gently open the rails (1). b. The connectors on the rear of the drive should face toward the tabs on the carrier rails. Lower the drive into the rails (2). c. Align the four carrier pins with the holes in the hard drive, and snap the rails into place (3). Figure 3 Installing the hard drive in the rails ENWW Step 2-Preparing and installing the hard drive 5
-
 1
1 -
 2
2 -
 3
3 -
 4
4 -
 5
5 -
 6
6 -
 7
7 -
 8
8
 |
 |
