HP Z600 HP Z Series Workstations - HP Optical Bay Hard Drive Bracket Installat
HP Z600 - Workstation - 6 GB RAM Manual
 |
UPC - 884962074053
View all HP Z600 manuals
Add to My Manuals
Save this manual to your list of manuals |
HP Z600 manual content summary:
- HP Z600 | HP Z Series Workstations - HP Optical Bay Hard Drive Bracket Installat - Page 1
pre-mounted in a 3.5-inch adapter. Kit contents ● HP optical bay hard drive bracket ● Four M3 guide screws ● Warranty information System requirements ● Available optical bay position ● One unused port connector for each hard drive being installed Before you begin To view QuickSpecs and determine the - HP Z600 | HP Z Series Workstations - HP Optical Bay Hard Drive Bracket Installat - Page 2
, be sure you discharge static electricity by briefly touching a grounded metal object. CAUTION: To prevent damage to the workstation, observe the following Electrostatic Discharge (ESD) precautions while performing the system parts removal and replacement procedures: - Work on a static-free - HP Z600 | HP Z Series Workstations - HP Optical Bay Hard Drive Bracket Installat - Page 3
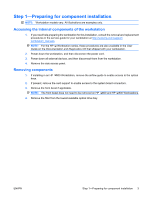
in the service guide for your workstation at http://www.hp.com/support/ workstation_manuals. NOTE: For the HP Workstation series, these procedures are also available in the User Guide on the Documentation and Diagnostics CD that shipped with your workstation. 2. Power down the workstation, and then - HP Z600 | HP Z Series Workstations - HP Optical Bay Hard Drive Bracket Installat - Page 4
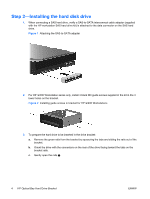
interconnect cable adapter (supplied with the HP workstation SAS hard drive kit) is attached to the data connector on the SAS hard drive. Figure 1 Attaching the SAS-to-SATA adapter 2. For HP 400 Workstation series only, install 4 black M3 guide screws suppled in the kit in the 4 lower holes on the - HP Z600 | HP Z Series Workstations - HP Optical Bay Hard Drive Bracket Installat - Page 5
d. Lower the drive into the rails 2. e. Align the four pins on the rails with the holes in the hard drive, and then snap the rails into place . Figure 3 Installing the drive in the rails 4. To install the hard drive in the drive bracket, gently squeeze the green tabs while sliding the drive with - HP Z600 | HP Z Series Workstations - HP Optical Bay Hard Drive Bracket Installat - Page 6
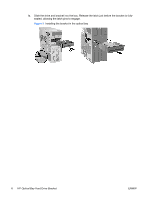
b. Slide the drive and bracket into the bay. Release the latch just before the bracket is fullyseated, allowing the latch pins to engage. Figure 5 Installing the bracket in the optical bay 6 HP Optical Bay Hard Drive Bracket ENWW - HP Z600 | HP Z Series Workstations - HP Optical Bay Hard Drive Bracket Installat - Page 7
supplied with the hard drive kit that best fits the hardware configuration of the workstation. 3. Connect one end of the data cable to the hard drive 2. 4. Connect the opposite end of the data cable to the system board or compatible RAID controller card. Always start with the lowest numbered port - HP Z600 | HP Z Series Workstations - HP Optical Bay Hard Drive Bracket Installat - Page 8
the card support, if applicable. 3. Reinstall the airflow guide, if applicable. 4. Reinstall the side access panel. 5. Reconnect power to the workstation and all external devices. 6. Restore power to the workstation and all external devices. Step 5-Setting up the operating system When powering up
-
 1
1 -
 2
2 -
 3
3 -
 4
4 -
 5
5 -
 6
6 -
 7
7 -
8
 |
 |

HP Optical Bay Hard Drive Bracket
Introduction
This document describes how to install 8.89 cm (3.5 inch) hard drives in the HP optical bay hard drive
bracket and install the bracket in the optical drive bay of an HP
Workstation. This bracket may also
be used for small form factor (SFF) drives pre-mounted in a 3.5-inch adapter.
Kit contents
●
HP optical bay hard drive bracket
●
Four M3 guide screws
●
Warranty information
System requirements
●
Available optical bay position
●
One unused port connector for each hard drive being installed
Before you begin
To view
QuickSpecs
and determine the compatibility of this product with your HP workstation, see
go/productbulletin
.
© 2009 Hewlett-Packard Development Company, L.P. Printed in the U.S.
ENWW
Introduction
1