HP Z600 HP Z Series Workstations - HP Optical Bay Hard Drive Bracket Installat - Page 4
Step 2-Installing the hard disk drive - rail kit
 |
UPC - 884962074053
View all HP Z600 manuals
Add to My Manuals
Save this manual to your list of manuals |
Page 4 highlights
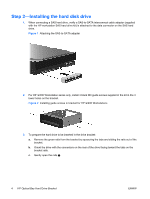
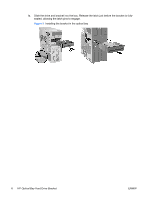
Step 2-Installing the hard disk drive 1. When connecting a SAS hard drive, verify a SAS-to-SATA interconnect cable adapter (supplied with the HP workstation SAS hard drive kit) is attached to the data connector on the SAS hard drive. Figure 1 Attaching the SAS-to-SATA adapter 2. For HP 400 Workstation series only, install 4 black M3 guide screws suppled in the kit in the 4 lower holes on the bracket. Figure 2 Installing guide screws in bracket for HP 400 Workstations 3. To prepare the hard drive to be inserted in the drive bracket: a. Remove the green rails from the bracket by squeezing the tabs and sliding the rails out of the bracket. b. Orient the drive with the connectors on the rear of the drive facing toward the tabs on the bracket rails. c. Gently open the rails . 4 HP Optical Bay Hard Drive Bracket ENWW
-
 1
1 -
 2
2 -
 3
3 -
 4
4 -
 5
5 -
 6
6 -
 7
7 -
 8
8
 |
 |
