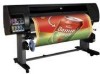
HP Z6100ps HP Designjet Z6100 Printer Series - Setup Poster (60 inch)
HP Z6100ps - DesignJet Color Inkjet Printer Manual
 |
UPC - 882780990135
View all HP Z6100ps manuals
Add to My Manuals
Save this manual to your list of manuals |
HP Z6100ps manual content summary:
- HP Z6100ps | HP Designjet Z6100 Printer Series - Setup Poster (60 inch) - Page 1
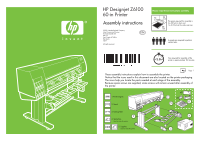
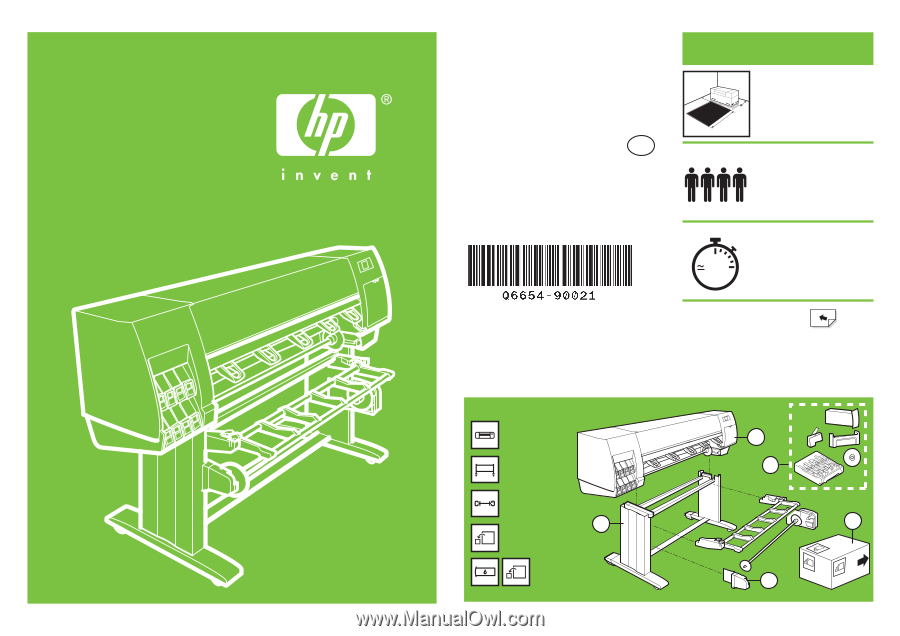
HP Designjet Z6100 60-in Printer Assembly instructions ©2007 Hewlett-Packard Company. Inkjet Commercial Division Avenida Graells 501 08174 Sant Cugat del Vallès, Barcelona Spain All rights reserved. EN Please read these instructions carefully 1m 3.5ft 1m 3.5ft 3m 10ft The space required for - HP Z6100ps | HP Designjet Z6100 Printer Series - Setup Poster (60 inch) - Page 2
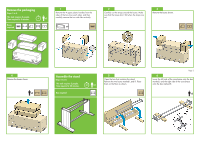
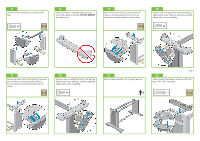
Remove the packaging Steps 1 to 4. This task requires 2 people. Time required is 5 minutes. 5' x2 Boxes required 1 Remove the 4 upper plastic handles from the sides of the box (two each side), and then carefully remove the two side lids vertically. x4 2 Carefully cut the straps around the - HP Z6100ps | HP Designjet Z6100 Printer Series - Setup Poster (60 inch) - Page 3
the bag of screws and the screwdriver provided. Notice that the screwdriver is slightly magnetic. Because spare screws are supplied, some screws will remain unused after assembly of the printer. 8 Remove the left leg from the box, and then remove the two pieces inside the leg. 9 Lower the left - HP Z6100ps | HP Designjet Z6100 Printer Series - Setup Poster (60 inch) - Page 4
15 Use four screws to attach the cross-bar to the legs. x4 16 Notice that there is anti-slip material around two of the wheels on the feet. DO NOT REMOVE this material yet. 17 Place a foot on the left leg. There are pins to help you correctly position the foot. Do not remove the anti-slip material - HP Z6100ps | HP Designjet Z6100 Printer Series - Setup Poster (60 inch) - Page 5
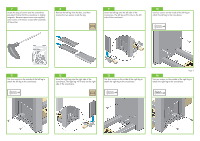
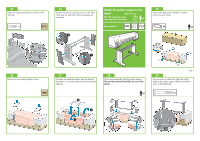
. x1 24 Position the left and right leg covers on the front of the legs (1), and then clip the rear edge (2) into place. 2 Attach the printer engine to the stand Steps 25 to 37. This task requires 4 people. Time required is 15 minutes. 15' x4 Boxes required 25 Remove the eight - HP Z6100ps | HP Designjet Z6100 Printer Series - Setup Poster (60 inch) - Page 6
-slip material touch the floor. x4 34 Remove the pallet before lifting the printer to its upright position. x2 35 Use the hand holds at the rear of the printer engine to carefully lift the printer to its upright position. HP recommends four people to complete this task. x4 36 Remove the two foam - HP Z6100ps | HP Designjet Z6100 Printer Series - Setup Poster (60 inch) - Page 7
pull the take-up reel motor down so that it rests securely on the screws. 42 Use two screws to attach the rear of the take-up reel motor to the to connect the take-up reel motor to the parallel port at the rear of the printer. Page 7 44 Identify the three holes on the inside of the left leg. The - HP Z6100ps | HP Designjet Z6100 Printer Series - Setup Poster (60 inch) - Page 8
the left side assembly, and then tighten all three screws. x1 48 Use four screws to attach the take-up reel deflector supports. x4 x2 49 IMPORTANT Move the printer to its final location. 50 Move the front right wheel so that it faces forward (B), and then lock the wheel. 51 Slide - HP Z6100ps | HP Designjet Z6100 Printer Series - Setup Poster (60 inch) - Page 9
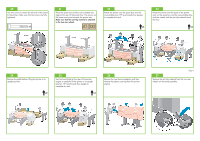
side of the deflector into the right deflector support. 57 Carefully lift the central core tube. The central core tube contains the take-up reel spindle. 58 Remove the take-up reel spindle from the core. 59 Remove the two take-up reel hubs. 60 Loosen the plastic nut on the black - HP Z6100ps | HP Designjet Z6100 Printer Series - Setup Poster (60 inch) - Page 10
-up reel by pushing the spindle lever to its upper most position. 67 Load the take-up reel spindle into the printer by pushing firmly on each end of the spindle. Page 10 68 See the HP Start-Up Kit CD/DVD for information about how to use the take-up reel. - HP Z6100ps | HP Designjet Z6100 Printer Series - Setup Poster (60 inch) - Page 11
supplies box. Attach the Quick Reference Guide holder by angling the holder forward at the top (1), positioning the two hooks, and then ''clicking'' the lower part (2) to the rear of the printer. 73 Plug the Gigabit Ethernet cable into the Gigabit Ethernet connection. 70 Open the printer window - HP Z6100ps | HP Designjet Z6100 Printer Series - Setup Poster (60 inch) - Page 12
rear of the printer. 77 If the power light on the front panel remains off, press the Power button to switch on the printer. 78 Wait until 1' 79 Wait until this message appears. The front panel guides you through the procedures for inserting the ink supplies. 80 To release the ink cartridge drawer - HP Z6100ps | HP Designjet Z6100 Printer Series - Setup Poster (60 inch) - Page 13
the maintenance cartridge, pushing it in and down until it clicks into place, and then close the maintenance cartridge door. 89 Wait until this message appears on the front panel (about 1 minute). 1' Page 13 90 Open the printer window, and then remove the packing foam from the top of the printhead - HP Z6100ps | HP Designjet Z6100 Printer Series - Setup Poster (60 inch) - Page 14
all of the printheads vertically into their correct positions. The printer "beeps" when each printhead is correctly inserted. Page 14 98 Make sure that the printheads are correctly seated. When all of the printheads are inserted, the front panel prompts you to "Close printhead cover and window". - HP Z6100ps | HP Designjet Z6100 Printer Series - Setup Poster (60 inch) - Page 15
the printheads. If the problem persists, refer to the HP Start-Up Kit CD/DVD. 100 Close the carriage assembly cover. 101 Lower and lock the blue latch. Make sure that the blue latch is correctly engaged, and then lower the latch. 102 Close the printer window. 103 Wait until the Ready for paper - HP Z6100ps | HP Designjet Z6100 Printer Series - Setup Poster (60 inch) - Page 16
remove the blue hub from the left end of the spindle. Keep the spindle horizontal. 107 Place one of the two rolls of paper that came with your printer in the middle of the take-up reel deflector. 108 Make sure that the black hub on the right side of the spindle - HP Z6100ps | HP Designjet Z6100 Printer Series - Setup Poster (60 inch) - Page 17
114 Open the printer window. 115 Lift the paper-load lever. 116 Pull out approximately 1m (3 feet) of paper to avoid back tension on the spindle, which can cause difficulties when loading the paper into the printer. 117 Insert the lead-edge of the paper into the printer, above the black roller. - HP Z6100ps | HP Designjet Z6100 Printer Series - Setup Poster (60 inch) - Page 18
and performs a color calibration for the paper that you loaded into the printer. During the process, the printer advances the paper up to 3 m (~10 feet) before printing. 20' Macintosh users must wait for the printhead alignment. Windows users can proceed with software installation. Page - HP Z6100ps | HP Designjet Z6100 Printer Series - Setup Poster (60 inch) - Page 19
Install the software This task requires 1 person. Time required is 15 minutes. Box required 15' x1 The assembly of your printer is complete. The following pages describe how to configure your computer for successful printing. Mac OS page 20 Windows page 21 Page 19 - HP Z6100ps | HP Designjet Z6100 Printer Series - Setup Poster (60 inch) - Page 20
, and then look for the 'Mac OS X HP Designjet Installer' icon. 5. When the software has been installed, the HP Printer Setup Assistant starts automatically to help you set up a connection to your printer. Follow the onscreen instructions. 6. In the HP Printer Setup Assistant, click the Continue - HP Z6100ps | HP Designjet Z6100 Printer Series - Setup Poster (60 inch) - Page 21
is connected, select Wired Networking. • Verify that the network settings are correct for the printer that you selected. • Select your printer from the list. If you have more than one HP Designjet Z6100 printer connected to the network, use the IP address that you noted earlier to confirm that - HP Z6100ps | HP Designjet Z6100 Printer Series - Setup Poster (60 inch) - Page 22
numerous paper types available for your printer. To use HP Color Center, you must first install it. Follow the instructions in your product installation CD/DVD. To access HP Color Center in Windows, double-click the following icon, which is on your computer desktop. To access HP Color Center in Mac
-
 1
1 -
 2
2 -
 3
3 -
 4
4 -
 5
5 -
 6
6 -
 7
7 -
8
-
9
-
10
-
11
-
12
-
13
-
14
-
15
-
16
-
17
-
18
-
19
-
20
-
21
-
22
 |
 |
1m
3.5ft
1m
3.5ft
3m
10ft
HP Designjet Z6100
60-in Printer
©2007 Hewlett-Packard Company.
Inkjet Commercial Division
Avenida Graells 501
08174
Sant Cugat del Vallès,
Barcelona
Spain
All rights reserved.
Assembly instructions
Please read these instructions carefully
Time required for assembly of the
printer is approximately 160 minutes.
4 people are required to perform
certain tasks.
These assembly instructions explain how to assemble the printer.
Notice that the icons used in this document are also located on the printer packaging.
The icons help you locate the parts needed at each stage of the assembly.
Because spare screws are supplied, some screws will remain unused after assembly of
the printer.
1. Printer engine.
2. Stand.
3. Take-up Reel.
5. Supplies.
Used to rotate the printer.
EN
5
2
3
4
1
x8
x8
Page 1
4. Spare box.
Used to rotate the printer.
The space required for assembly is
3m (10 feet) in front and
1m (3.5 feet) at the sides and rear.
2.5h