HP rp7405 nPartition Administrator's Guide, Second Edition - Page 221
DIMMDEALLOC, REBOOT, dimmconfig, Procedure 7-15 Configuring and Deconfiguring Memory EFI Shell
 |
View all HP rp7405 manuals
Add to My Manuals
Save this manual to your list of manuals |
Page 221 highlights
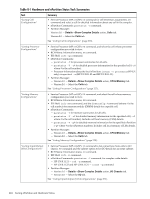
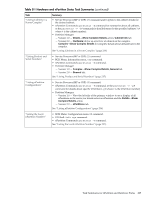
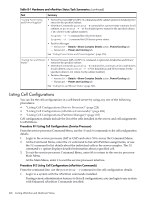
1. Access the BCH Main Menu for the nPartition whose memory you want to configure or deconfigure. Login to the service processor (MP or GSP) and enter CO to access the Console list. Select the nPartition console. When accessing the console, confirm that you are at the BCH Main Menu (the Main Menu: Enter command or menu> prompt). If at a BCH menu other than the Main Menu, then enter MA to return to the BCH Main Menu. 2. Enter SER to access the BCH Service Menu. 3. From the Service Menu, use the DIMMDEALLOC command to list the current configurations of memory modules (DIMMs) in the cells assigned to the local nPartition. Also use the DIMMDEALLOC command to configure and deconfigure DIMMs for cells in the local nPartition. NOTE: When you deallocate a DIMM, all other DIMMs in the rank or echelon also will not be used the next time the nPartition boots. Enter DIMMDEALLOC with no arguments to list the current DIMM configurations for all cells in the local nPartition. DIMMDEALLOC cell dimm OFF deconfigures the specified DIMM (dimm) on the cell (cell) indicated. DIMMDEALLOC cell dimm ON configures the DIMM on the cell. Use DIMMDEALLOC cell to display the DIMM configuration for a cell. Enter HELP DIMMDEALLOC for details. 4. Reboot the nPartition using the REBOOT command. Whenever changing memory configurations you must reboot the corresponding nPartition to allow the configuration changes to take place. 5. Exit the console and service processor interfaces if finished using them. To exit the BCH environment type ^B (Control-B); this exits the nPartition console and returns to the service processor Main Menu. To exit the service processor, type X at the Main Menu. Procedure 7-15 Configuring and Deconfiguring Memory (EFI Shell) From the EFI Shell environment, use the dimmconfig command to configure or deconfigure memory modules (DIMMs) in cells assigned to the local nPartition. The EFI Shell is available only on HP Integrity systems. 1. Access the EFI Shell environment for the nPartition whose memory you want to configure or deconfigure. Login to the service processor (MP or GSP) and enter CO to access the Console list. Select the nPartition console. When accessing the console, confirm that you are at the EFI Boot Manager menu (the main EFI menu). If at another EFI menu, select the Exit option from the sub-menus until you return to the screen with the EFI Boot Manager heading. From the EFI Boot Manager menu, select the EFI Shell menu option to access the EFI Shell environment. 2. Enter the dimmconfig command with no arguments to list a current summary of the memory configuration for the local nPartition. 3. Use the dimmconfig command to change memory configurations for any of the cells assigned to the local nPartition. Configuring and Deconfiguring Memory (DIMMs) 221
-
 1
1 -
2
-
3
-
4
-
5
-
6
-
7
-
8
-
9
-
10
-
11
-
12
-
13
-
14
-
15
-
16
-
17
-
18
-
19
-
20
-
21
-
22
-
23
-
24
-
25
-
26
-
27
-
28
-
29
-
30
-
31
-
32
-
33
-
34
-
35
-
36
-
37
-
38
-
39
-
40
-
41
-
42
-
43
-
44
-
45
-
46
-
47
-
48
-
49
-
50
-
51
-
52
-
53
-
54
-
55
-
56
-
57
-
58
-
59
-
60
-
61
-
62
-
63
-
64
-
65
-
66
-
67
-
68
-
69
-
70
-
71
-
72
-
73
-
74
-
75
-
76
-
77
-
78
-
79
-
80
-
81
-
82
-
83
-
84
-
85
-
86
-
87
-
88
-
89
-
90
-
91
-
92
-
93
-
94
-
95
-
96
-
97
-
98
-
99
-
100
-
101
-
102
-
103
-
104
-
105
-
106
-
107
-
108
-
109
-
110
-
111
-
112
-
113
-
114
-
115
-
116
-
117
-
118
-
119
-
120
-
121
-
122
-
123
-
124
-
125
-
126
-
127
-
128
-
129
-
130
-
131
-
132
-
133
-
134
-
135
-
136
-
137
-
138
-
139
-
140
-
141
-
142
-
143
-
144
-
145
-
146
-
147
-
148
-
149
-
150
-
151
-
152
-
153
-
154
-
155
-
156
-
157
-
158
-
159
-
160
-
161
-
162
-
163
-
164
-
165
-
166
-
167
-
168
-
169
-
170
-
171
-
172
-
173
-
174
-
175
-
176
-
177
-
178
-
179
-
180
-
181
-
182
-
183
-
184
-
185
-
186
-
187
-
188
-
189
-
190
-
191
-
192
-
193
-
194
-
195
-
196
-
197
-
198
-
199
-
200
-
201
-
202
-
203
-
204
-
205
-
206
-
207
-
208
-
209
-
210
-
211
-
212
-
213
-
214
-
215
-
 216
216 -
 217
217 -
 218
218 -
 219
219 -
 220
220 -
 221
221 -
 222
222 -
 223
223 -
 224
224 -
 225
225 -
 226
226 -
227
-
228
-
229
-
230
-
231
-
232
-
233
-
234
-
235
-
236
-
237
-
238
-
239
-
240
-
241
-
242
-
243
-
244
-
245
-
246
-
247
-
248
-
249
-
250
-
251
-
252
-
253
-
254
-
255
-
256
-
257
-
258
-
259
-
260
-
261
-
262
-
263
-
264
-
265
-
266
 |
 |
