Hitachi 55HDT51 Owners Guide - Page 31
AV NET button, NOTES
 |
View all Hitachi 55HDT51 manuals
Add to My Manuals
Save this manual to your list of manuals |
Page 31 highlights
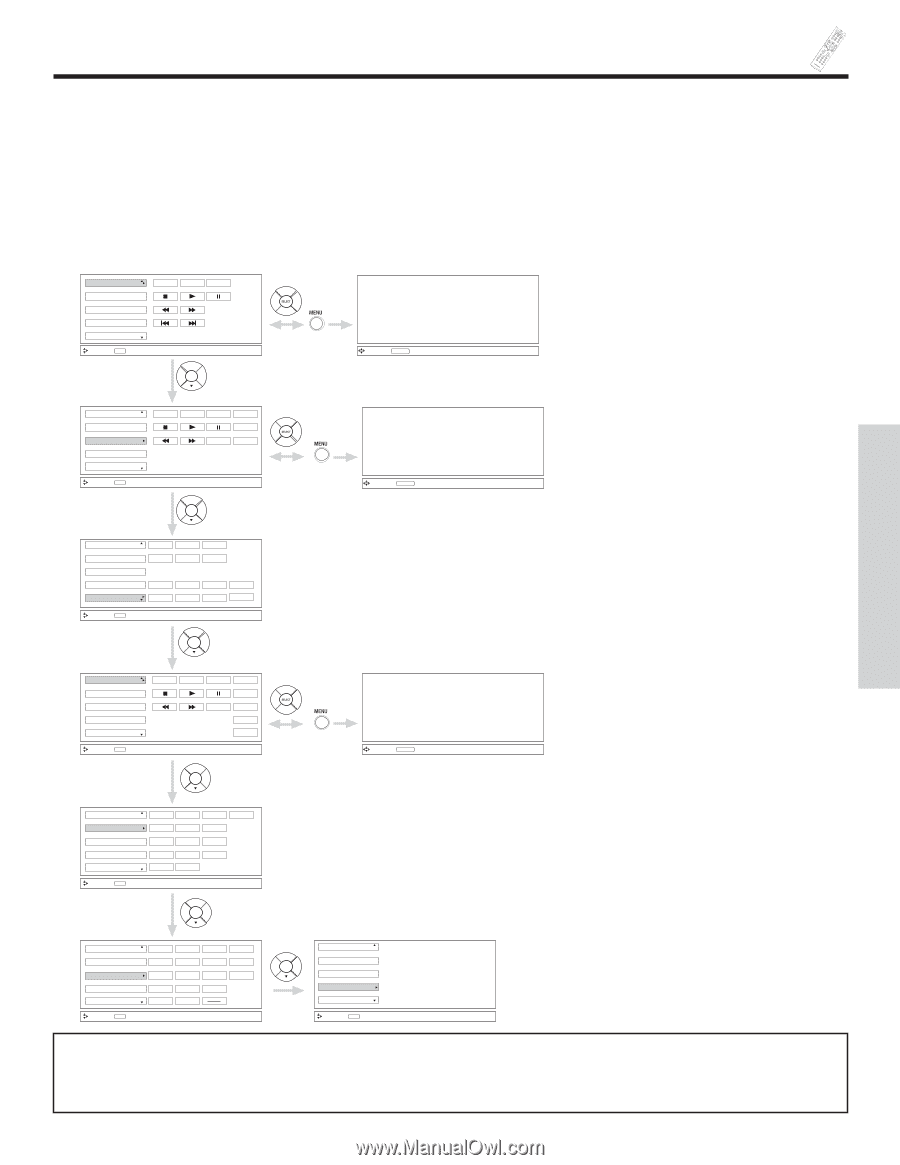
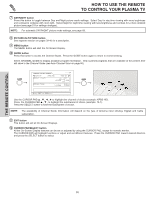
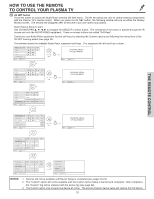
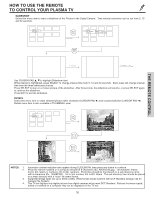
HOW TO USE THE REMOTE TO CONTROL YOUR PLASMA TV ቯ AV NET button Press this button to access the Audio/Video network (AV Net) menu. The AV Net allows the user to control external components with the Plasma TV's remote control. When you press the AV NET button, the following window will pop up within the Display Monitor screen. The window will disappear after 30 seconds if you don't press any buttons. Select Device Setup to start. Use CURSOR PAD to navigate and SELECT to select button. The command on the button is passed through the IR mouse and onto the AUDIO/VIDEO equipment. These on-screen buttons are called "Soft Keys". Customize your Audio/Video equipment list and soft keys by selecting the Custom options and following the instructions of the AV NET learning wizard (see page 32). This window shows the available Audio/Video equipment soft keys. The equipment list will scroll up or down. DVD DVD2 VCR VCR2 AV Receiver POWER Move SEL Select MENU MORE MORE.. ORIGINAL MENU OF EQUIPMENT Move AV NET Return 2x DVD DVD2 VCR VCR2 AV Receiver POWER CH ̄ CH ̆ MENU TV/VCR b MORE Move SEL Select MORE.. 2x DVD DVD2 VCR VCR2 AV Receiver POWER CH ̄ CH ̆ AUDIO VOL ̄ VOL ̆ Inputs: SOURCE1 SOURCE2 SOURCE3 SOURCE4 SOURCE5 SOURCE6 SOURCE7 SOURCE8 Move SEL Select ORIGINAL MENU OF EQUIPMENT Move AV NET Return THE REMOTE CONTROL PV Recorder Cable Box Set Top Box Custom Device Setup POWER CH ̄ CH ̆ MENU TV/VCR INFO GUIDE MORE Move SEL Select MORE.. ORIGINAL MENU OF EQUIPMENT Move AV NET Return PV Recorder Cable Box Set Top Box Custom Device Setup POWER CH ̄ 1 2 4 5 7 8 LAST CH 0 CH ̆ 3 6 9 Move SEL Select INFO PV Recorder Cable box Set Top Box Custom Device Setup POWER CH ̄ 1 2 4 5 7 8 LAST CH 0 Move SEL Select CH ̆ 3 6 9 MENU INFO GUIDE PV Recorder Cable box Set Top Box Custom Device Setup Move SEL Select NOTES: 1. Devices will not be available until Device Setup is completed (see pages 22-24). 2. The "Custom" option will not be available until the Custom device Setup is learned and completed. After completion, the "Custom" tag will be replaced with the device tag (see page 32). 3. The Custom option only accepts one device at a time. The second Custom device setup will replace the first device. 31
-
 1
1 -
2
-
3
-
4
-
5
-
6
-
7
-
8
-
9
-
10
-
11
-
12
-
13
-
14
-
15
-
16
-
17
-
18
-
19
-
20
-
21
-
22
-
23
-
24
-
25
-
 26
26 -
 27
27 -
 28
28 -
 29
29 -
 30
30 -
 31
31 -
 32
32 -
 33
33 -
 34
34 -
 35
35 -
 36
36 -
37
-
38
-
39
-
40
-
41
-
42
-
43
-
44
-
45
-
46
-
47
-
48
-
49
-
50
-
51
-
52
-
53
-
54
-
55
-
56
-
57
-
58
-
59
-
60
-
61
-
62
-
63
-
64
-
65
-
66
-
67
-
68
-
69
-
70
-
71
-
72
-
73
-
74
-
75
-
76
-
77
-
78
-
79
-
80
-
81
-
82
-
83
-
84
-
85
-
86
-
87
-
88
-
89
-
90
-
91
-
92
-
93
-
94
-
95
-
96
-
97
-
98
-
99
-
100
 |
 |