Hitachi 55HDX62 Owners Guide - Page 48
Video - user manual
 |
View all Hitachi 55HDX62 manuals
Add to My Manuals
Save this manual to your list of manuals |
Page 48 highlights
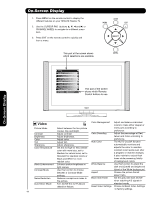
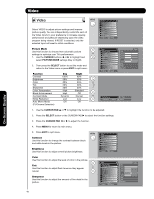
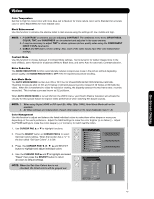
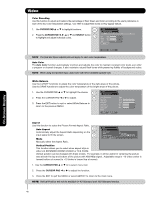
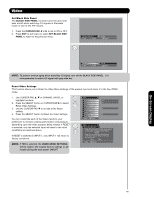
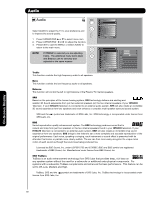
Video Color Decoding Use this function to adjust and balance the percentage of Red, Green and Color according to the user's preference in each of the four color temperature settings. Use TINT to adjust flesh tones so they appear natural. 1. Use CURSOR PAD ̆ or ̄ to highlight functions. Video Color Decoding or 2. Press the CURSOR PAD ̇, ̈, ̆ or ̄ and SELECT button RGB R G B to highlight and adjust individual colors. Red Green 50% 50% Color 50% Tint Reset Move SEL Return NOTE: The Red and Green adjustments will apply for each color temperature. Auto Color The Auto Color function automatically monitors and adjusts the color to maintain constant color levels even after a program or channel changes. It also maintains natural flesh tones while preserving fidelity of background colors. NOTE: When using Component input, Auto Color will not be available (grayed out). White Balance Use the CUTOFF functions to adjust the color temperature of the dark areas of the picture. Use the DRIVE functions to adjust the color temperature of the bright areas of the picture. 1. Use the CURSOR PAD ̆ or ̄ to highlight the choice. or 2. Press the CURSOR PAD ̇ or ̈ to adjust. 3. Press the EXIT button to quit or select White Balance to return to the previous MENU. Video White Balance Color Temperature Red Drive Green Drive Blue Drive Red Cutoff Green Cutoff Blue Cutoff Reset Move SEL Return : High 100% 100% 100% 50% 50% 50% On-Screen Display Aspect Use this function to select the Picture Format Aspect Ratio. Auto Aspect Automatically adjust the Aspect Ratio depending on the OR input signal to fill the screen. Mode Manually select the Aspect Ratio. Video Aspect Auto Aspect Mode Vertical Position : On : 16:9 Standard : 0 Move SEL Return Vertical Position This function allows you to select when aspect style is either 4:3 EXPANDED/ZOOM1/ZOOM2 or 16:9 ZOOM. Vertical position can be changed with these modes. For example, it will be useful for centering the picture area at both the top and bottom of the picture with 480i/480p signal. Adjustable range is -10 (video center is toward bottom of screen) to +10 (video is toward top of screen). 1. Use the CURSOR PAD ̆ or ̄ to to select menu item. 2. Press the CURSOR PAD ̇ or ̈ to adjust the function. 3. Press the EXIT to quit the MENU or select ASPECT to return to the main menu. NOTE: Vertical Position will not be available in 4:3 Standard and 16:9 Standard modes. 48
-
 1
1 -
2
-
3
-
4
-
5
-
6
-
7
-
8
-
9
-
10
-
11
-
12
-
13
-
14
-
15
-
16
-
17
-
18
-
19
-
20
-
21
-
22
-
23
-
24
-
25
-
26
-
27
-
28
-
29
-
30
-
31
-
32
-
33
-
34
-
35
-
36
-
37
-
38
-
39
-
40
-
41
-
42
-
 43
43 -
 44
44 -
 45
45 -
 46
46 -
 47
47 -
 48
48 -
 49
49 -
 50
50 -
 51
51 -
 52
52 -
 53
53 -
54
-
55
-
56
-
57
-
58
-
59
-
60
-
61
-
62
-
63
-
64
-
65
-
66
-
67
-
68
-
69
-
70
-
71
-
72
-
73
-
74
-
75
-
76
-
77
-
78
-
79
-
80
-
81
-
82
-
83
-
84
-
85
-
86
-
87
-
88
-
89
-
90
-
91
-
92
-
93
-
94
-
95
-
96
-
97
-
98
-
99
-
100
-
101
-
102
-
103
-
104
-
105
-
106
-
107
-
108
-
109
-
110
-
111
-
112
 |
 |
