Hitachi CP-RX61 User Manual - Page 25
One of Advance Menus ex. SETUP menu → Main of Advance MENU
 |
View all Hitachi CP-RX61 manuals
Add to My Manuals
Save this manual to your list of manuals |
Page 25 highlights
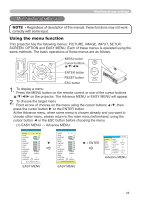
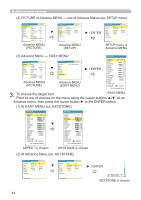
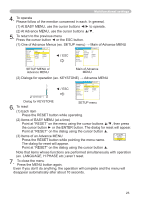
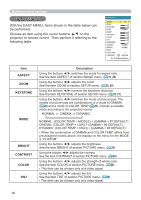
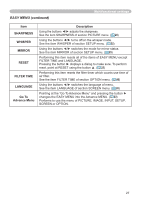
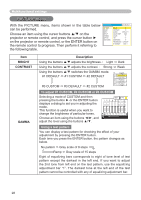
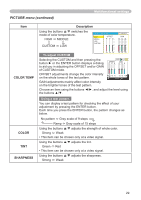
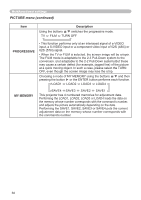
Multifunctional settings 4. To operate Please follow of the mention concerned in each. In general, (1) At EASY MENU, use the cursor buttons ◄/► to operate. (2) At Advance MENU, use the cursor buttons ▲/▼. 5. To return to the previous menu Press the cursor button ◄ or the ESC button. (1) One of Advance Menus (ex. SETUP menu) → Main of Advance MENU MENU [RGB1] PICTURE IMAGE INPUT SETUP SCREEN OPTION EASY MENU ZOOM KEYSTONE WHISPER MIRROR VOLUME :SELECT 100 +0 NORMAL NORMAL 16 ◄ / ESC MENU [RGB1] PICTURE IMAGE INPUT SETUP SCREEN OPTION EASY MENU ZOOM KEYSTONE WHISPER MIRROR VOLUME :SELECT 100 +0 NORMAL NORMAL 16 SETUP MENU of Advance MENU Main of Advance MENU (2) Dialogs for operation (ex. KEYSTONE) → Advance MENU KEYSTONE +0 ◄ / ESC MENU [RGB1] PICTURE IMAGE INPUT SETUP SCREEN OPTION EASY MENU ZOOM KEYSTONE WHISPER MIRROR VOLUME :SELECT 100 +0 NORMAL NORMAL 16 Dialog for KEYSTONE SETUP menu 6. To reset (1) Each item Press the RESET button while operating. (2) Items of EASY MENU (at a time) Point at "RESET" on the menu using the cursor buttons ▲/▼, then press the cursor button ► or the ENTER button. The dialog for reset will appear. Point at "RESET" on the dialog using the cursor button ▲. (3) Items of an Advance MENU Press the RESET button while pointing the menu name. PICTURE RESET CANCEL The dialog for reset will appear. Point at "RESET" on the dialog using the cursor button ▲. Note that items whose functions are performed simultaneously with operation (ex. LANGUAGE, H PHASE etc.) aren't reset. 7. To close the menu Press the MENU button again. Even if you don't do anything, the operation will complete and the menu will disappear automatically after about 10 seconds. 25
-
 1
1 -
2
-
3
-
4
-
5
-
6
-
7
-
8
-
9
-
10
-
11
-
12
-
13
-
14
-
15
-
16
-
17
-
18
-
19
-
 20
20 -
 21
21 -
 22
22 -
 23
23 -
 24
24 -
 25
25 -
 26
26 -
 27
27 -
 28
28 -
 29
29 -
 30
30 -
31
-
32
-
33
-
34
-
35
-
36
-
37
-
38
-
39
-
40
-
41
-
42
-
43
-
44
-
45
-
46
-
47
-
48
-
49
-
50
-
51
-
52
-
53
 |
 |
