Hitachi CP-RX61 User Manual - Page 36
SCREEN menu
 |
View all Hitachi CP-RX61 manuals
Add to My Manuals
Save this manual to your list of manuals |
Page 36 highlights
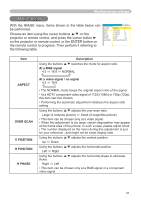
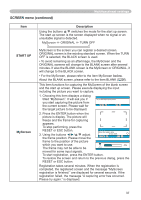
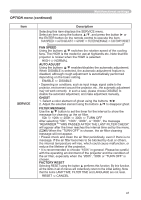
Multifunctional settings SCREEN menu With the SCREEN menu, items shown in the table below can be performed. Choose an item using the cursor buttons ▲/▼ on the projector or remote control, and press the cursor button ► on the projector or remote control, or the ENTER button on the remote control to progress. Then perform it referring to the following table. MENU [RGB1] :SELECT PICTURE IMAGE INPUT SETUP SCREEN OPTION EASY MENU LANGUAGE ENGLISH MENU POSITION OSD BRIGHT 5 BLANK BLACK START UP ORIGINAL MyScreen MyScreen Lock TURN OFF MESSAGE TURN ON Item LANGUAGE Description Using the buttons ▲/▼ switches the OSD (On Screen Display) language. ENGLISH ó FRANÇAIS ó DEUTSCH ó ESPAÑOL ó ITALIANO NORSK ó NEDERLANDS ó PORTUGUÊS ó SVENSKA ó SUOMI ó POLSKIó TÜRKÇE MENU POSITION OSD BRIGHT Using the buttons adjusts the menu position. To quit the operation, press the MENU button or keep no operation for 10 seconds. Using the buttons ▲/▼ switches the brightness level of the OSD (On Screen Display). Bright ó Dark Using the buttons ▲/▼ switches the mode for the blank screen. The blank screen is the screen for the temporarily blanking feature (22). It is displayed by pressing the BLANK button. MyScreen ó ORIGINAL ó BLUE ó WHITE ó BLACK BLANK MyScreen is the screen you can register a desired screen. ORIGINAL screen is the existing standard screen. BLUE, WHITE and BLACK are non-patterned (plain) screens in each color. • To avoid remaining as an afterimage, the MyScreen and the ORIGINAL screens will change to the BLACK screen after several minutes. • For the MyScreen, please refer to the item MyScreen (37). 36
-
 1
1 -
2
-
3
-
4
-
5
-
6
-
7
-
8
-
9
-
10
-
11
-
12
-
13
-
14
-
15
-
16
-
17
-
18
-
19
-
20
-
21
-
22
-
23
-
24
-
25
-
26
-
27
-
28
-
29
-
30
-
 31
31 -
 32
32 -
 33
33 -
 34
34 -
 35
35 -
 36
36 -
 37
37 -
 38
38 -
 39
39 -
 40
40 -
 41
41 -
42
-
43
-
44
-
45
-
46
-
47
-
48
-
49
-
50
-
51
-
52
-
53
 |
 |
