Hitachi CP-RX61 User Manual - Page 31
IMAGE menu
 |
View all Hitachi CP-RX61 manuals
Add to My Manuals
Save this manual to your list of manuals |
Page 31 highlights
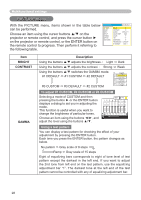
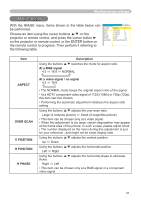
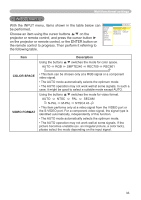
Multifunctional settings IMAGE menu With the IMAGE menu, items shown in the table below can be performed. Choose an item using the cursor buttons ▲/▼ on the projector or remote control, and press the cursor button ► on the projector or remote control, or the ENTER button on the remote control to progress. Then perform it referring to the following table. MENU [RGB1] :SELECT PICTURE IMAGE INPUT SETUP SCREEN OPTION EASY MENU ASPECT 4:3 OVER SCAN 5 V POSITION 25 H POSITION 142 H PHASE 16 H SIZE 1344 AUTO ADJUST EXECUTE Item ASPECT OVER SCAN V POSITION H POSITION H PHASE Description Using the buttons ▲/▼ switches the mode for aspect ratio. At a RGB signal 4:3 ó 16:9 ó NORMAL At a video signal / no signal 4:3 ó 16:9 • The NORMAL mode keeps the original aspect ratio of the signal. • At a HDTV component video signal of 1125i (1080i) or 750p (720p), this item can't be chosen. • Performing the automatic adjustment initializes the aspect ratio setting. Using the buttons ▲/▼ adjusts the over-scan ratio. Large (It reduces picture) ó Small (It magnifies picture) • This item can be chosen only at a video signal. • When this adjustment is too large, certain degradation may appear at the frame area of the picture. In such a case, please adjust small. • The number displayed on the menu during this adjustment is just for your reference , and might not be exact display ratio. Using the buttons ▲/▼ adjusts the vertical position. Up ó Down Using the buttons ▲/▼ adjusts the horizontal position. Left ó Right Using the buttons ▲/▼ adjusts the horizontal phase to eliminate flicker. Right ó Left • This item can be chosen only at a RGB signal or a component video signal. 31
-
 1
1 -
2
-
3
-
4
-
5
-
6
-
7
-
8
-
9
-
10
-
11
-
12
-
13
-
14
-
15
-
16
-
17
-
18
-
19
-
20
-
21
-
22
-
23
-
24
-
25
-
 26
26 -
 27
27 -
 28
28 -
 29
29 -
 30
30 -
 31
31 -
 32
32 -
 33
33 -
 34
34 -
 35
35 -
 36
36 -
37
-
38
-
39
-
40
-
41
-
42
-
43
-
44
-
45
-
46
-
47
-
48
-
49
-
50
-
51
-
52
-
53
 |
 |
