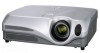
Hitachi CP-X440 User Manual
Hitachi CP-X440 Manual
 |
View all Hitachi CP-X440 manuals
Add to My Manuals
Save this manual to your list of manuals |
Hitachi CP-X440 manual content summary:
- Hitachi CP-X440 | User Manual - Page 1
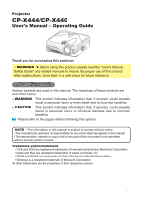
Projector CP-X444/CP-X440 User's Manual - Operating Guide Thank you for purchasing this projector. WARNING ►Before using this product, please read the "User's Manual - Safety Guide" and related manuals appear in this manual. • The reproduction, transfer or copy of all or any part of this document - Hitachi CP-X440 | User Manual - Page 2
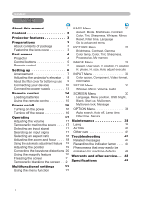
5 Remote control 5 Setting up 6 Arrangement 7 Adjusting the projector's elevator . . 8 About the filter cover for bottom-up use . . 9 Connecting your devices 10 Connecting power supply 13 EASY Menu 23 Aspect, Mode, Brightness, Contrast, Color, Tint, Sharpness, Whisper, Mirror, Reset, Filter - Hitachi CP-X440 | User Manual - Page 3
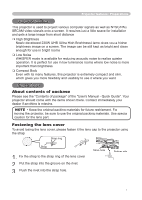
Please see the "Contents of package" of the "User's Manual - Quick Guide". Your projector should come with the items shown there. Contact caution for the lens part. Fastening the lens cover To avoid losing the lens cover, please fasten it the lens cap to the projector using the strap. Strap - Hitachi CP-X440 | User Manual - Page 4
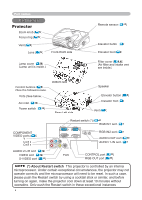
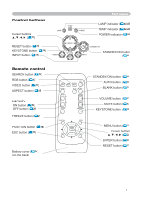
Part names Part names Projector Zoom knob (18) Focus ring (18) Vent (6) Lens (16) Front-Right side Lamp cover (39) (Lamp unit is inside.) Remote sensor (15) Elevator button (8) Elevator foot (8) Filter cover (9,40) (Air filter and intake vent are inside.) Control buttons (5) (See the - Hitachi CP-X440 | User Manual - Page 5
(20) INPUT button (17) Remote control SEARCH button (18) RGB button (17) VIDEO button (17) ASPECT button (18) MAGNIFY ON button (20) OFF button (20) FREEZE button (21) POSITION button (19) ESC button (22) Battery cover (14) (on the back) Part names LAMP indicator (44,45) TEMP indicator - Hitachi CP-X440 | User Manual - Page 6
. Placing the projector in such place could cause a fire, an electric shock and/or malfunction to the projector. • Do not place the projector near a humidifier, a smoking space or a kitchen. ►Adjust the direction of the projector to keep the light from directly hitting the projector's remote sensor. 6 - Hitachi CP-X440 | User Manual - Page 7
projector to the screen (±10%) (b) (c) The height of the screen (±10%) 4:3 (a) 16:9 (a) (c) up (c) down For the model CP-X444 (189) -5 (-2) 145 (57) 150 (3.8) 4.6 (181) 5.5 (217) 23 (9) 206 (81) 5.0 (197) 6.0 (237) -6 (-2) 181 (71) 362 (142) For the model CP-X440 (a) Screen size [inch (m)] - Hitachi CP-X440 | User Manual - Page 8
9 degrees. Exceeding these range could cause malfunction, and could shorten the lifetime of the consumables. ►Except for inclining by the elevator feet adjustment, place the projector horizontally. You can use the elevator feet to make adjustments if the surface on which you need to set the - Hitachi CP-X440 | User Manual - Page 9
Setting up About the filter cover for bottom-up use WARNING ►Do not replace the filter cover during use or immediately after use. While the projector is connected with a power supply, or the projector is in a high temperature state, handling could cause an electric shock, a fire, a burn and/or - Hitachi CP-X440 | User Manual - Page 10
to connect a laptop computer to the projector, be sure to activate the laptop's RGB external image output (set the laptop to CRT display or to simultaneous LCD and CRT display). For details on how this is done, please refer to the instruction manual of the corresponding laptop computer. • Secure - Hitachi CP-X440 | User Manual - Page 11
Examples of connection with a computer Setting up * For the audio input, please refer to the AUDIO item in the SETUP menu. RS-232C Audio out RGB out Stereo mini audio cable RGB IN1 RGB IN2 RGB IN2 COMPONENT VIDEO RGB OUT CR/PR CB/PB Y R-AUDIO 2-L VIDEO S-VIDEO RGB cable RS-232C - Hitachi CP-X440 | User Manual - Page 12
Setting up Examples of connection with a VCR/DVD player Audio/Video cable RGB IN1 RGB IN2 Video out Audio (L) out Audio (R) out COMPONENT VIDEO RGB OUT CR/PR CB/PB Y R-AUDIO 2-L VIDEO S-VIDEO CONTROL AUDIO 1-IN AUDIO-OUT S-Video out Audio (L) out Audio (R) out S-Video cable Audio - Hitachi CP-X440 | User Manual - Page 13
in fire and/or electrical shock. • Only use the power cord that came with the projector. If it is damaged, contact your dealer to newly get correct one. • Only plug the power cord into an outlet rated for use with the power cord's specified voltage range. • Never modify the power cord - Hitachi CP-X440 | User Manual - Page 14
Do not use batteries of different types at the same time. Do not mix a new battery with used one. • Make sure the plus and minus terminals are correctly and minus terminals as indicated in the remote control. 3. Close the battery cover. Replace the battery cover in the direction of the arrow and - Hitachi CP-X440 | User Manual - Page 15
for an extended period. • Replace the batteries whenever the remote control starts malfunctioning. • When strong lights (such as direct sunlight) or light from an extremely close range (such as from an inverter fluorescent lamp), hit the projector's remote sensor, the remote control may cause to - Hitachi CP-X440 | User Manual - Page 16
RESET STANDBY/ON button Power switch POWER indicator Turning on the power 1. Make sure that the power cord is firmly and correctly connected to the projector ) 3. Press the STANDBY/ON button on the projector or the remote control. The projector lamp will light up and the POWER indicator will begin - Hitachi CP-X440 | User Manual - Page 17
Selecting an input signal ENTER ESC RESET 1. Press the INPUT button on the projector. Each time you press the button, the projector switches its input port as below. RGB IN1 RGB IN2 VIDEO S-VIDEO COMPONENT VIDEO 1. Press the RGB button on the remote control to select an input port - Hitachi CP-X440 | User Manual - Page 18
COMPONENT VIDEO S-VIDEO VIDEO POSITION MENU Selecting an aspect ratio ENTER 1. Press the ASPECT button on the remote control. ESC RESET Each time you press the button, the projector switches the mode for aspect ratio in turn. For an RGB signal NORMAL 4:3 16:9 VIDEO RGB SEARCH - Hitachi CP-X440 | User Manual - Page 19
the respective input signal and the aENTsERpect ratio will be selected automatically. ESC RESET This function is available only when the AUTO mode is selected to the the position MUTE OFF 1. Press the POSITION button on the remote control. The "POSITION" indication will appear on the screen. - Hitachi CP-X440 | User Manual - Page 20
button again. ENTER To exit the MAGNIFY mode and restore the screen to normal, press the OFF button of MAGNIFY on the remote control. ESC RESET ● The projector automatically exits the MAGNIFY mode when the input signal is changed, or when the display condition is changed. ● Although in the - Hitachi CP-X440 | User Manual - Page 21
the input signal changes, or when one of the projector's buttons or the remote control bENuTERttons except buttons of MAGNIFY, FREEZE, ESC and RESET is presseEdSC. RESET ● If the projector continues projecting a still image for long time, the LCD panel might possibly be printed. Do not leave the - Hitachi CP-X440 | User Manual - Page 22
it to the EASY MENU, select the MIRROR NORMAL RESET FILTER TIME 0 LANGUAGE ENGLISH EASY MENU. Go To Advance Menu... Then press the cursor button ► on the projector or remote control, or the ENTER button on the remote control to select an item. The display of the - Hitachi CP-X440 | User Manual - Page 23
on the projector or remote control. Then perform it referring to the following table. EASY MENU ASPECT 4:3 MODE NORMAL BRIGHTNESS +0 CONTRAST +0 COLOR +0 TINT +0 SHARPNESS +3 WHISPER NORMAL MIRROR NORMAL RESET FILTER 23 - Hitachi CP-X440 | User Manual - Page 24
the filter timer which counts usage time of the air filter. A dialog is displayed for confirmation. Selecting RESET using the button ▲ performs resetting. See the FILTER TIME item in the OPTION menu (36). Select the LANGUAGE item to toggle the menu language. Refer to description of LANGUAGE in the - Hitachi CP-X440 | User Manual - Page 25
on the projector or remote control, and press the cursor button ► on the projector or remote control, or the ENTER button on the remote control to an item using the buttons ◄/►, and adjust the level using the buttons ▲/▼. ENTER : 1 23 4 56 7 8 +0 +0 +0 +0 +0 +0 +0 +0 GAMMA [CUSTOM 1] You can - Hitachi CP-X440 | User Manual - Page 26
Multifunctional settings PICTURE Menu (continued) Item Description Using the buttons ▲/▼ switches the mode of color temperature. HIGH MIDDLE LOW CUSTOM COLOR TEMP COLOR TINT SHARPNESS To adjust CUSTOM Selecting the CUSTOM and then pressing the button ► or the ENTER button displays a - Hitachi CP-X440 | User Manual - Page 27
then pressing the button ► or the ENTER button performs each function. LOAD1 LOAD2 LOAD3 LOAD4 MY MEMORY SAVE4 SAVE3 SAVE2 SAVE1 This projector has 4 numbered memories for adjustment data. Performing the LOAD1, LOAD2, LOAD3 or LOAD4 loads the data on the memory whose number corresponds - Hitachi CP-X440 | User Manual - Page 28
the table below can be performed. Select an item using the cursor buttons ▲/▼ on the projector or remote control, and press the cursor button ► on the projector or remote control, or the ENTER button on the remote control to execute the item. Then perform it referring to the following table. MENU - Hitachi CP-X440 | User Manual - Page 29
signal. • When this adjustment is excessive, the picture may not be displayed correctly. In such a case, please reset the adjustment by pressing the RESET button on the remote control during this operation. Selecting this item performs the automatic adjustment feature. For an RGB signal The vertical - Hitachi CP-X440 | User Manual - Page 30
the table below can be performed. Select an item using the cursor buttons ▲/▼ on the projector or remote control, and press the cursor button ► on the projector or remote control, or the ENTER button on the remote control to execute the item. Then perform it referring to the following table. MENU - Hitachi CP-X440 | User Manual - Page 31
INPUT Menu (continued) Multifunctional settings Item INFORMATION Description Selecting this item displays a dialog titled "INPUT INFORMATION". It shows the information about the current input. INPUT-INFORMATION RGB 1024x768 @60.0 FRAME LOCK INPUT-INFORMATION S-VIDEO SECAM AUTO INPUT- - Hitachi CP-X440 | User Manual - Page 32
the table below can be performed. Select an item using the cursor buttons ▲/▼ on the projector or remote control, and press the cursor button ► on the projector or remote control, or the ENTER button on the remote control to execute the item. Then perform it referring to the following table. MENU - Hitachi CP-X440 | User Manual - Page 33
the table below can be performed. Select an item using the cursor buttons ▲/▼ on the projector or remote control, and press the cursor button ► on the projector or remote control, or the ENTER button on the remote control to execute the item. Then perform it referring to the following table. MENU - Hitachi CP-X440 | User Manual - Page 34
control when the picture is displayed. The picture will freeze and the frame for capturing appears. To stop performing, press the RESET or ESC button on the remote control. 2. Using the buttons adjusts the frame position. Please move the frame to the position of the picture which you want to use - Hitachi CP-X440 | User Manual - Page 35
SCREEN Menu (continued) Multifunctional settings Item MESSAGE Description Using the buttons ▲/▼ turns on/off the message function. TURN ON TURN OFF When the TURN ON is selected, the following message function works. "AUTO IN PROGRESS" while automatically adjusting "NO INPUT IS DETECTED" "SYNC - Hitachi CP-X440 | User Manual - Page 36
usage time of the lamp. Pressing the RESET button on the remote control or the button ► of the projector displays a dialog. To reset the lamp time, select the RESET using the button ▲. RESET CANCEL • Please reset the lamp time only when you have replaced the lamp, for a corresponding message about - Hitachi CP-X440 | User Manual - Page 37
the remote control to execute the item. FAN SPEED AUTO ADJUST GHOST KEY LOCK FILTER MESSAG FACTORY RESET SERVICE FAN projector, etc., the automatic adjustment may not work correctly. In such a case, please choose DISABLE to disable the automatic adjustment, and make adjustment manually - Hitachi CP-X440 | User Manual - Page 38
there are electrical problems elsewhere besides the lamp. If this happens, contact your local dealer or a service representative. • Handle with care: jolting or scratching could cause the lamp bulb to burst during use. • If the indicators or a message prompt you to replace the lamp (see the section - Hitachi CP-X440 | User Manual - Page 39
message prompt you to replace the lamp, replace the lamp as soon as possible. 1. Turn the projector off, and unplug the power cord. Allow the lamp to cool for at least 45 minutes. 2. To prepare a new lamp, contact your dealer and tell the lamp type number = DT00691. If the projector is mounted on - Hitachi CP-X440 | User Manual - Page 40
filter or a new air filter into place, and push the "PUSH" mark with claws to fix the air filter. 8. Replace the filter cover and snap it back into place. 9. Slowly turn the projector so that the top is facing up. 10. Turn the projector on, and reset the filter time using the FILTER TIME function of - Hitachi CP-X440 | User Manual - Page 41
Do not touch the lens directly with your hand. Caring for the cabinet and remote control Incorrect care could have adverse influence such as discoloration, peeling paint, etc. 1. Turn the projector off, and unplug the power cord. Allow the projector to cool sufficiently. 2. After making sure that the - Hitachi CP-X440 | User Manual - Page 42
dealer or service company. Although these messages will be automatically disappeared around several minutes, it will be reappeared every time the power is turned on. Message CHANGE THE LAMP. AFTER REPLACING LAMP, RESET THE LAMP TIMER. CHANGE THE LAMP. AFTER REPLACING LAMP, RESET THE LAMP TIMER. THE - Hitachi CP-X440 | User Manual - Page 43
of the SERVICE item in the reset the filter timer(40). RESET FILTER TIMER. SEE MANUAL FURTHER INFO. NOTE • A lamp has a finite product life. Lamps are characterized by the fact that, after long hours of usage, a lamp will no longer light up, or the lamp will break or burst, etc. This projector - Hitachi CP-X440 | User Manual - Page 44
the instructions within the table. If the same indication is displayed after the remedy, or if an indication other than the following is displayed, please contact your dealer or service company. POWER LAMP TEMP indicator indicator indicator Description Lighting Turned Turned The projector is - Hitachi CP-X440 | User Manual - Page 45
Troubleshooting Regarding the indicator lamps (continued) POWER LAMP TEMP indicator indicator indicator Description Blinking In Red or Lighting In Red Turned off Blinking In Red The cooling fan is not operating. Please turn the power off, and allow the projector to cool down at least 20 - Hitachi CP-X440 | User Manual - Page 46
stopped, contact your dealer or service company. 1. Before requesting repair, please check in accordance with the following chart. This operation sometimes resolves your problem. If the situation cannot be corrected, 2. The projector's microprocessor may need to be reset. Please push the Restart - Hitachi CP-X440 | User Manual - Page 47
Troubleshooting remote control. 23, 25 Video screen display freezes. Colors have a faded- out appearance, or Color tone is poor. The computer cannot detect the projector in the SETUP menu. The lamp is approaching the end of its product lifetime. Replace the lamp. 23, 25 23, 32 38, 39 Pictures - Hitachi CP-X440 | User Manual - Page 48
projector Liquid Crystal panel Panel size Drive system Pixels CP-X444 : 2.0 cm (0.79 type) CP-X440 : 1.8 cm (0.7 type) TFT active matrix 786,432 pixels (1024 horizontal x 768 vertical) Lens CP-X444 : Zoom lens F=1.7 ~ 2.1 f=24.4 ~ 29.3 mm CP-X440 : Zoom lens F=1.7 ~ 1.9 f=21.8 ~ 26.2 mm Lamp - Hitachi CP-X440 | User Manual - Page 49
Specifications (continued) For the model CP-X444 Specifications For the model CP-X440 49
-
 1
1 -
 2
2 -
 3
3 -
 4
4 -
 5
5 -
 6
6 -
 7
7 -
8
-
9
-
10
-
11
-
12
-
13
-
14
-
15
-
16
-
17
-
18
-
19
-
20
-
21
-
22
-
23
-
24
-
25
-
26
-
27
-
28
-
29
-
30
-
31
-
32
-
33
-
34
-
35
-
36
-
37
-
38
-
39
-
40
-
41
-
42
-
43
-
44
-
45
-
46
-
47
-
48
-
49
 |
 |
1
Projector
CP-X444/CP-X440
User's Manual – Operating Guide
Thank you for purchasing this projector.
WARNING
►
Before using this product, please read the "User's Manual -
Safety Guide" and related manuals to ensure the proper use of this product.
After reading them, store them in a safe place for future reference.
About this manual
Various symbols are used in this manual. The meanings of these symbols are
described below.
WARNING
This symbol indicates information that, if ignored, could possibly
result in personal injury or even death due to incorrect handling.
CAUTION
This symbol indicates information that, if ignored, could possibly
result in personal injury or physical damage due to incorrect
handling.
Please refer to the pages written following this symbol.
NOTE
• The information in this manual is subject to change without notice.
• The manufacturer assumes no responsibility for any errors that may appear in this manual.
• The reproduction, transfer or copy of all or any part of this document is not permitted
without express written consent.
Trademark acknowledgment
• VGA and XGA are registered trademarks of International Business Machines Corporation.
• Apple and Mac are registered trademarks of Apple Computer, Inc.
• VESA and SVGA are trademarks of Video Electronics Standard Association.
• Windows is a registered trademark of Microsoft Corporation.
All other trademarks are the properties of their respective owners.