Hitachi DZMV750MA Owners Guide - Page 152
Inserting 3d Title Images
 |
UPC - 050585223486
View all Hitachi DZMV750MA manuals
Add to My Manuals
Save this manual to your list of manuals |
Page 152 highlights
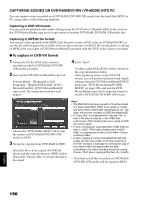
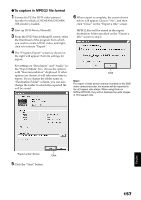
INSERTING 3D TITLE IMAGES You can attach a 3D title to the images recorded on a DVD-RAM. 1 Connect the DVD video camera/recorder in which the DVD-RAM to be edited is loaded to USB port of PC. 2 Start up DVD-MovieAlbumSE. The 3D title creation screen (3D-Title STUDIO) will start. You can then attach a 3D title to the top of program. The contents recorded on the DVD-RAM will appear. From this screen, you can cut, move scenes, and create a play list. 3 Right-click the top of program, and then choose "Enter 3D Title". 4 Click "OK". The set 3D title will be written to the DVDRAM. Note: • To attach a 3D title to a designated position, divide the program at that position. • The attached 3D title will be treated as one scene by this DVD video camera/recorder. If you wish to combine it with subsequent scenes, use DVDMovieAlbumSE to delete the chapter of the scenes that follow the 3D title, or use the Disc Navigation function of this DVD video camera/recorder to select the 3D title and the scenes that follow it, and combine them (see page 116). • A DVD-RAM requires free space of several tens seconds to attach a 3D title. • No 3D title can be entered while in the HDD mode of DVD-MovieAlbumSE. English 152
-
 1
1 -
2
-
3
-
4
-
5
-
6
-
7
-
8
-
9
-
10
-
11
-
12
-
13
-
14
-
15
-
16
-
17
-
18
-
19
-
20
-
21
-
22
-
23
-
24
-
25
-
26
-
27
-
28
-
29
-
30
-
31
-
32
-
33
-
34
-
35
-
36
-
37
-
38
-
39
-
40
-
41
-
42
-
43
-
44
-
45
-
46
-
47
-
48
-
49
-
50
-
51
-
52
-
53
-
54
-
55
-
56
-
57
-
58
-
59
-
60
-
61
-
62
-
63
-
64
-
65
-
66
-
67
-
68
-
69
-
70
-
71
-
72
-
73
-
74
-
75
-
76
-
77
-
78
-
79
-
80
-
81
-
82
-
83
-
84
-
85
-
86
-
87
-
88
-
89
-
90
-
91
-
92
-
93
-
94
-
95
-
96
-
97
-
98
-
99
-
100
-
101
-
102
-
103
-
104
-
105
-
106
-
107
-
108
-
109
-
110
-
111
-
112
-
113
-
114
-
115
-
116
-
117
-
118
-
119
-
120
-
121
-
122
-
123
-
124
-
125
-
126
-
127
-
128
-
129
-
130
-
131
-
132
-
133
-
134
-
135
-
136
-
137
-
138
-
139
-
140
-
141
-
142
-
143
-
144
-
145
-
146
-
 147
147 -
 148
148 -
 149
149 -
 150
150 -
 151
151 -
 152
152 -
 153
153 -
 154
154 -
 155
155 -
 156
156 -
 157
157 -
158
-
159
-
160
-
161
-
162
-
163
-
164
-
165
-
166
-
167
-
168
-
169
-
170
-
171
-
172
-
173
-
174
-
175
-
176
-
177
-
178
-
179
-
180
-
181
-
182
-
183
-
184
-
185
-
186
-
187
-
188
-
189
-
190
-
191
-
192
-
193
-
194
-
195
-
196
-
197
-
198
-
199
-
200
 |
 |
