Hitachi ED-X3400 User Manual - Page 30
INPUT Menu
 |
View all Hitachi ED-X3400 manuals
Add to My Manuals
Save this manual to your list of manuals |
Page 30 highlights
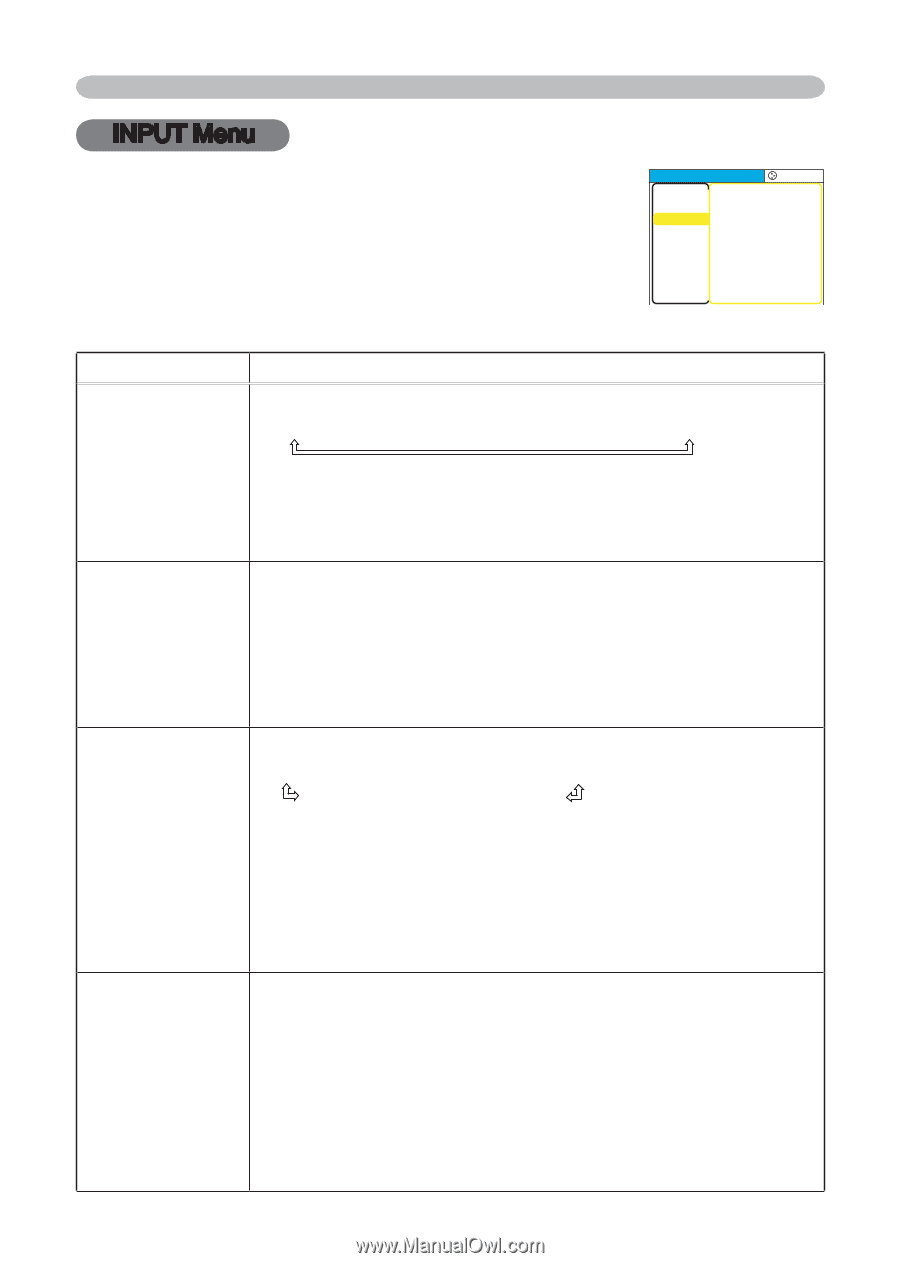
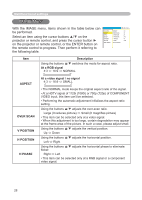
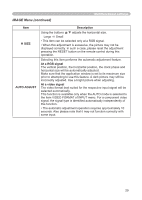
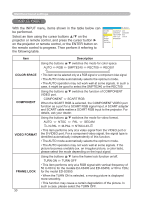
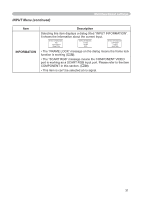
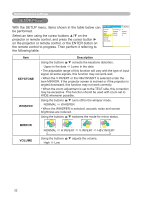
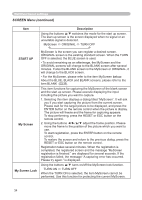
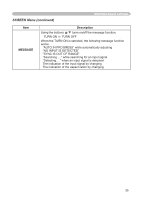
Multifunctional settings INPUT Menu With the INPUT menu, items shown in the table below can be performed. Select an item using the cursor buttons ▲/▼ on the projector or remote control, and press the cursor button ► on the projector or remote control, or the ENTER button on the remote control to progress. Then perform it referring to the following table. MENU [RGB] PICTURE IMAGE INPUT SETUP SCREEN OPTION EASY MENU :SELECT COLOR SPACE AUTO COMPONENT COMPONENT VIDEO FORMAT AUTO FRAME LOCK TURN ON INFORMATION Item Description Using the buttons ▲/▼ switches the mode for color space. AUTO RGB SMPTE240 REC709 REC601 COLOR SPACE COMPONENT VIDEO FORMAT FRAME LOCK 30 • This item can be selected only at a RGB signal or a component video signal. • The AUTO mode automatically selects the optimum mode. • The AUTO operation may not work well at some signals. In such a case, it might be good to select the SMPTE240 or the REC709. Using the buttons ▲/▼ switches the function of COMPONENT VIDEO port. COMPONENT SCART RGB When the SCART RGB is selected, the COMPONENT VIDEO port function as a port for a SCART RGB signal input. A SCART adapter and SCART cable realize a SCART RGB input to the projector. For details, ask your dealer. Using the buttons ▲/▼ switches the mode for video format. AUTO NTSC PAL SECAM N-PAL M-PAL NTSC4.43 • This item performs only at a video signal from the VIDEO port or the S-VIDEO port. For a component video signal, the signal type is identified automatically independently of this function. • The AUTO mode automatically selects the optimum mode. • The AUTO operation may not work well at some signals. If the picture becomes unstable (ex. an irregular picture, a color lack), please select the mode depending on the input signal. Using the buttons ▲/▼ turns the frame lock function on/off. TURN ON TURN OFF • This item performs only at a RGB signal with vertical frequency of 50 to 60 Hz for the models Ed-X3400 and ED-X3450, or 50 to 72Hz for the model ED-S3350. • When the TURN ON is selected, a moving picture is displayed more smoothly. • This function may cause a certain degradation of the picture. In such a case, please select the TURN OFF.
-
 1
1 -
2
-
3
-
4
-
5
-
6
-
7
-
8
-
9
-
10
-
11
-
12
-
13
-
14
-
15
-
16
-
17
-
18
-
19
-
20
-
21
-
22
-
23
-
24
-
 25
25 -
 26
26 -
 27
27 -
 28
28 -
 29
29 -
 30
30 -
 31
31 -
 32
32 -
 33
33 -
 34
34 -
 35
35 -
36
-
37
-
38
-
39
-
40
-
41
-
42
-
43
-
44
-
45
-
46
-
47
-
48
-
49
 |
 |