Honeywell 2070A Operating Guide - Page 7
Home and Office Security Safes - expandable
 |
UPC - 016247207003
View all Honeywell 2070A manuals
Add to My Manuals
Save this manual to your list of manuals |
Page 7 highlights
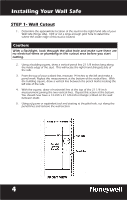
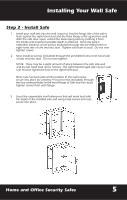
Installing Your Wall Safe Step 2 - Install Safe 1. Install your wall safe into the wall cutout so that the hinge side of the safe is flush against the right hand stud and the front flange is flat against the wall. With the safe door open, extend the telescoping back by pushing it from the inside until maximum possible depth is achieved. Once the back is extended, install six wood screws (included) through the pre-drilled holes in right hand side of safe and into stud. Tighten safe flush to stud. Do not over tighten screws. 2. Now install six screws (included) through the pre-drilled holes in left hand side of safe and into stud. Do not over tighten. NOTE: There may be a slight amount of space between the safe side wall and the left hand stud, this is normal. The right hand hinged side of your wall safe must be tightened flush to the right hand stud. Once safe has been placed into position in the wall cutout, secure into place by screwing 4 wood screws (included) through the four recessed holes in the front flange of Safe and into studs. Tighten screws flush with flange. 3. Select the expandable shelf extensions that will work best with the depth of the installed safe and using small screws and nuts, secure into place. Home and Office Security Safes 5
-
 1
1 -
 2
2 -
 3
3 -
 4
4 -
 5
5 -
 6
6 -
 7
7 -
 8
8 -
 9
9 -
 10
10 -
 11
11 -
 12
12 -
13
-
14
-
15
-
16
 |
 |