Honeywell CT3355A1003 Owner's Manual - Page 21
Step 7: Mount Thermostat Mounting Plate
 |
View all Honeywell CT3355A1003 manuals
Add to My Manuals
Save this manual to your list of manuals |
Page 21 highlights
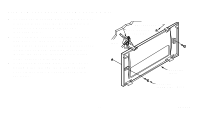
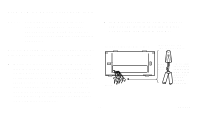
Step 7: Mount Thermostat Mounting Plate s Position the mounting plate on the wall. Use a level to make sure the mounting plate is level. Use a pencil to mark the two mounting holes. s Remove the mounting plate from the wall, and drill 3/16-inch holes in the wall (if WALL drywall) as marked. For firmer material such as plaster or wood, drill 7/32-inch holes. Gently tap anchors (provided) into drilled holes until flush with the wall. s Reposition mounting plate over the holes, pulling wires through the wiring opening. Loosely insert two mounting screws into the holes. WALL ANCHORS (2) WIRES THROUGH WALL OPENING MOUNTING PLATE MOUNTING SCREWS (2) M1718 21 69-1012
-
 1
1 -
2
-
3
-
4
-
5
-
6
-
7
-
8
-
9
-
10
-
11
-
12
-
13
-
14
-
15
-
 16
16 -
 17
17 -
 18
18 -
 19
19 -
 20
20 -
 21
21 -
 22
22 -
 23
23 -
 24
24 -
 25
25 -
 26
26 -
27
-
28
-
29
-
30
-
31
-
32
-
33
-
34
-
35
-
36
-
37
-
38
-
39
-
40
 |
 |

21
69-1012
Step 7: Mount Thermostat Mounting Plate
■
Position the mounting plate on the wall. Use
a level to make sure the mounting plate is
level. Use a pencil to mark the two
mounting holes.
■
Remove the mounting plate from the wall,
and drill 3/16-inch holes in the wall (if
drywall) as marked. For firmer material such
as plaster or wood, drill 7/32-inch holes.
Gently tap anchors (provided) into drilled
holes until flush with the wall.
■
Reposition mounting plate over the holes,
pulling wires through the wiring opening.
Loosely insert two mounting screws into
the holes.
WALL
WIRES THROUGH
WALL OPENING
WALL ANCHORS (2)
MOUNTING
PLATE
MOUNTING
SCREWS (2)
M1718