Honeywell CT3500 Owner's Manual - Page 11
Step 7. Mount the Thermostat, Step 8. Customize Your Thermostat - features
 |
View all Honeywell CT3500 manuals
Add to My Manuals
Save this manual to your list of manuals |
Page 11 highlights
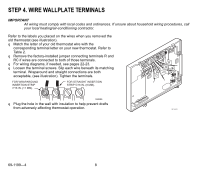
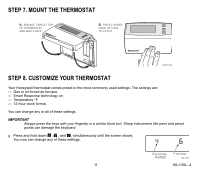
STEP 7. MOUNT THE THERMOSTAT A. ENGAGE TABS AT TOP OF THERMOSTAT AND WALLPLATE. B. PRESS LOWER EDGE OF CASE TO LATCH. M12703A STEP 8. CUSTOMIZE YOUR THERMOSTAT Your Honeywell thermostat comes preset to the most commonly used settings. The settings are: - Gas or oil forced air furnace. - Smart Response technology on. - Temperature °F. - 12-hour clock format. You can change any or all of these settings. IMPORTANT Always press the keys with your fingertip or a similar blunt tool. Sharp instruments like pens and pencil points can damage the keyboard. q Press and hold down , , and , simultaneously until the screen shows. You now can change any of these settings. FEATURE NUMBER OPTION M13330 11 69-1199-4
-
 1
1 -
2
-
3
-
4
-
5
-
 6
6 -
 7
7 -
 8
8 -
 9
9 -
 10
10 -
 11
11 -
 12
12 -
 13
13 -
 14
14 -
 15
15 -
 16
16 -
17
-
18
-
19
-
20
-
21
-
22
-
23
-
24
 |
 |

11
69-1199—4
STEP 7. MOUNT THE THERMOSTAT
STEP 8. CUSTOMIZE YOUR THERMOSTAT
Your Honeywell thermostat comes preset to the most commonly used settings. The settings are:
—
Gas or oil forced air furnace.
—
Smart Response technology on.
—
Temperature °F.
—
12-hour clock format.
You can change any or all of these settings.
IMPORTANT
Always press the keys with your fingertip or a similar blunt tool. Sharp instruments like pens and pencil
points can damage the keyboard.
q
Press and hold down
,
, and
, simultaneously until the screen shows.
You now can change any of these settings.
M12703A
B
.
PRESS LOWER
EDGE OF CASE
TO LATCH.
A
.
ENGAGE TABS AT TOP
OF THERMOSTAT
AND WALLPLATE.
M13330
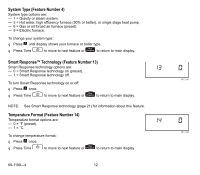
FEATURE
NUMBER
OPTION