Honeywell CT3500 Owner's Manual - Page 7
Replacing a Thermostat that has Three Wires, Step 3. Mount Thermostat Wallplate - installation
 |
View all Honeywell CT3500 manuals
Add to My Manuals
Save this manual to your list of manuals |
Page 7 highlights
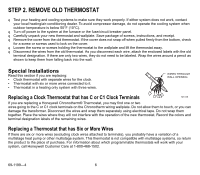
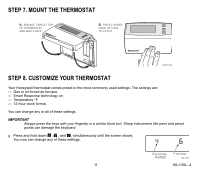
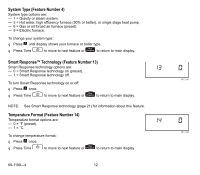
Replacing a Thermostat that has Three Wires If you have three wires for a heating only system and can operate the fan using the fan ON switch this thermostat works with your system. However, some hot water (zoned) heating systems also have three wires. Your thermostat will work only if you install an isolating relay on these systems. For details, call your local heating and/or cooling contractor. STEP 3. MOUNT THERMOSTAT WALLPLATE q Separate the wallplate from the thermostat by placing your thumb or fingers between the bottom of the wallplate and the thermostat, and pulling the wallplate up and away from the thermostat. See illustration at right. q Position the wallplate on the wall. Level the wallplate for appearance if desired. Use a pencil to mark the two mounting holes that best fit the application. M16427 q Remove the wallplate from the wall. Drill two 3/16 in. holes in wall (if drywall) as shown. For materials such as plaster or wood, drill 7/32 in. holes where marked. Gently, tap the (provided) anchors WALL into the drilled holes until they are flush with the wall. q Reposition the wallplate over the holes. Pull the wires through the WIRES THROUGH WALL wiring opening. Loosely insert mounting screws into each of the holes. q Level the wallplate if desired. Thermostat functions properly when WALL ANCHORS (2) not level. q Tighten mounting screws. MOUNTING HOLES MOUNTING SCREWS M15044 7 69-1199-4
-
 1
1 -
 2
2 -
 3
3 -
 4
4 -
 5
5 -
 6
6 -
 7
7 -
 8
8 -
 9
9 -
 10
10 -
 11
11 -
 12
12 -
13
-
14
-
15
-
16
-
17
-
18
-
19
-
20
-
21
-
22
-
23
-
24
 |
 |
