Honeywell HCM6011I Owners Manual - Page 13
Troubleshooting Continued - instructions
 |
UPC - 092926344320
View all Honeywell HCM6011I manuals
Add to My Manuals
Save this manual to your list of manuals |
Page 13 highlights
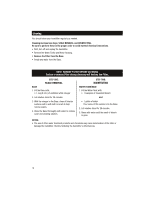
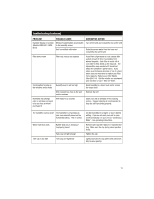
Troubleshooting (Continued) PROBLEM Humidity display is too high (Models HCM-6012, HCM6013) POSSIBLE CAUSE Moisture/condensation accumulated in the humidity sensor Unit is overfilled with water CORRECTIVE ACTION Turn off the unit and completely dry out the unit Drain the excess water from the base and completely dry out the unit Filter turns brown Filter may need to be replaced If you filter is light brown or rust colored after a short amount of time it's probably from mineral deposits. Soak filter in a sink full of cool water to help break up the deposits. The discoloration may remain but it should not affect the humidifier's performance. If you notice a performance decrease or live in a hard water area you may have to replace your filter more regularly. Replace your filter (Model Filter E/HC-14). Visit the retailer you purchased your unit from or call 1-800-477-0457. Condensation forming on the windows and/or walls Humidity level is set too high Reset humidity to a lower level and/or reduce the output level. Unit is placed too close to the wall and/or windows Relocate the unit Humidifier has strange odor or unit does not seem to be as clean as when I purchased it Unit needs to be cleaned Clean your unit as directed in the Cleaning section. Regular cleaning is recommended to keep the unit functioning properly. The humidifier cycles on/off The humidifier is responding to your room humidity based on the humidistat setting. This is normal. Water leaks from tank Rubber tank ring is missing or improperly placed Tank cap is too tight Tank cap not tight enough Tank cap over tightened Set the humidistat to a higher or lower desired setting. If you do not want your unit to cycle on/off periodically run your unit on "Continuous Mode". See operating instructions. Remove tank cap then replace or reposition the ring. Make sure the cap spring valve operates freely. Tighten the cap Lightly lubricate the cap gasket with petroleum jelly to ease opening. 13
-
 1
1 -
2
-
3
-
4
-
5
-
6
-
7
-
 8
8 -
 9
9 -
 10
10 -
 11
11 -
 12
12 -
 13
13 -
 14
14 -
 15
15 -
 16
16 -
 17
17 -
 18
18 -
19
-
20
-
21
-
22
-
23
-
24
-
25
-
26
-
27
-
28
-
29
-
30
-
31
 |
 |
