Honeywell HWM910 Owners Manual - Page 5
Setup, Filling
 |
UPC - 092926343101
View all Honeywell HWM910 manuals
Add to My Manuals
Save this manual to your list of manuals |
Page 5 highlights
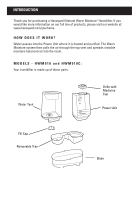
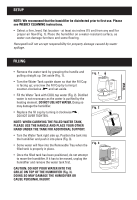
SETUP NOTE: We recommend that the humidifier be disinfected prior to first use. Please see WEEKLY CLEANING instructions. • Select a firm, level, flat location - at least six inches (15 cm) from any wall for proper air flow (Fig. 1). Place the humidifier on a water-resistant surface, as water can damage furniture and some flooring. Honeywell will not accept responsibility for property damage caused by water spillage. WALL ➡ FILLING • Remove the water tank by grasping the handle and pulling straight up. Set aside (Fig. 1). Fig. 1 • Turn the Water Tank upside down so that the Fill Cap is facing up; unscrew the Fill Cap by turning it counter-clockwise and set aside. • Fill the Water Tank with COOL tap water (Fig. 2). Distilled water is not necessary as the water is purified by the 6" heating element. DO NOT USE HOT WATER. Doing so may damage the humidifier. Fig. 2 • Replace the fill cap by turning it clockwise . DO NOT OVER TIGHTEN. NOTE: WHEN CARRYING THE FILLED WATER TANK, PLEASE USE THE HANDLE AND PLACE YOUR OTHER HAND UNDER THE TANK FOR ADDITIONAL SUPPORT. • Turn the Water Tank right side up. Position the tank into the humidifier and push it into place (Fig. 3). • Some water will flow into the Removable Tray when the filled tank is properly in place. Fig. 3 • Once the filled tank has been positioned, do not attempt to move the humidifier. If it has to be moved, unplug the humidifier and remove the water tank first. CAUTION: DO NOT POUR WATER INTO THE GRILLE ON TOP OF THE HUMIDIFIER (Fig. 3). DOING SO MAY DAMAGE THE HUMIDIFIER OR CAUSE PERSONAL INJURY.
-
 1
1 -
 2
2 -
 3
3 -
 4
4 -
 5
5 -
 6
6 -
 7
7 -
 8
8 -
 9
9 -
 10
10 -
 11
11 -
12
-
13
-
14
-
15
-
16
-
17
-
18
-
19
-
20
-
21
-
22
-
23
-
24
-
25
-
26
-
27
-
28
-
29
-
30
-
31
-
32
-
33
-
34
-
35
-
36
 |
 |
