Honeywell HY-047B User Guide - Page 7
Efy-041 Series And Hy-041 Series Remote Control Operation Cont'd, Efy-045, Efy-047 Series, Hy-047 - temperature control
 |
UPC - 092926345501
View all Honeywell HY-047B manuals
Add to My Manuals
Save this manual to your list of manuals |
Page 7 highlights
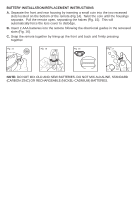
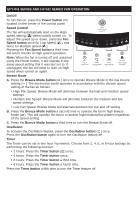
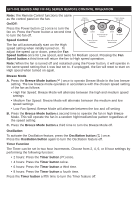
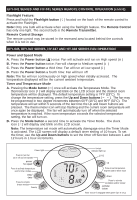
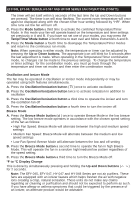
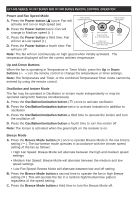
EFY-041 SERIES RANEMD OHTYE-0C41ONSETRIOELSORPEEMROATTEIOCNONTROL OPERATION (cont'd) Flashlight Feature: Press and hold the Flashlight button ( ) located on the back of the remote control to activate the Flashlight. Note: Only one bulb will activate when using the flashlight feature. The Remote Control has only one light. The second bulb is the Remote Transmitter. Remote Control Storage The remote control may be stored in the recessed area located behind the controls when it is not in use. EFY-045, EFY-047 SERIES, HY-047 AND HY-048 SERIES FAN OPERATION Power and Speed Mode A. Press the Power button ( ) once: Fan will activate and run on High speed ( ) B. Press the Power button twice: Fan will change to Medium speed ( ) C. Press the Power button a third time: Fan will run at Low speed ( ) D. Press the Power button a fourth time: Fan will turn off Note: The fan will run continuously on high speed when initially activated. The temperature displayed will be the current ambient temperature. Timer and Temperature Mode A. Pressing the Mode button ( ) once will activate the Temperature Mode. The thermometer icon ( ) will display and blink on the LCD screen and the desired room temperature will be displayed. The default temperature setting is 74°F (23°C). To change the temperature setting, press the Up and Down buttons ( ). The fan may be programmed in two degree increments between 60°F (16°C) and 90°F (32°C). The temperature will set within 5 seconds of the last time the Up and Down buttons are pressed. The thermometer icon will stop flashing and the current room temperature will once again be displayed. The fan will automatically turn off when the selected temperature is reached. If the room temperature exceeds the selected temperature setting, the fan will turn on. B. Press the Mode button a second time to activate the Timer Mode. The clock icon ( ) will display and blink on the LCD screen. Note: The temperature set mode will automatically disengage once the Timer Mode is activated. The LCD screen will display a default timer setting of 10 hours. To set the timer, use the Up and Down buttons to set the timer off function between 1 and 12 hours in 1 hour increments.
-
 1
1 -
 2
2 -
 3
3 -
 4
4 -
 5
5 -
 6
6 -
 7
7 -
 8
8 -
 9
9 -
 10
10 -
 11
11 -
 12
12 -
13
-
14
-
15
-
16
-
17
-
18
-
19
-
20
-
21
-
22
-
23
-
24
-
25
-
26
-
27
-
28
-
29
-
30
-
31
-
32
-
33
-
34
-
35
-
36
 |
 |