Honeywell T8401C1015 Installation Instructions - Page 6
Caution - instructions
 |
View all Honeywell T8401C1015 manuals
Add to My Manuals
Save this manual to your list of manuals |
Page 6 highlights
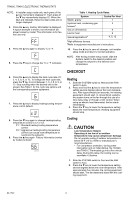
T8400C, T8401C ELECTRONIC THERMOSTATS NOTE: In installer setup mode only, each press of the ▲ key momentarily displays 01. Each press of the ▼ key momentarily displays 02. When the keys are released, these two-digit codes are no longer displayed. 3. Press the ▲ key. Factory information is displayed. A typical example is shown, but information displayed varies by model. This information is for factory use only. M14687 4. Press the ▲ key again to display °C or °F. M14688 5. Press the ▼ key to change the °C or °F indication. Table 1. Heating Cycle Rates. System Steam, gravity Hydronic heat, condensing gas furnacea Gas or oil forced air Electric heat Special applicationsb Cycles Per Hour 1 3 6 9 4, 5, 12 aHigh efficiency furnace. bRefer to equipment manufacturer's instructions. 10. Press the ▲ key to save all changes, exit installer setup mode and return to normal operation. NOTE: After exiting installer setup mode, slide the System switch to the desired position and change the setpoint to the desired room temperature. M14689 6. Press the ▲ key to display the heat cycle rate of 1, 3, 4, 5, 6, 9, or 12. To change the heat cycle rate, press the ▼ key to scroll between 1, 3, 4, 5, 6, 9, or 12. Stop scrolling when the desired rate is displayed. See Table 1 for the cycle rate options and the corresponding system equipment. M14690 7. Press the ▲ key to display heating/cooling temperature control default.. M18419A 8. Press the ▼ key again to change heating/cooling temperature control to C1 or C3. C1 = Standard heating/cooling temperature control. C3 = Aggressive heating/cooling temperature control (can cause room temperature to overshoot the setpoint). 9. Press the ▲ key again. Factory information (varies by model) is shown. M18420 CHECKOUT Heating 1. Slide the SYSTEM switch to Heat and the FAN switch to Auto. 2. Press and hold the ▲ key to raise the temperature setting several degrees above the room temperature. After approximately ten seconds, the heating equipment should start. In conventional systems, the system turns on the fan through the use of a time delay relay or through a limit control. When using an electric heat thermostat, the fan starts immediately. 3. Press the ▼ key to lower the temperature setting below the room temperature. Heating equipment should stop. Cooling CAUTION Low Temperature Hazard. Operating at too low of an outdoor temperature may cause compressor damage. Do not operate cooling if outdoor temperature is below 50°F (10°C). Refer to manufacturer's recommendations. • For compressor protection, during power interruption and on initial startup, the T8400C and T8401C Thermostats go into a five-minute delay. During this delay, the cooling icon (a snowflake ❄) flashes. 1. Slide the SYSTEM switch to Cool and the FAN switch to Auto. 2. Press the ▼ key to lower the temperature setting several degrees below the room temperature. After approximately five minutes, the cooling equipment should start. The fan starts and stops with the cooling equipment. 69-1740 6
-
 1
1 -
 2
2 -
 3
3 -
 4
4 -
 5
5 -
 6
6 -
 7
7 -
 8
8
 |
 |