Honeywell TE653ELW User Manual - Page 6
Battery Installation, Placement, Operation - weather
 |
UPC - 012345626869
View all Honeywell TE653ELW manuals
Add to My Manuals
Save this manual to your list of manuals |
Page 6 highlights
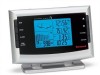
• Allows displaying pressure history records J. SNOOZE/LIGHT button • Stops all alarms temporarily • Activates a backlight for 5 seconds K. Back panel UP (▲) button Increases the parameters of pressure and altitude L. Back panel DOWN (▼) button Decreases the parameters of pressure and altitude M. Back panel UNIT button When depressed and held activates pressure & altitude units programming mode N. Back panel PRESSURE/ALTITUDE button • Allows toggling between SEA LEVEL pressure, LOCAL pressure and ALTITUDE modes • When depressed and held, enters into the altitude programming mode O. BATTERY COMPARTMENT Accommodates 2 (two) UM-3 or AA 1.5V alkaline batteries P. REMOVABLE TABLE STAND Holds unit in upright position on a flat surface Q. WALL- MOUNT RECESSED OPENING Keeps the unit on the wall BATTERY INSTALLATION • Remove the battery compartment door located on the back. • Insert two (2) AA size batteries according to the polarities shown and replace the battery compartment door. • When placing the main unit on the table or other horizontal surface, unfold the table stand adjusting it to the desired viewing angle. 11 • When mounting the main unit on the wall or vertical surface, remove the table stand from the unit. PLACEMENT • Make sure that the main unit is locating within the operating range of the remote sensor • Ideally the remote sensor should be mounted within the line of sight of the main unit. • Transmission range may be affected by trees, metal structures and electronic appliances. • Test reception before permanently mounting the remote sensor Avoid placing the main unit in the following areas: • Direct sunlight and surfaces emitting and radiating heat, such as heating ducts or air conditioners. • Areas with interference from the wireless devices (such as cordless phones, radio headsets, baby listening devices) and electronic appliances. OPERATION The weather forecaster is designed to measure local pressure and calculate the other two parameters based on the Local Pressure. Sea Level Pressure and Altitude are interdependent. If you adjust altitude, it will calculate sea level pressure, if you adjust sea level pressure, it will automatically calculate altitude. You can only adjust one of the two - either sea level barometric pressure or altitude. If you wish to know pressure changes at your specific location (house), the LOCAL barometric pressure should be selected In this case, the local altitude/elevation must be programmed according to GPS readings, Internet, etc. If you wish to know pressure changes in your surrounding metro area, then 11 12
-
 1
1 -
 2
2 -
 3
3 -
 4
4 -
 5
5 -
 6
6 -
 7
7 -
 8
8 -
 9
9 -
 10
10 -
 11
11 -
 12
12 -
13
-
14
-
15
 |
 |
