Hoover F5914 900 Product Manual - Page 6
Store Hose, Store Tool, Attach Tool Holder - nozzle
 |
UPC - 073502025550
View all Hoover F5914 900 manuals
Add to My Manuals
Save this manual to your list of manuals |
Page 6 highlights
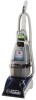
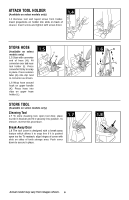
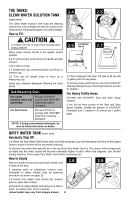
Attach Tool holder (Available on select models only) 1.4 Remove tool and taped screw from holder. Insert projections on holder into slots on back of cleaner. Insert screw and tighten with screw driver. 1.4 Store Hose 1.5 (Available on select I G models only) 1.5 Start with converter H end of hose (H). Fit converter over tab near tool holder (I). Press converter firmly to snap in place. Press solution tube (G) into clip next to converter as shown. 1.6 Wrap hose around hook on upper handle (K). Press hose into clips on upper hose holder (L). Store Tool (Available on select models only) Cleaning Tool 1.7 To store cleaning tool, open tool door, place nozzle in bracket and fit it securely into position. To remove, reverse this procedure. Break-Away Door 1.8 The tool cover is designed with a break-away feature which allows it to snap free if it is pushed open too far. To reattach, align hinges of cover with slots on sides of tools storage area. Push cover down to secure in place. 1.7 1.6 K L L 1.8 Actual model may vary from images shown. 6
-
 1
1 -
 2
2 -
 3
3 -
 4
4 -
 5
5 -
 6
6 -
 7
7 -
 8
8 -
 9
9 -
 10
10 -
 11
11 -
 12
12 -
13
-
14
-
15
-
16
-
17
-
18
-
19
-
20
-
21
-
22
-
23
-
24
-
25
-
26
-
27
-
28
-
29
-
30
-
31
-
32
-
33
-
34
-
35
-
36
-
37
-
38
-
39
-
40
-
41
-
42
-
43
-
44
-
45
-
46
-
47
-
48
-
49
-
50
-
51
-
52
-
53
-
54
-
55
-
56
-
57
-
58
-
59
-
60
-
61
-
62
-
63
 |
 |
