Hoover F7458-900 Product Manual - Page 17
Maintenance - replacement parts
 |
View all Hoover F7458-900 manuals
Add to My Manuals
Save this manual to your list of manuals |
Page 17 highlights
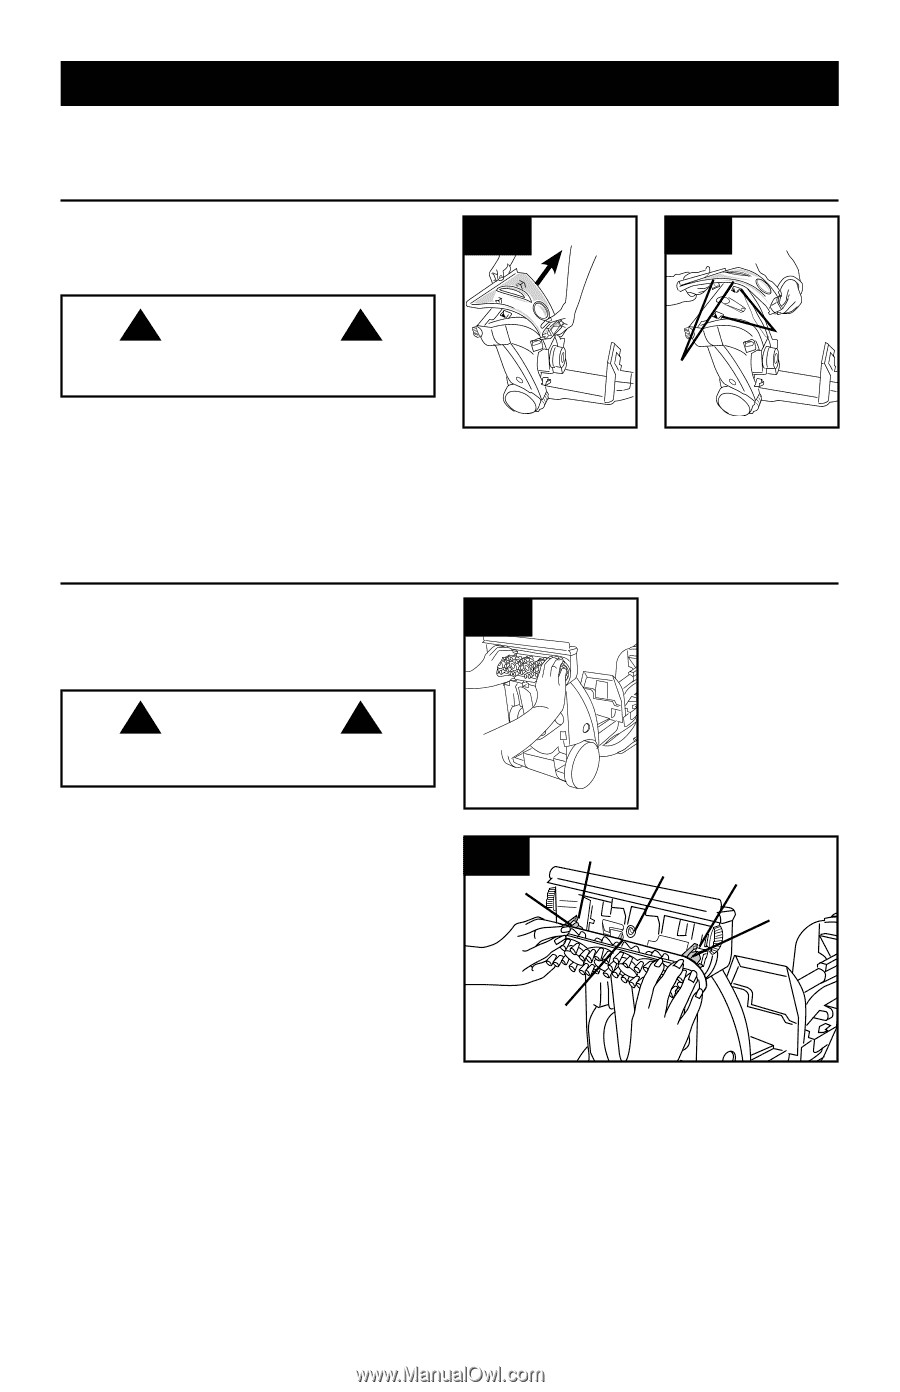
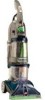
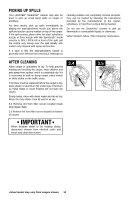
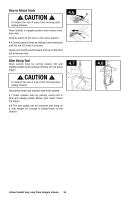
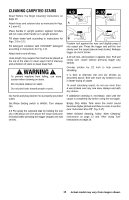
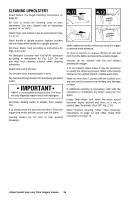
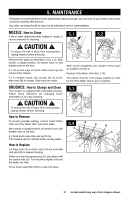
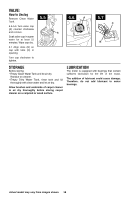
5. MAINTENANCE Familiarize yourself with these home maintenance tasks as proper use and care of your cleaner will ensure continued cleaning effectiveness. Any other servicing should be done by an authorized service representative. nozzle: How to Clean If lint or other debris becomes lodged in nozzle, it can be removed for cleaning. 5.1 5.2 ! CAUTION ! To reduce the risk of injury from moving parts, unplug cleaner before servicing. Remove both tanks as described in Fig. 2.16. With handle in upright position, tilt cleaner back so that handle rests on the floor. 5.1 Lift up rear edge of nozzle. Slide nozzle up and remove from cleaner. 5.2 To replace nozzle, line up tabs (A) on nozzle with holes (B) in cleaner. Slide tabs into holes. B A Slide nozzle completely onto cleaner. Press down on nozzle to secure it. Replace Dirty Water Tank (Fig. 2.16). The nozzle must be in the proper position in order for the Dirty Water Tank to go on properly. brushes: How to Change and Clean Your cleaner is equipped with removable brushes. Follow these directions for changing brush assemblies or for easy cleaning. ! CAUTION ! To reduce the risk of injury from moving parts, unplug cleaner before servicing. 5.3 How to Remove To prevent possible leaking, remove Clean Water Tank and Dirty Water Tank. Set tanks aside. With handle in upright position, tilt cleaner back until handle rests on the floor. 5.3 Grab brush assembly and pull firmly. The brushes can be cleaned under running water. 5.4 A B D B A How to Replace C 5.4 Align posts (A) on both ends of brush assembly with slots (B) in cleaner housing. Make sure that the square post (C) also aligns with the square hole (D). Turn brushes slightly until post fits easily into hole. Press brush assembly firmly to snap into place. 17 Actual model may vary from images shown.
-
 1
1 -
2
-
3
-
4
-
5
-
6
-
7
-
8
-
9
-
10
-
11
-
 12
12 -
 13
13 -
 14
14 -
 15
15 -
 16
16 -
 17
17 -
 18
18 -
 19
19 -
 20
20 -
 21
21 -
 22
22 -
23
-
24
-
25
-
26
-
27
-
28
-
29
-
30
-
31
-
32
-
33
-
34
-
35
-
36
-
37
-
38
-
39
-
40
-
41
-
42
-
43
-
44
-
45
-
46
-
47
-
48
-
49
-
50
-
51
-
52
-
53
-
54
-
55
-
56
-
57
-
58
-
59
-
60
-
61
-
62
-
63
-
64
-
65
-
66
 |
 |