Hoover Power Scrub Deluxe Product Manual - Page 15
Caution, Warning - carpet cleaner
 |
View all Hoover Power Scrub Deluxe manuals
Add to My Manuals
Save this manual to your list of manuals |
Page 15 highlights
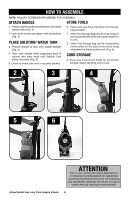
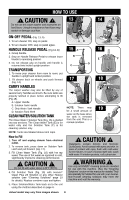
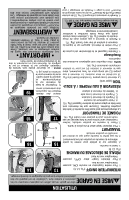
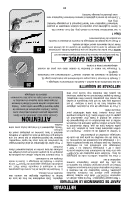
HOW TO USE ! CAUTION ! 13 14 Do not use this carpet washer and accesories on hard floors. Using this machine on hard floors may scratch or damage your floor. ON-OFF PEDAL (Fig. 13, A) 1. To turn cleaner ON, step on pedal. 2. To turn cleaner OFF, step on pedal agian. HANDLE RELEASE PEDAL (Fig 13, B) 1. Grasp handle. 2. Step on Handle Release Pedal to release lower handle to operating position. 3. Do not release grip on handle until handle is returned into locked upright position TRANSPORTING 1. To move your cleaner from room to room, put handle in upright and locked position. 2. Tilt cleaner back on wheels and push forward (Fig. 14). CARRY HANDLES The carpet washer may also be lifted by any of several carry handles as shown. Be sure tanks are properly latched in place before attempting to lift (Fig 15). A. Upper Handle B. Solution Tank Handle C. Dirty Water Tank Handle D. Solution Tank Shelf CLEAN WATER/SOLUTION TANK The Clean Water / Solution Tank (Fig. 16) is divided into two sections. The Clean Water Tank (E) is for water only and the Solution Tank (F) is for cleaning solution only. NOTE: Tanks are labeled above tank caps. How to Fill 1. Turn off and unplug cleaner from electrical outlet. 2. To remove tank, press down on Solution Tank Latch and pull forward. (Fig. 17). 3. Fill Clean Water Tank (Fig. 18) with hot tap water. The use of hot water as opposed to cold, significantly improves cleaning performance. ! CAUTION ! Do not fill with water above 140°F (60°C). 4. Fill Solution Tank (Fig. 19) with Hoover® Clean Plus 2X Solution or any other Hoover solution (see "Cleaning Solutions" page 19 for details). Replace container caps and tighten. 5. Place Solution/Water Tank back on to the unit using the method described on page 6. AB 15 A 16 B E F D C 17 18 NOTE: There may 19 be a small amount of water on the base when the tank is removed from the unit. This is a normal condition. ! CAUTION ! Detergents contain Anionic and Nonionic Surfactants. Avoid contact with eyes and skin. In case of contact with eyes, flush with cold water for 15 minutes. In case of contact with skin, wash with water. If irritation persists, call a physician. ! WARNING ! Use only HOOVER® cleaning products intended for use with this machine. (See the "Cleaning Solutions" section in this manual for details) They are specially formulated for use with your cleaner. Non-Hoover cleaning solutions may harm the machine and void the warranty. Actual model may vary from images shown. 8
-
 1
1 -
2
-
3
-
4
-
5
-
6
-
7
-
8
-
9
-
 10
10 -
 11
11 -
 12
12 -
 13
13 -
 14
14 -
 15
15 -
 16
16 -
 17
17 -
 18
18 -
 19
19 -
 20
20 -
21
-
22
-
23
-
24
-
25
-
26
-
27
-
28
-
29
-
30
-
31
-
32
-
33
-
34
-
35
-
36
-
37
-
38
-
39
-
40
-
41
-
42
-
43
-
44
-
45
-
46
-
47
-
48
-
49
-
50
-
51
-
52
-
53
-
54
-
55
-
56
-
57
-
58
-
59
-
60
-
61
-
62
-
63
-
64
 |
 |