Hoover Power Scrub Deluxe Product Manual - Page 23
Caution - carpet cleaner parts
 |
View all Hoover Power Scrub Deluxe manuals
Add to My Manuals
Save this manual to your list of manuals |
Page 23 highlights
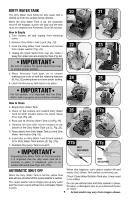
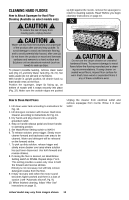
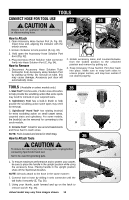
CLEANING HARD FLOORS How to Attach Squeegee for Hard Floor Cleaning (Available on select models only) ! CAUTION ! To reduce the risk of injury from moving parts, unplug cleaner. up tight against the nozzle. remove the squeegee to return to cleaning carpets. Read "Before you begin cleaning" instructions on page 10. 32 ! CAUTION ! Water will drip from the brushes and underside of the product after use and may puddle. To avoid damage to wood and laminate flooring and to avoid potential slip hazard, after use (a) do not leave the product on wood and laminate surfaces and remove to a hard surface and (b) place unit on absorbent material (such as towel) to soak up drips. To prevent possible leaking, remove clean water tank (Fig.17) and Dirty Water Tank (Fig. 20, 21). Set tanks aside (do not set tank on furniture). With handle in upright position, tilt cleaner back so that handle rests on the floor. Position the squeegee, larger lip facing up, on bottom of nozzle until it snaps securely into place (Fig. 32). Make sure the outside edges are pushed ! CAUTION ! Do not use the carpet cleaner on unsealed hardwood floors. To prevent damage to wood floors follow the flooring manufacturer's clean- ing recommendations. If using cleaner on sealed wood floors, inspect floor surface for worn finish, bare wood or separated floors if any of these conditions exist. How to Clean Hard Floors 1. Fill clean water tank according to instructions for Fig. 18. 2. Fill detergent container with Hoover Hard Floor Cleaner according to instructions for Fig. 19. 3. Dry hands and plug cleaner into a properly grounded outlet. 4. Step on handle release pedal and lower handle to operating postion. 5. Set Wash/Rinse Setting switch to WASH. 6. To release solution, press trigger. Slowly move cleaner forward and backward over area to be cleaned. Water and detergent will be released on the forward stroke. 7. To pick up dirty solution, release trigger and slowly move cleaner over area where solution has just been dispensed. Use both forward and reverse strokes. 8. If rinsing the floor is desired, set Wash/Rinse Setting switch to RINSE. Repeat steps 7 & 8. This setting provides a water-only rinse in both the forward and reverse strokes. Rinsing is not necessary, but will help remove detergent residue from the floor. 9. Empty recovery tank when the motor sound becomes higher pitched and there is a loss of suction ( see "Automatic shut-off, Pg. 9). 10. When finished cleaning, follow "After Use" instructions on page 11. Unplug the cleaner from electrical outlet and remove squeegee from nozzle. Rinse it in clear water. Actual model may vary from images shown. 12
-
 1
1 -
2
-
3
-
4
-
5
-
6
-
7
-
8
-
9
-
10
-
11
-
12
-
13
-
14
-
15
-
16
-
17
-
 18
18 -
 19
19 -
 20
20 -
 21
21 -
 22
22 -
 23
23 -
 24
24 -
 25
25 -
 26
26 -
 27
27 -
 28
28 -
29
-
30
-
31
-
32
-
33
-
34
-
35
-
36
-
37
-
38
-
39
-
40
-
41
-
42
-
43
-
44
-
45
-
46
-
47
-
48
-
49
-
50
-
51
-
52
-
53
-
54
-
55
-
56
-
57
-
58
-
59
-
60
-
61
-
62
-
63
-
64
 |
 |