Hotpoint HTR17BBSRWW Owners Manual - Page 10
Installation, instructions, iNSTALLiNG, THE WATER LiNE
 |
View all Hotpoint HTR17BBSRWW manuals
Add to My Manuals
Save this manual to your list of manuals |
Page 10 highlights
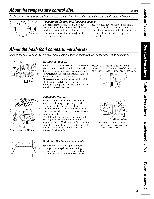
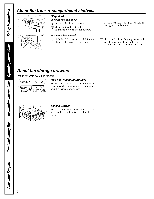
Installation instructions | iNSTALLiNG THE WATER LiNE (ONSOMEMODELS) BEFORE YOU BEGIN Recommended copper water supply kits are _'XSX2, WX8X3 or WX8X4, depending on the amount of tubing you need. Approved plastic water supply lines are GE SmartConnect'" Refi'igerator Tubing (WX08X10006, WX08X10015 and WX08X10025). When c(mnecting your reIi'igerator to a GE Reverse Osmosis Water S}:stem, the only approved installation is with a GE RVKJt. For other revel_e osmosis water systems, fl>llow the manuthcturer's recommendations. This water line installation is not warranted by the refi'igerator or icemaker manufiicturer. Follow these instructions carefully to minimize the risk of expensive water damage. _'\_lter hammer (water banging in tile pipes) in house plumbing can cause damage to reti'igerator parts and lead to water leakage or flooding. (;all a qualified phunber to correct water hammer beflwe installing the water supply line to the refl'igerator. To prevent burns and product damage, do not hook up the water line to the hot water line. If you use your refrigerator befl>re connecting the water line, make sm'e the feeler arm is in the STOP (up) position. Do not install the icemaker tubing in areas where temperatures ihll below freezing. When using any electrical device (such as a power drill) during installation, be sure the device is double insulated or grounded in a mamler to prevent the hazard of electric shock, or is battery powered. All installations must be in accordance plumbing code requirements. with local WHAT YOU WILL NEED • Copper or GE SmartConnect _" Refrigerator Tubing ldt, 1/4" outer diameter to connect the refrigerator to the water suppl> If using copper, be sure both ends of the tubing are cut square. To determine how much tubing you need: measure the distance ti'om the water valve on the back of the reti'igerator to the water supply pipe. Then add 8' (2.4 m). Be sure there is sutticient extra tubing (about 8' [2.4 m] coiled into 3 turns of about 10" [25 cm] diameter) to allow the reil"igerator to move out t]'om the wall atier installation. WHAT YOU WILL NEED (CONT.) (;E SmartConnec(" Reli'igerator Tubing Kits are available in the fl)llowing lengths: 6' (1.8 m) 15' (4.6 m) 25' (7.6 m) - WX08X10006 - WX08X10015 - _SX08X10025 Be sure that the kit v
-
 1
1 -
2
-
3
-
4
-
 5
5 -
 6
6 -
 7
7 -
 8
8 -
 9
9 -
 10
10 -
 11
11 -
 12
12 -
 13
13 -
 14
14 -
 15
15 -
16
-
17
-
18
-
19
-
20
-
21
-
22
-
23
-
24
 |
 |
