Hotpoint HTR17BBSRWW Owners Manual - Page 7
About storage drawer and cover removal, About the automatic icemaker.
 |
View all Hotpoint HTR17BBSRWW manuals
Add to My Manuals
Save this manual to your list of manuals |
Page 7 highlights
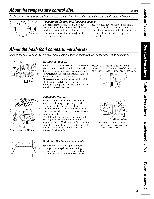
About storage drawer and cover removal, Not all features are on all models. ge.com Adjustable Humidity Drawer (on some models) .nail Low Slide the control all the way to the HIGH setting to provide lfigb lmmiditv reconnn ended for m()st vegetables, Slide tim control all tim way to the LOW setting to provide lower lmmiditv levels reconnn ended fin" m ()st fl'uits. Drawer and Cover Removal Drawers can be remo_ ed easily, by, ,grasl)ing, the sides and lifting up slightly while I)ullin" (lraweis past the stop location. Full-Width Drawer with Plastic Cover To remove the cover, lift it off its supports, pull it torward, tilt it and take it out. Twin Drawer Shelf To remove: E_] Remo',e the (lrawei_. _ Reach ill, push the fl'ont of glass coxer up, and at tim sanle dine, pull it fin'ward as fin" as it will come. Tilt it and take it out. A_oid cleaning the cold glass coxer with hot t_lter because the extreme temt/eIature (tifterence ma) cause it to break. _] Remoxe the drawer ti'alne. (_wa)_ renlo',e the glass co',er befi)re you take out the drawer fl'anle.) i Jfl the fi'ame off the supports at each skte and back, pull it fi)rward, tilt it and take it out. About the automatic icemaker. To replace: [_ i,ower the ti'ame until it rests on the supports at each side and back. ] Rel )lace the , glass co_ei; l)ushino its rear edge firefly into the rear fl'ame channel and gently lowering the fl'ont into place. _] Replace the drawet_. A newly-installed refrigerator may take 12 to 24 hours to begin making ice, Thereare 2 types of icemakers." GreenPoweLr ight FeeleAr rm Power switch model Automatic Icemaker (on some models) The icelnaker will llr()dtlce apllroxin-latel ) 100-130 cubes ill a 24-hour I/eriod, depending on the fl'eezer compartnlent telnl/eiattu'e, rooln telnpeIature, number of door openings and other rise conditions. If the refl'igelator is opelated befi)re the water connection is inade to the icemakei; moxe the feeler arm to the STOP (up) position. When the refligerator has been connected to the wamr SUl)ply, move the teeler aml to the ON (down) position. Tile icemaker will fill with _Jter when it cools to l 5°E A newl}qnsmlled refl'ig_iator ma) rake 12 to 24 hours to begin making ice cubes, Once the icelnaker starts to inake ice, it Inay take up to 48 bouI_ to fill the bin, dei)ending oil the telni)eramre settings and nulnber of door ol)enings. Wben tim bin fills m the level at the ti_eler aim, the icelnaker will stop produdng ice. It is noiinal fi)r several ctlbes to be joined togetbei: If ice is not used fl'equenfl> old ice cubes will become cloudy, taste stale, shrink or fllse togetbei: On power switch models, the green power light will blink if ice cubes get stuck ill the icemakei: To correct tiffs, set tim power switch to 0 (off) and relnove the cubes. Set the power switch to I (on)to restart the icelnakei: _Mtei" the icelnaker has been turned on again, there will be a delay of about 45 nfinutes betoi'e the icelnaker I'eStlllleS ol)eration. NOTE."In homes with lower-than-averagewater pressure,you may hear the icemakercycle multiple t/?neswhen maklbg onebatch of ice. FeeleArrmin (up)positi0n theON(down) position Feeler arm model You will bear a buzAng sound each tilne the icelnaker fills with watei: Throw awm the fiist tew batches of ice to allow the water lille to deal: Be sure nothing interteres of the teeler aml, with the sweep Icemaker Accessory Kit If your refl'ig_i'ator dkt not ah'ead) come equiI/ped with all automatic icemakeI; ml icemaker accessoi? kit is mailable at extra cost, Check the back _ff the refligemtor fin. the specific icemaker kit needed fin" 7 yOtlI" lnode].
-
 1
1 -
 2
2 -
 3
3 -
 4
4 -
 5
5 -
 6
6 -
 7
7 -
 8
8 -
 9
9 -
 10
10 -
 11
11 -
 12
12 -
13
-
14
-
15
-
16
-
17
-
18
-
19
-
20
-
21
-
22
-
23
-
24
 |
 |
