Husqvarna HU775L Operation Manual - Page 16
To Change Engine Oil, Air Filter
 |
View all Husqvarna HU775L manuals
Add to My Manuals
Save this manual to your list of manuals |
Page 16 highlights
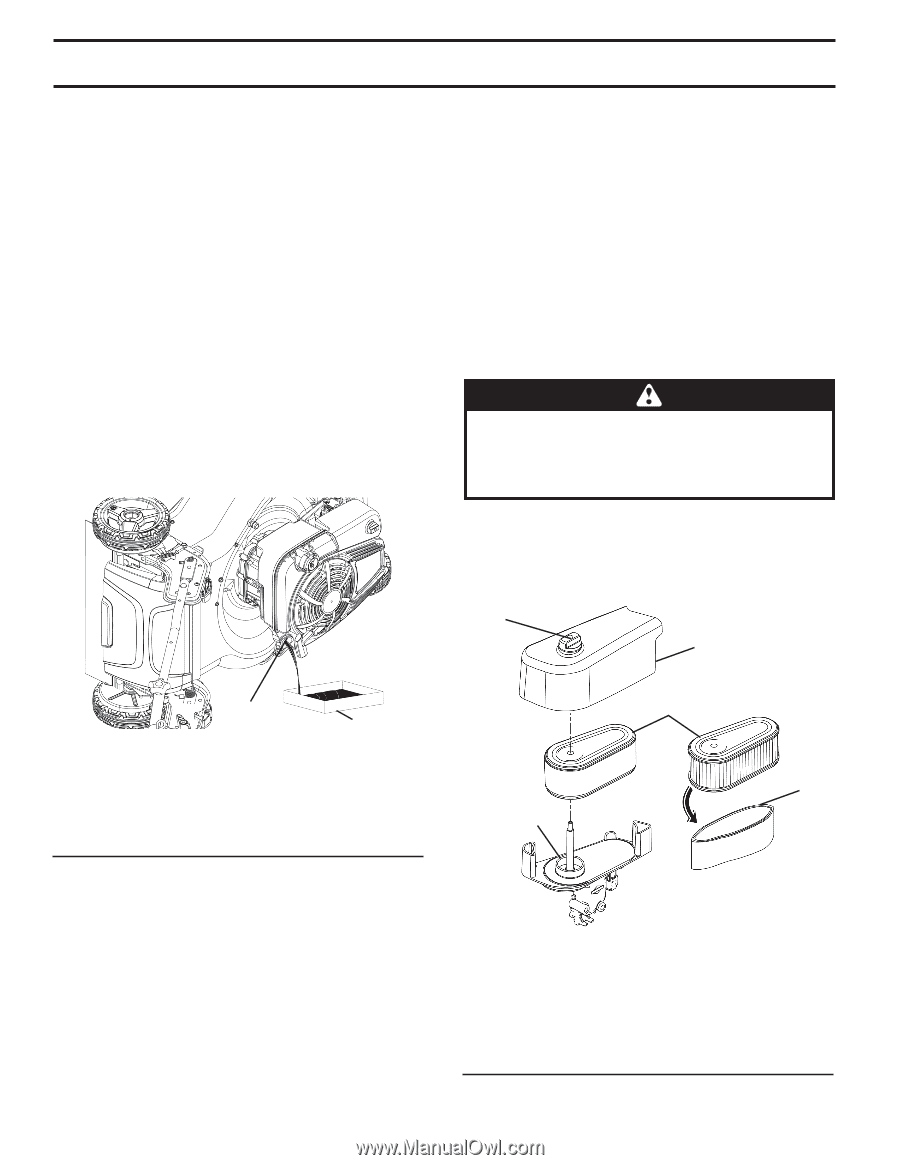
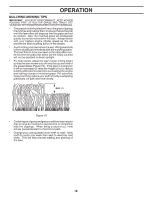
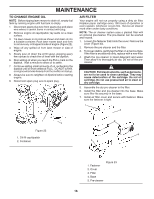
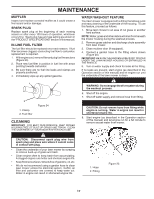
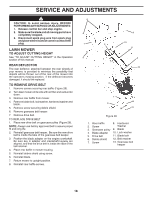
MAINTENANCE TO CHANGE ENGINE OIL NOTE: Before tipping lawn mower to drain oil, empty fuel tank by running engine until fuel tank is empty. 1. Disconnect spark plug wire from spark plug and place wire where it cannot come in contact with plug. 2. Remove engine oil cap/dipstick; lay aside on a clean surface. 3. Tip lawn mower on its side as shown and drain oil into a suitable container. Rock lawn mower back and forth to remove any oil trapped inside of engine (Figure 22). 4. Wipe off any spilled oil from lawn mower or side of engine. 5. Slowly pour oil down the oil fill spout, stopping every few ounces to check the oil level with the dipstick. 6. Stop adding oil when you reach the FULL mark on the dipstick. Wait a minute to allow oil to settle. 7. Continue adding small amounts of oil, rechecking the dipstick until oil level settles at FULL. DO NOT overfill, or engine will smoke heavily from the muffler on startup. 8. Always be sure to retighten oil dipstick before starting engine. 9. Reconnect spark plug wire to spark plug. AIR FILTER Your engine will not run properly using a dirty air filter. Replace paper cartridge every 100 hours of operation or every season, whichever occurs first. Service air cleaner more often under dusty conditions. NOTE: The air cleaner system uses a pleated filter with an optional pre-cleaner. The pre-cleaner can be washed and reused. 1. Loosen the fastener that holds the cover. Remove the cover (Figure 23). 2. Remove the pre-cleaner and the filter. 3. To loosen debris, gently tap the filter on a hard surface. If the filter is excessively dirty, replace with a new filter. 4. Wash the pre-cleaner in liquid detergent and water. Then allow it to thoroughly air dry. Do not oil the precleaner. CAUTION: Petroleum solvents, such as kerosene, are not to be used to clean cartridge. They may cause deterioration of the cartridge. Do not oil cartridge. Do not use pressurized air to clean or dry cartridge. 5. Assemble the dry pre-cleaner to the filter. 6. Install the filter and pre-cleaner into the base. Make sure filter fits securely in the base. 7. Install air filter cover and secure with fastener. Make sure the fastener is tight. 1 2 1 2 Figure 22 1. Oil fill cap/dipstick 2. Container 3 5 4 1. Fastener 2. Cover 3. Filter 4. Base 5. Pre-cleaner Figure 23 16
-
 1
1 -
2
-
3
-
4
-
5
-
6
-
7
-
8
-
9
-
10
-
 11
11 -
 12
12 -
 13
13 -
 14
14 -
 15
15 -
 16
16 -
 17
17 -
 18
18 -
 19
19 -
 20
20 -
 21
21 -
22
-
23
-
24
-
25
-
26
-
27
-
28
-
29
-
30
-
31
-
32
-
33
-
34
-
35
-
36
-
37
-
38
-
39
-
40
-
41
-
42
-
43
-
44
-
45
-
46
-
47
-
48
-
49
-
50
-
51
-
52
 |
 |