Husqvarna LE121P Owner Manual - Page 10
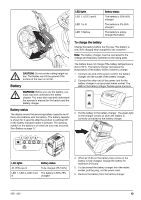
Put the wires in the cable brackets. Make sure
 |
View all Husqvarna LE121P manuals
Add to My Manuals
Save this manual to your list of manuals |
Page 10 highlights
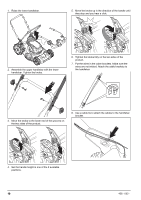
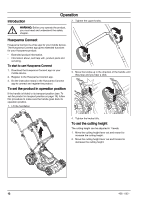
1. Raise the lower handlebar. 5. Move the knobs up in the direction of the handle until they stop and you hear a click. CLICK! 2. Assemble the upper handlebar with the lower handlebar. Tighten the knobs. 6. Tighten the knobs fully on the two sides of the product. 7. Put the wires in the cable brackets. Make sure the wires are not twisted. Attach the cable brackets to the handlebar. 3. Move the knobs to the lower end of the grooves on the two sides of the product. 8. Use a cable tie to attach the cables to the handlebar bracket. 4. Set the handle height in one of the 2 available positions. 10 428 - 002 -
-
 1
1 -
2
-
3
-
4
-
 5
5 -
 6
6 -
 7
7 -
 8
8 -
 9
9 -
 10
10 -
 11
11 -
 12
12 -
 13
13 -
 14
14 -
 15
15 -
16
-
17
-
18
-
19
-
20
-
21
-
22
-
23
-
24
-
25
-
26
-
27
-
28
-
29
-
30
-
31
-
32
-
33
-
34
-
35
-
36
-
37
-
38
-
39
-
40
-
41
-
42
-
43
-
44
-
45
-
46
-
47
-
48
-
49
-
50
-
51
-
52
-
53
-
54
-
55
-
56
-
57
-
58
-
59
-
60
-
61
-
62
-
63
-
64
-
65
-
66
-
67
-
68
 |
 |

1.
Raise the lower handlebar.
2.
Assemble the upper handlebar with the lower
handlebar. Tighten the knobs.
3.
Move the knobs to the lower end of the grooves on
the two sides of the product.
4.
Set the handle height in one of the 2 available
positions.
5.
Move the knobs up in the direction of the handle until
they stop and you hear a click.
CLICK!
6.
Tighten the knobs fully on the two sides of the
product.
7.
Put the wires in the cable brackets. Make sure the
wires are not twisted. Attach the cable brackets to
the handlebar.
8.
Use a cable tie to attach the cables to the handlebar
bracket.
10
428 - 002 -